介紹 Introduction
快速上手 Quickstart
趕時間嗎?請前往〈新手入門〉。
取得協助 Getting Help
需要幫助?請參閱取得協助。
翻譯 Translations
志願者將此手冊翻譯成了不同語言。翻譯版本可能過時,以原英文手冊為準。
- Bahasa Indonesia
- Deutsch
- Español
- Français
- Italiano
- Polski
- Português Brasileiro
- русский язык
- Українська
- العربية
- فارسى
- 日本語
- 简体中文
若要參與翻譯手冊,請見翻譯文檔。
Background
Anki is a program which makes remembering things easy. Because it is a lot more efficient than traditional study methods, you can either greatly decrease your time spent studying, or greatly increase the amount you learn.
Anyone who needs to remember things in their daily life can benefit from Anki. Since it is content-agnostic and supports images, audio, videos and scientific markup, the possibilities are endless. For example:
-
Learning a language
-
Studying for medical and law exams
-
Memorizing names and faces of people
-
Brushing up on geography
-
Mastering long poems
-
Even practising guitar chords!
There are two simple concepts behind Anki: active recall testing and spaced repetition. They are not known to most learners, despite being well-documented in scientific literature. Understanding how these concepts work will make you a more effective learner.
Active Recall Testing
Active recall testing means being asked a question and trying to remember the answer. This is in contrast to passive study, where we read, watch, or listen to something without pausing to consider if we know the answer. Research has shown that active recall testing is far more effective at building strong memories than passive study. There are two reasons for this:
-
The act of recalling something strengthens the memory, increasing the chances we’ll be able to remember it again.
-
When we're unable to answer a question, it tells us we need to return to the material to review or relearn it.
You have probably encountered active recall testing in your school years without even realizing it. When good teachers give you a series of questions to answer after reading an article, or make you take weekly tests, they are not doing it simply to see if you understood the material or not. By testing you, they are increasing the chances you will be able to remember the material in the future.
A good way to integrate active recall testing into your own studies is to use flashcards. With traditional paper flashcards, you write a question on one side of a card, and the answer on the other side. By not turning the card over until you've recalled the answer, you can learn things more effectively than passive observation allows.
Use It or Lose It
Our brains are efficient machines, and they rapidly forget information that doesn't seem useful. Chances are that you don't remember what you had for dinner on Monday two weeks ago, because this information is not usually useful. However, if you went to a fantastic restaurant that day and have spent the last two weeks telling people about how great it was, you're likely to still remember it in vivid detail.
The brain's "use it or lose it" policy applies to everything we learn. If you spend an afternoon memorizing some science terms, and then don't think about that material for two weeks, you'll probably have forgotten most of it. In fact, studies show we forget about 75% of material learnt within a 48 hour period. This can seem pretty depressing when you need to learn a lot of information!
However, the solution is simple: review. By reviewing newly-learnt information, we can greatly reduce forgetting.
The only problem is that traditionally, reviewing has not been very practical. If you are using paper flashcards, it's easy to flick through all of them if you only have 30 of them to review, but as the number grows to 300 or 3000, it quickly becomes unmanageable.
Spaced Repetition
The spacing effect was reported in 1885 by a German psychologist called Hermann Ebbinghaus. He observed that we tend to remember things more effectively, if we spread reviews out over time, instead of studying multiple times in one session. Since the 1930s, there have been a number of proposals for utilizing the spacing effect to improve learning, in what has come to be called spaced repetition.
One example was in 1972, when a German scientist called Sebastian Leitner popularized a method of spaced repetition with paper flashcards. By separating the paper cards into a series of boxes, and moving the cards to a different box on each successful or unsuccessful review, it was possible to see at a glance a rough estimate of how well a card was known and when it should be reviewed again. This was a great improvement over a single box of cards, and it has been widely adopted by computerized flashcard software. It is a rather rough approach however, as it cannot give you an exact date on which you should review something again, and it does not work very well with material of varying difficulty.
The biggest developments in the last 30 years have come from the authors of SuperMemo, a commercial flashcard program that implements spaced repetition. SuperMemo pioneered the concept of a system that keeps track of the ideal time to review material and optimizes itself based on the performance of the user.
In SuperMemo's spaced repetition system, every time you answer a question, you tell the program how well you were able to remember it — whether you forgot completely, made a small mistake, remembered with trouble, remembered easily, etc. The program uses this feedback to decide the optimal time to show you the question again. Because a memory gets stronger each time you successfully recall it, the time between reviews gets longer and longer — so you may see a question for the first time today, then 3 days later, 15 days later, 45 days later, and so on.
This was a revolution in learning, as it meant material could be learnt and retained with the absolute minimum amount of effort necessary. SuperMemo's slogan sums it up: with spaced repetition, you can: "forget about forgetting".
Why Anki?
While there is no denying the huge impact SuperMemo has had on the field, it is not without its problems. The program is often criticized for being buggy and difficult to navigate. It only runs on Windows computers. It is proprietary software, meaning that end-users cannot extend it or access the raw data. And while very old versions have been made available for free, they are quite limited for modern use.
Anki addresses these issues. There are free clients for Anki available on many platforms, so struggling students and teachers with budgetary constraints are not left out. Anki is open source, with an already flourishing library of add-ons contributed by end-users. It is multi-platform, running on Windows, macOS, Linux/FreeBSD, and some mobile devices. And it is considerably easier to use than SuperMemo.
Anki's spaced repetition system is based on an older version of the SuperMemo algorithm called SM-2. Recently, a new algorithm called FSRS has been integrated as an alternative to the legacy SM-2 algorithm.
平台說明 Platform Notes (英文)
此章節介紹了各作業系統的 Anki 安裝方法及可能出現的問題:
如已安裝 Anki,請前往〈新手入門〉章節。
Windows
Installing & Upgrading Anki on Windows
For instructions on how to install or upgrade Anki on Windows, please see:
Problems
If you encounter any issues when installing or starting Anki, please see the subsections in the table of contents.
Installing & Upgrading Anki on Windows
Requirements
Recent Anki releases require a computer running the 64 bit version of Windows 10 or 11.
- The last Anki release that supported Windows 7 and 8.1 was Anki 2.1.49.
- The last Anki release that supported 32 bit Windows was Anki 2.1.35-alternate.
If you're on an old machine, you can obtain old releases from the releases page.
Installing
To install Anki:
- Download Anki from https://apps.ankiweb.net. See the next section for how to choose between -qt5 and -qt6.
- Save the installer to your desktop or downloads folder.
- Double-click on the installer to run it. If you see an error message, please see the installation issues page.
- Once Anki is installed, double-click on the new star icon on your desktop to start Anki.
Qt5 vs. Qt6
Recent Anki versions come in separate Qt5 and Qt6 variants. The Qt6 version is recommended for most users.
Advantages of the Qt6 version:
- Various bugfixes, including things like better support for less common languages.
- Very large images load faster than the Qt5 version.
- Security updates. Support for the Qt5 library was discontinued in Nov 2020, meaning that any security flaws discovered since then will remain unfixed.
- Some users experience freezes when using a custom shortcut key to switch input languages in Qt5.
Disadvantages of the Qt6 version:
- Some add-ons currently only work with the Qt5 version.
Upgrading
If upgrading from Anki 2.1.6+, there is no need to uninstall the previous version first. All you need to do is close Anki if it is open, and then follow the installation steps above. Your cards will be preserved when you upgrade.
If upgrading from an Anki version before 2.1.6, or switching from the standard to the alternate version or vice versa, we recommend uninstalling the old version first, which will remove Anki's program data, but not delete your card data.
If you wish to downgrade to a previous version, please make sure you downgrade first.
Add-on Compatibility
Some add-ons may not always work with the latest Anki release. If you upgrade to the latest Anki version and find an add-on you cannot live without stops working, you can download older Anki versions from the releases page.
Problems
If you encounter any issues when installing or starting Anki, please see the following pages:
If you encounter any interface issues when using Anki, please see the following pages:
Windows installation issues
Some error messages you may encounter when installing Anki:
Please also see startup issues.
"Error opening file for writing"
If closing Anki and your browser does not help, please try restarting your computer, then running the installer again.
"Windows protected your PC"
When a new Anki version is released, Windows may display a scary-looking message until it has seen enough people using the new version. To be able to proceed with app installation, please use Run anyway.
Antivirus programs may sometimes also report a false positive.
Windows startup issues
- No error, but app does not appear
- Windows updates
- Windows 7/8
- Video driver issues
- Multiple displays
- Antivirus/firewall software
- Admin access
- Multiple Anki installations present after updating
- Debugging
- If all else fails
No error, but app does not appear
If you start Anki and it fails to appear, without any error message, you can try the following:
- Disconnect multiple/external displays.
- Install the latest Anki version (try both qt6 and qt5).
- Adjust your decimal separator, if it is not a period.
- Install the old 2.1.35-alternate build of Anki.
Windows updates
When starting Anki, you may receive a message like the following:
- Error loading Python DLL
- The program can't start because api-ms-win.... is missing
- Failed to execute script runanki
- Failed to execute script pyi_rth_multiprocessing
- Failed to execute script pyi_rth_win32comgenpy
These errors are usually because your computer is missing a Windows update or Windows library.
Please open Windows update, and ensure your system has all updates installed. If any needed to be installed, please restart your device after installing.
Windows 7/8
On Windows 7/8, you may need to manually install extra updates. Please try:
- https://www.microsoft.com/en-us/download/details.aspx?id=48234
- https://aka.ms/vs/15/release/vc_redist.x64.exe
- http://www.catalog.update.microsoft.com/Search.aspx?q=kb4474419
- http://www.catalog.update.microsoft.com/Search.aspx?q=kb4490628
Video driver issues
Please see display issues.
Multiple displays
If you get a LoadLibrary failed with error 126, this may be caused by the toolkit Anki is built on having trouble with multiple displays.
Antivirus/firewall software
Third-party software on your machine may prevent Anki from loading. You can try adding an exception for Anki, or temporarily disabling your antivirus/firewall to see if it helps.
Admin access
Some users have reported that Anki did not run for them until they right-clicked on the Anki icon and chose "Run as administrator". Anki stores all of its data in your user folder, and should not need administrator privileges, but it's something you can try if you've exhausted other options.
Multiple Anki installations present after updating
If the update process leaves you with multiple Anki installs (such as within
C:\Program Files\Anki and C:\Program Files (x86)\Anki), they may be left in a
non-working state, and Anki may refuse to start without showing an error message.
Try uninstalling all copies of Anki from your computer. To do this, find them in Windows Settings > Apps & features (or Apps > Installed apps) and uninstall, or run uninstall.exe in each Anki program
folder. Afterward, install Anki again.
Debugging
Starting Anki from a terminal may reveal a bit more information about some
errors. After installing the latest Anki version and ensuring all Windows
updates are installed, instead of running Anki directly, press the Windows key (or open the Start menu), type cmd, and launch Command Prompt. When the terminal window opens, paste the following command, and press Enter. (The path will be different if Anki is installed in a location that is not the default.)
%LocalAppData%\Programs\Anki\anki-console.bat
Presumably Anki will fail to open like before, but the output in the terminal window may reveal something about what is causing the problem.
If all else fails
If you are unable to start Anki after trying the above workarounds, you have two remaining options:
- You can try running from Python.
- You can try an older Anki version built with an older toolkit, such as 2.1.35-alternate, or 2.1.15.
Windows display issues
On Windows, there are three ways of content being displayed on screen. The default is software, which is slower, but the most compatible. There are two other options that are faster: OpenGL and ANGLE. They are faster, but they may not work, or may cause display issues such as missing menubars, blank windows, and so on. Which one works best will depend on your computer.
If and how you can change this display method depends on which Anki version you are using, more precisely on the version of the used Qt toolkit.
Qt5
This toolkit is used by all Anki versions prior to 2.1.50. Here, the display driver can be adjusted via the Tools>Preferences menu. Make sure you restart Anki after adjusting it.
If you’re unable to get to Anki’s preferences screen, and restarting Anki a few times does not help, you may need to manually adjust the graphics driver. You can do this by starting cmd.exe and typing the following:
echo auto > %APPDATA%\Anki2\gldriver
It will not print anything. You can then start Anki again.
The default is software; the other two drivers you can try are angle and auto.
Qt6
Anki 2.1.50+ is available with the more recent Qt6 toolkit. The new toolkit defaults to having graphics acceleration enabled. If you run into display issues, you can try switching to software mode via cmd:
echo software > %APPDATA%\Anki2\gldriver6
Or you can do it via PowerShell:
echo software > $env:APPDATA\Anki2\gldriver6
It will not print anything. You can then start Anki again.
To revert to the default behaviour, change software to auto, or delete that file.
In Anki 23.10+, you can also change the graphics driver from preferences screen.
Full screen
Anki 2.1.50+ comes with a full screen mode, but due to various issues, it had to
be disabled while OpenGL is used. Turning on software rendering as described
above will allow the full screen option to be used, though please bear in mind
that rendering performance may suffer.
In Anki 23.10+, full screen mode is supported with the default Direct3D driver.
複製/貼上發生問題 Copy and paste issues (英文)
如果在複製/貼上時發生問題,請檢查電腦上有沒有其他程式正在監視剪貼板,例如辭典程式、剪貼板管理器等。Anki 使用的工具組可能會在執行此類程式時發生問題。
Text Size
If you find the text is the wrong size, there are two environmental variables you can try:
-
ANKI_NOHIGHDPI=1 will turn off some of Qt’s high dpi support
-
ANKI_WEBSCALE=1 will alter the scale of Anki’s web views (like the deck list, study screen, etc), while leaving interface elements like the menu bar alone. Replace 1 with the desired scale, such as 1.5 or 0.75.
On Windows you can add these to a batch file to make it easier to start Anki. For example, create a file called startanki.bat on your desktop with the following text:
set ANKI_WEBSCALE=0.75
start "Anki" "C:\Program Files\Anki\anki"
After saving, you can double click on the file to start Anki with that setting.
Windows permission problems
Permission Problems
If you receive "access denied" messages, some of Anki's files may be set to read only mode, meaning Anki is not able to write to them.
To fix the problem, you can do the following:
- in the search area of the start bar, type cmd.exe and hit enter
- in the window that opens, type the following and hit enter to see your username:
whoami
- type the following, hitting enter after each line, and replacing ____ (and keeping the :F part) with your username from the previous command
cd %APPDATA%
icacls Anki2 /grant ____:F /t
That command should fix the permissions on Anki's data folder, and you should now be able to start the program.
Antivirus/Firewall/Anti-Malware
Some users have experienced "permission denied" or "readonly" errors that were caused by security software installed on their machine. You may need to add an exception for Anki, or try temporarily disabling the software to rule it out as the cause. Some users have reported that simply turning off their software did not fix the problem, and they either had to add an exception for Anki or uninstall the software.
Debugging Permission Problems
If problems persist after you've ruled out Antivirus and related programs, have performed the steps above to fix permissions, and don't use OneDrive, please run the following commands in cmd.exe, pressing enter after each one.
whoami
cd %APPDATA%
icacls Anki2 /t
Then please copy & paste or screenshot what you see, and post it to us in a support ticket.
macOS
Installing & Upgrading Anki on macOS
For instructions on how to install or upgrade Anki on macOS, please see:
Problems
If you encounter any issues when installing or starting Anki, please see the subsections in the table of contents.
Installing & Upgrading Anki on macOS
Requirements
Recent Anki releases require a Mac running macOS 10.13.4 or later.
The last Anki release that supported macOS 10.10 to 10.13.3 was Anki 2.1.35-alternate. If you're on an old machine, you can obtain the old version from the releases page.
Installing
- Download Anki from https://apps.ankiweb.net. See the next section for how to choose between -qt5 and -qt6.
- Save the file to your desktop or downloads folder.
- Open it, and drag Anki to your Applications folder or desktop.
- Double-click on Anki in the location you placed it.
Qt5 vs. Qt6
Recent Anki versions come in separate Qt5 and Qt6 variants. The Qt6 version is recommended for most users.
Advantages of the Qt6 version:
- Native support for recent Apple Silicon Macs (faster, better battery life).
- Various bugfixes, including things like better support for less common languages.
- Security updates. Support for the Qt5 library was discontinued in Nov 2020, meaning that any security flaws discovered since then will remain unfixed.
Disadvantages of the Qt6 version:
- Tabbed windows (e.g in full screen) are no longer possible.
- Some Mac users have reported that the Intel Qt5 version was faster and more reliable for them.
- Some add-ons currently only work with the Qt5 version.
Upgrading
To upgrade, close Anki if it is open, and then follow the steps above. Drag the Anki icon into the same location you previously stored it, and when prompted, overwrite the old version. Your card data will be preserved.
Homebrew
Homebrew users can install Anki using
brew install --cask anki in their preferred Terminal application.
Upgrading can be done using brew upgrade, and for uninstalling: brew uninstall --cask anki
Add-on Compatibility
Some add-ons may not always work with the latest Anki release. If you upgrade to the latest Anki version and find an add-on you cannot live without stops working, you can download older Anki versions from the releases page.
Problems
If you encounter any issues when installing or starting Anki, please see:
Display Issues on macOS
Qt6 Video Driver
If you're experiencing display issues or crashes in Anki 23.10+, you can try changing the video driver in the preferences screen, then restarting Anki.
Older Anki versions did not provide an option in the preferences, but allowed you to adjust the driver by opening Terminal.app, then pasting the following and hit enter:
echo software > ~/Library/Application\ Support/Anki2/gldriver6
It will not print anything. You can then start Anki again.
If you wish to switch back to the default, change software to auto, or
remove that file.
eGPUs
If you experience blank screens when using an external graphics card on a Mac, you can ctrl+click on the Anki app, click "Get Info", and enable the "prefer eGPU" option.
Monitors with different resolutions
Please see this forum post.
Linux
Installing & Upgrading Anki on Linux
For instructions on how to install or upgrade Anki on Linux, please see:
Problems
If you encounter any issues when installing or starting Anki, please see the subsections in the table of contents.
Installing & Upgrading Anki on Linux
Requirements
The packaged version requires a recent 64 bit Intel/AMD Linux with glibc, and common libraries like libwayland-client and systemd. If you are on a different architecture (e.g ARM/AArch64), or a barebones Linux distro, you will not be able to use the packaged version, but you may be able to use the Python wheels instead.
Debian and derivatives, such as Ubuntu and Chromebooks with Linux enabled, please use the following before installing:
sudo apt install libxcb-xinerama0 libxcb-cursor0 libnss3
If Anki fails to start after installing, you may be missing other libraries.
If you're on Ubuntu 24.04 and Anki won't start, please see this thread.
Anki's build system only supports glibc, so musl-based distros are not currently supported.
Installing
To install Anki:
- Download Anki from https://apps.ankiweb.net to your Downloads folder. See the next section for how to choose between -qt5 and -qt6.
- If zstd is not already installed on your system, you'll need to install it (e.g
sudo apt install zstd). - Open a terminal and run the following commands, replacing the filename as appropriate.
tar xaf Downloads/anki-2XXX-linux-qt6.tar.zst
cd anki-2XXX-linux-qt6
sudo ./install.sh
On some Linux systems, you may need to use tar xaf --use-compress-program=unzstd.
- You can then start Anki by typing 'anki' and hitting enter. If you encounter any issues, please see the links on the left.
Qt5 vs. Qt6
Recent Anki versions come in separate Qt5 and Qt6 variants. The Qt6 version is recommended for most users.
Advantages of the Qt6 version:
- Compatibility with recent glibc versions (fixes blank screens on recent distros).
- Better HiDPI support.
- Better Wayland support.
- Various bugfixes, including things like better support for less common languages.
- Security updates. Support for the Qt5 library was discontinued in Nov 2020, meaning that any security flaws discovered since then will remain unfixed.
Disadvantages of the Qt6 version include:
- Some add-ons currently only work with the Qt5 version.
Upgrading
If you were running Anki from a .deb/.rpm/etc in the past, please make sure to remove the system version before installing the package provided here.
If you're upgrading from a previous package, simply repeat the installation steps to upgrade to the latest version. Your user data will be preserved.
If you wish to downgrade to a previous version, please make sure you downgrade first.
Add-on Compatibility
Some add-ons may not always work with the latest Anki release. If you upgrade to the latest Anki version and find an add-on you cannot live without stops working, you can download older Anki versions from the releases page.
Problems
If you encounter any issues when installing or starting Anki, please see the following pages:
- Missing Libraries
- Display Issues
- Blank Main Window
- Linux Distro Packages
- Incorrect GTK Theme
- Wayland
- Input Methods
Missing Libraries
If Anki fails to start, please run it from a terminal with anki. If it says a
library is missing, please install it and try again.
If it complains about no platform being available, please start Anki with the following command line, which should reveal a missing library:
QT_DEBUG_PLUGINS=1 anki
After installing the library with apt-get or similar, repeat the process. You may need to do this a few times before all required libraries are installed.
Display Issues on Linux
Qt5
Hardware acceleration defaults to off. Enabling it in the preferences screen and restarting Anki may make Anki’s interface more responsive, but some users may experience missing menubars, blank windows or crashes when it is enabled. (Blank windows may also be caused by this problem.)
You can adjust the display driver in Anki's Preferences screen. We recommend you try both settings, and see which one works best for you.
If you're unable to open Anki, you can adjust the driver in a terminal, by
writing either auto or software into ~/.local/share/Anki2/gldriver. Please
note that if you’re using nouveau, it is known to be buggy, and it only supports
software mode.
Qt6
Hardware acceleration defaults to on. If you experience blank screens or display issues, you can try enabling software rendering using the terminal:
echo software > ~/.local/share/Anki2/gldriver6
If you wish to switch back to the default, change software to auto, or
remove that file.
In Anki 23.10+, you can also change the graphics driver from preferences screen.
Blank Main Window
Some Linux distros have recently updated glibc. Recent versions break the web toolkit that Anki is built on, causing Anki's main window to appear blank.
There are two ways to work around this:
- Install the latest Qt6 version of Anki, which uses an updated toolkit:
- Use one of the workarounds posted on the following threads:
- https://forums.ankiweb.net/t/another-blank-main-window-solution-for-linux/32835
- https://forums.ankiweb.net/t/please-use-file-import-popup-on-startup/14695
- https://forums.ankiweb.net/t/setting-disable-seccomp-filter-sandbox-by-default-on-linux/13765
- https://forums.ankiweb.net/t/fedora-35-and-anki-2-1-47-updates-with-blank-anki-window/13431/11
Packages Distributed by Linux Distributions
We have seen a lot of issues caused by the customized versions of Anki distributed by Linux distributions:
- Anki depends on third-party libraries like Qt, and Linux distributions often substitute different versions of those libraries, without testing the impact of those changes.
- Sometimes the version of Anki they distribute is years old, or is an alpha/beta version not intended for stable release. Distributions will often disable the built-in update check as well, to prevent you from being notified of newer versions.
Compiled builds of Anki are available on https://apps.ankiweb.net. Most of the necessary libraries are included, and Anki has been tested to work with these library versions. If you're experiencing issues with your distro's version, the first thing you should try is switching to the latest packaged version we provide.
You are welcome to continue using your distro's version of Anki if you prefer, but if you run into any issues, you will need to report them to your distribution's package maintainers.
Anki not picking up GTK theme on Gnome/Linux
You can work around this issue by explicitly telling Anki what the GTK theme is. Run the following commands in a terminal:
theme=$(gsettings get org.gnome.desktop.interface gtk-theme)
echo "gtk-theme-name=$theme" >> ~/.gtkrc-2.0
echo "export GTK2_RC_FILES=$HOME/.gtkrc-2.0" >> ~/.profile
Then log out and log back into your computer, and Anki should pick up the GTK theme.
Wayland
From Anki 2.1.48, you can force Anki to use Wayland by defining ANKI_WAYLAND=1 before starting Anki. Wayland may give you better rendering across multiple displays, but it is currently off by default, due to the following issues:
- On some distros, windows are rendered without borders.
- Bringing windows to the front is not possible, so for example, clicking on Add to reveal an existing Add Cards window will not work.
Input Methods on Linux
Fcitx
The standard Anki build includes fcitx support, but it may not work on all distributions. If you are unable to use fcitx, you may want to run Anki from Python wheels instead.
新手入門 Getting Started (英文)
安裝 & 升級 Installing & Upgrading
請前往對應系統的安裝指示:
影片教學 Videos
以下影片可能使用舊版 Anki 演示,但概念是一樣的。
若無法存取 YouTube,你也可以下載以上影片。
- 阿姨我決定要繼續努力了!使用卡片軟體 Anki 學會任何東西 + 輕鬆應付考試! - PAPAYA 電腦教室(中文)
主要概念 Key Concepts
卡片 Cards
跟紙製字卡一樣,一張「卡片」包括一組問題和答案。與紙製字卡不同的是,Anki 中的卡片可以在答案面上同時顯示問題。假設你在學習基礎化學,有一張卡片的問題面為:
Q: 氧氣的化學符號是什麼?
經過思考,你得出的答案是 O,此時按下「顯示回答」按鈕,Anki 將顯示:
Q: 氧氣的化學符號是什麼?
A: O
確定你答對之後,你可以評價自己的記憶如何,Anki 將會選擇你下一次複習這張卡片的時機。
卡片種類
-
新卡片:下載或建立後從未學習過的卡片。
-
學習中:近期初次學習,但還未學完的卡片。
-
複習卡:學完過後,現在需要複習來保持記憶的卡片。複習卡有兩種類型:
- 未熟練:學完後間隔小於 21 天的卡片。
- 熟練:間隔大於 21 天的卡片。
-
重新學習:複習失敗並因此重新回到學習模式的卡片。
牌組 Decks
一個「牌組」由一組卡片組成。你可以把卡片分類放進不同的牌組中,這樣你就不用每次都學習全部卡片。你還可以對每個牌組分別進行設定,例如調整每天要學習的新卡片數量,或是卡片需要下次出現的時間。
牌組中可以包含其他牌組,所以你可以分層整理牌組。Anki 使用兩個冒號「::」來表示層級。「日文::漢字」表示「漢字」牌組,它是「日文」牌組的一部分。如果你選取了「漢字」牌組,那就只有漢字卡片會出現;如果你選取了「日文」牌組,那所有的日文卡片,包括漢字卡片在內都會出現。
要分層置放牌組,你可以在牌組層級的名字之間輸入「::」,或者在牌組列表中拖放牌組。在其他牌組下層的牌組(即名字中包含至少一個「::」的牌組)常稱作「下層牌組」或「子牌組」,上層的牌組則有時稱為「上層牌組」或「父牌組」。
Anki 一開始會為你建立一個 「預設」牌組;任何不包含於其他牌組的卡片都將被放入預設牌組中。若預設牌組中沒有卡片,同時你建立了其他的牌組,則預設牌組會被隱藏。你也可以對它重新命名,當作普通的牌組使用。
在牌組清單中,牌組依字母順序顯示。因此,當你的牌組包含數字時,順序可能不盡人意。例如,「我的牌組 10」會排在「我的牌組 9」前,因為 1 會排在 9 前面。若要給牌組編號,可以在個位數字前加上一個「0」,如「牌組 01」、「牌組 02」...「牌組 10」。
牌組的理想使用方式是用來較為廣泛地分類卡片,不適合用來細分成「食物動詞」、「第一課」等課題。請參閱〈恰當運用牌組〉章節來進一步了解。
關於牌組對卡片顯示順序的影響,請參閱〈顯示順序〉章節。
筆記 & 欄位 Notes & Fields
做字卡時,一則資訊經常需要製作多張卡片。例如,在學習日文時,你學到「こんにちは」意為「你好」,想要建立一張卡片顯示「こんにちは」,提問它的意思「你好」,然後再建立一張卡片顯示「你好」,提問它的日文「こんにちは」。兩張卡片分別考驗你的認知和輸出能力。
使用紙製閃卡時,即使它們包含的資訊相同,你還是只能分別做兩張卡片。有一些電腦閃卡程式可以調換正背面,雖然比起紙製要節省時間,但這些程式有兩大缺點:
-
這些程式無法分開記錄你的認知和輸出能力的表現,卡片無法在最恰當的時機出現,這會導致你遺忘更多內容,或是多花不必要的時間來學習。
-
調換正背面的作法只適用於兩遍內容完全一致的情形。因此你沒有辦法為每張卡片的背面各自加入更多資訊。
這些問題在 Anki 得以解決——你可以把卡片的內容細分為小塊的資訊。然後你可以指定要在每張卡片中各自顯示哪部分資訊,Anki就會為你建立卡片,並且你將來做出的任何修改都會自動更新到卡片中。
假設我們要學習日文字彙,想在每張卡片的背面加入頁碼,就像這樣:
Q: こんにちは
A: 你好
   第 12 頁
和這樣:
Q: 你好
A: こんにちは
   第 12 頁
這裡,我們有三則相關的資訊:日文單字、中文意思和頁碼。把它們放到一起,像這樣:
日文:こんにちは
中文:你好
頁碼:12
在 Anki 中把這樣相關的資訊集中到一起,就叫做一則「筆記」,每則資訊叫做一個「欄位」。所以,這一個筆記類型中有三個欄位:日文、中文和頁碼。
要加入及編輯欄位,請在新增或編輯筆記時按一下「欄位…」按鈕。請參閱〈自訂欄位〉章節來進一步了解欄位。
卡片類型 Card Types
要讓 Anki 依照筆記內容來建立卡片,我們需要提供一張藍圖:每張卡片的正面和背面分別應該顯示的欄位。這張藍圖叫做一個「卡片類型」。每個類型的筆記都可以包含一或更多個卡片類型;新增筆記時,Anki 會依每個卡片類型分別建立一張卡片。
每個卡片類型都有兩個「模板」,分別為問題面和答案面。在上面日文單字的例子中,我們要建立像這樣的認知測試卡片:
Q: こんにちは
A: 你好
   第 12 頁
要得到這樣的效果,我們可以將問題面和答案面的模板設定成這樣:
Q: {{日文}}
A: {{中文}}<br>
   第 {{Page}} 頁
只要用雙花括號包住欄位名稱,Anki 就會把它取代為欄位中的實際內容。而沒有包在雙花括號裡的內容則會保留原樣。(例如,頁碼欄位中的「第 頁」不用每次都手動輸入,它會被自動加入每張卡片。)若要換行,請輸入特殊代碼 <br>;請參閱〈模板〉以取得更多資訊。
輸出測試卡片的模板也類似:
Q: {{中文}}
A: {{日文}}<br>
   第 {{Page}} 頁
建立卡片類型後,每次新增筆記時,就會同時依照卡片類型來建立卡片。卡片類型使得每張卡片的格式一致,更為輕鬆地加入資訊。而且還能讓 Anki 安排拉大關聯的卡片出現的間隔,當你發現內容有誤時只要修改一次就能更新到所有關聯的卡片上。
要新增及編輯卡片類型,請在新增或編輯筆記時按一下「卡片…」按鈕。請參閱〈卡片和模板〉來進一步了解卡片類型。
筆記類型 Note Types
你可以在 Anki 中為不同的材料建立不同的筆記類型。每種筆記類型都有各自的欄位和卡片類型。在新增筆記前,不妨為各類課題各自建立相應的筆記類型。在上面日文單字的例子中,我們可以建立名為「日文」的筆記類型。若要記憶各國首都,可以再另外建立一個筆記類型,加入「國家」和「首都」欄位。
檢查重複項目時,Anki 只會在同一種筆記類型中比較。因此,如果你已經有了「雪梨」的日文字卡,當你用首都筆記類型加入名為「雪梨」的首都時,也不會提示有重複項目。
Anki 會在你建立新集合時自動加入一些基本的筆記類型。這些筆記類型降低了新手入門的門檻,但為長遠打算,建議根據自己學習的內容來建立筆記類型。基礎筆記類型有以下幾種:
-
基本型 有「正面」、「背面」兩個欄位,建立一張卡片。「正面」欄位的內容會顯示在卡片正面,「背面」欄位的內容會顯示在卡片背面。
-
基本型(含反向卡片)
在基本型的基礎上增加了一張方向相反的卡片,即建立兩張卡片:正面→背面,背面→正面。 -
基本型(選擇性反向卡片) 建立一張「正面→背面」卡片,並可選擇是否建立「背面→正面」卡片。只要在筆記類型的第三個欄位「加入反向卡片」中輸入任意文字,便會建立一張反向卡片。請參閱〈卡片和模板〉來進一步了解。
-
基本型(輸入答案) 在基本型的基礎上,在卡片正面增加了一個文字框,輸入答案後,當你將卡片翻到背面,Anki 就會自動檢查你輸入的答案是否正確。請參閱〈檢查答案〉章節來進一步了解。
-
克漏字
使用這個筆記類型,可以輕鬆選取文字並將其轉換為一個填空題空格(如「人類在 […] 年首次登月」→「人類在 1969 年首次登月」)。請參閱〈克漏字空格〉章節來進一步了解。 -
影像遮擋 可看作是用在影像上的克漏字,對有大量圖片需求的學習內容很有幫助,譬如解剖學、地理等學科。請參閱〈影像遮擋〉章節來進一步了解。
要新增自己的筆記類型及修改現有筆記類型,請在 Anki 主視窗選擇「工具」>「管理筆記類型」。
筆記和筆記類型通用於整個集合,不受限於單個牌組。你可以在同一個牌組中使用多種不同的筆記類型,也可以把同一則筆記建立的多張卡片分別放入不同的牌組中。使用「新增」視窗時,你可以自由選取要使用的筆記類型和牌組。另外,筆記被建立之後你仍然可以更改其筆記類型。
集合 Collection
「集合」指儲存在 Anki 中的所有資料——包括你的卡片、筆記、牌組、筆記類型、牌組選項等。
共享牌組 Shared Decks
開始使用 Anki 最簡單的方式就是下載別人分享的牌組:
-
按一下牌組下方的「取得共享牌組」按鈕。
-
找到心儀的牌組後,按一下「Download」按鈕來下載牌組檔。
-
下載完成後,按兩下下載好的牌組檔以將其載入 Anki,或者在 Anki 中選擇「檔案」→「匯入…」。
建立自己的牌組能使你更好地學習較為複雜的學科。像是語言、科學這種沒有辦法單靠死記硬背來理解的學科——只有提供了解釋和上下文時才能高效學習。而且,輸入內容時你需要判斷哪些是關鍵點,在這過程中你將能更透徹地理解內容。
如果你在學習一門語言,你可能會想要下載像是「必背 7000 單字」這樣一大堆帶有翻譯的單字卡,但用這種方式學習的效率無異於單靠背誦公式來學物理。要學好語言,你需要教材、老師、多接觸真實對話。
不要學習未理解的內容。
Do not learn if you do not understand.
--SuperMemo
大多數共享牌組的建立者都是在 Anki 之外——透過教材、課堂、看電視劇等途徑學習後,再把學到的內容加入到 Anki 中。由於已經對材料有了一定了解,他們不會費心加入卡片的背景或解釋。如果你下載了這些牌組,缺少了背景和解釋,單純學習這些卡片將很吃力。
但共享牌組也並非一無是處——學習複雜學科時,雖然不能完全取代外部材料,但你可以對其加以補充。如果你正在使用教材《ABC》,下載別人共享的《ABC》牌組可以為你節省不少時間。而在學習簡單的內容時,像是首都名稱這種一一對應的事實,單靠共享牌組也足以應對。但使用 Anki 學習複雜學科時,若不使用外部材料,效果將不盡如人意。
Getting help
Asking good questions
With the exception of AnkiMobile, Anki and its support is provided free of charge, by people who generously volunteer their time. Please bear this in mind when posting - if you are rude and demanding, or have made no effort to solve the problem on your own, people are less likely to want to help you.
Please start by trying to resolve the issue on your own:
- Read the getting started section of the manual, and check out the intro videos.
- If you've encountered a bug, please follow these steps.
- Use the search button on this page to search frequently asked questions.
- Use the search button in the manual.
- Use the search button on the forums.
- Google the issue.
If you have tried the above and are still stuck, it's time to ask for help. When writing a post, please explain the problem you are having clearly, and in detail.
Please avoid vague questions like:
"My Anki doesn't work, what should I do?"
Instead, please provide as much detail as you can. For example:
"When I double-click on the Anki icon, an error message pops up. I tried searching for the error on Google, but couldn't find anything useful. I have copied and pasted the error message to the bottom of my post. I followed the steps on the 'When problems occur' page, but the error message does not go away. What should I do?"
This is a much better question. It tells us:
- What you have tried.
- What steps you are taking when the problem happens.
- What problems/errors you are getting when things go wrong.
Knowing these things makes it much easier to answer your question.
The user forums use a different login to AnkiWeb, so please create an account there if it's your first time.
Anki Desktop (the computer version) and AnkiWeb
After reading the above section, please post on the user forums for assistance.
The user forums use a different login to AnkiWeb, so please create an account there if it's your first time.
AnkiDroid (Android devices)
Please see AnkiDroid's support page.
AnkiMobile (iPhone/iPad)
Please see AnkiMobile's support page.
Private questions
For security reports and business enquiries, you can post a private ticket here. If you have a question about Anki, AnkiWeb or AnkiDroid, please use the user forums instead.
學習 Studying (英文)
- 牌組 Decks
- 學習概覽 Study Overview
- 問題 Questions
- 學習/重新學習 Learning/Relearning Cards
- 複習 Review Cards
- 到期數量 Due Counts
- 模糊乘數 Fuzz Factor
- 「編輯」和「其他」 Editing and More
- 顯示順序 Display Order
- 關聯卡片和推遲 Siblings and Burying
- 快速鍵 Keyboard Shortcuts
- 進度落後 Falling Behind
找到牌組或加入筆記後,你可以開始學習了。
牌組 Decks
選取牌組開始學習時,Anki 只會從你所選牌組及其子牌組中「收集」(抽取)卡片。
牌組畫面中顯示了牌組及子牌組清單。每天需要學習的「新卡片」、「學習中」和「已到期」(待複習)的卡片數量也會在這裡顯示。
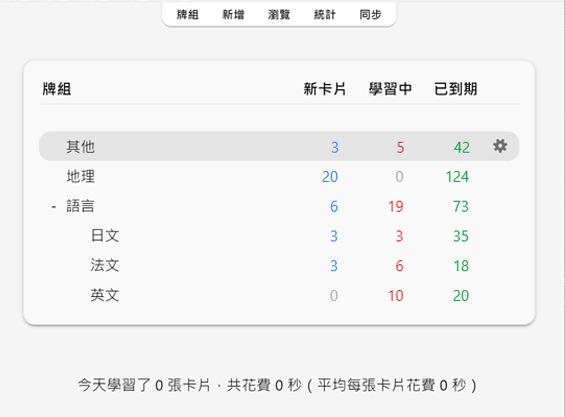
按一下牌組將前往學習畫面。按一下主視窗上方的「牌組」將回到牌組清單。(你可以使用選單中的「學習牌組…」動作以使用鍵盤進行切換;也可按下 s 鍵來開始學習當前選取的牌組)
按一下牌組右邊的設定按鈕可以重新命名或刪除牌組、更改選項,或匯出牌組。
學習概覽 Study Overview
按下要學習的牌組後,你會在「牌組概覽」畫面上看到今天到期的卡片數量:

卡片分為三種狀態:新卡片、學習中和待複習。在牌組選項中啟用「推遲關聯的 ... 卡片」後,會出現灰色的數字來表示將被推遲的卡片數量:
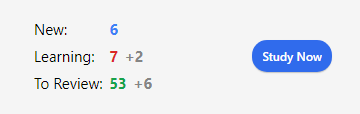
按一下「開始學習」按鈕後, Anki 將會開始展示當天應學的所有卡片。
在學習過程中,在鍵盤上按 s 鍵就可以回到概覽畫面。
問題 Questions
卡片問題面顯示後,你需要思考答案,然後按一下「顯示答案」按鈕或空白鍵來顯示答案面。雖然不需要急著回答,但建議 10 秒後還答不出來就直接放棄並檢查答案,不要埋頭苦想。
顯示答案後,你需要對比你的答案和顯示的答案,然後選擇你的記憶水平。你還可以讓 Anki 在顯示答案之前讓你輸入答案。
學習/重新學習 Learning/Relearning Cards
學習中的新卡片或遺忘後重新學習中的卡片會顯示一或多次。卡片每一次出現就稱作一個「學習階段」(learning step)。新卡片預設有兩個學習階段:1 分鐘和 10 分鐘。你可以在牌組選項中調整學習階段的數量和時間延遲。
學習時有四個評價按鈕可選擇:
-
按下「重來」會將卡片重置到第一個學習階段。
-
按下「困難」會重複當前學習階段。
- 若卡片處於第一個(且僅有一個)學習階段,延遲將比第一個階段大 50%。但最多只會比當前學習階段長一天。
- 若卡片處於第一個學習階段,且你設定了多個學習階段,則延遲時間取「重來」和「良好」的平均值,即第一個和第二個階段的平均值。
- 若卡片不處於第一個學習階段,按下「困難」會重複上次的延遲時間。
-
按下「良好」會讓卡片前進至下一個學習階段。如果卡片已在最後一個階段,則會成為複習卡(又稱「畢業」)。根據預設,卡片完成最後一個學習階段後,會在第二天出現,之後的延遲會逐漸延長(見下一章節)。
-
按下「簡單」會將卡片立即成為複習卡,無視剩餘的學習階段。根據預設,卡片會在 4 天後出現,之後的延遲會逐漸延長。重新學習時,因為 v1 排程器的「簡單」跟「良好」的間隔一樣,因此不會顯示「簡單」按鈕;而在 v2 以上版本排程器中,「簡單」按鈕會使間隔延長 1 天。
沒有學習過的新卡片即處於第一個學習階段。此時第一次回答「良好」後,卡片會在 10 分鐘後再次出現,跳過 1 分鐘的初始階段。但如果你按下了「重來」,卡片則會在 1 分鐘後再次出現。
你可以在鍵盤上使用 1、2、3 和 4 鍵來選取按鈕,1 鍵為「重來」。按下空白鍵或 Enter 鍵會選取「良好」。
如果沒有其他卡片可以顯示,Anki 會提前顯示卡片。若要保持完整的延遲時長,你可以在「偏好設定」>「排程」>「提前學習上限」中進行調整。
複習 Review Cards
複習學過的卡片時,你可以選擇評價按鈕:
-
按下「重來」表示回答錯誤,卡片未來將更常出現。即卡片被「遺忘」了。請參閱〈遺忘〉章節來進一步了解 Anki 如何處理遺忘的複習卡。
-
按下「困難」後,根據預設,卡片下一次出現的時間將比上一次的間隔稍微更長一些,增加卡片未來出現的頻率。
-
按下「良好」表示上一次 Anki 安排的延遲時間恰好,無須調整卡片輕鬆度。使用預設起始輕鬆度時,卡片下一次出現的時間大約是上一次的 2.5 倍,也就是說,如果卡片上次學習 10 天後再出現,下一次則將在 25 天後出現。
-
按下「簡單」表示 Anki 安排的延遲時間過早。按下後,卡片下次出現前的延遲將比按下「良好」更久,並降低卡片未來出現的頻率。「簡單」會急速增加延遲,因此建議僅用於最最簡單的卡片。一般情況下回答「良好」即可。
跟學習卡片時一樣,你可以在鍵盤上使用 1、2、3 和 4 鍵來回答,1 鍵為「重來」。按下空白鍵或 Enter 鍵會選取「良好」。
要進一步了解演算法如何工作,請參閱〈牌組選項〉章節和 FAQ。
到期數量 Due Counts
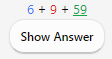
顯示問題面時,Anki 畫面底部會顯示三個數字,如 6 + 9 + 59。這三個數字代表新卡片(藍色),學習中的卡片(紅色),以及待複習的卡片(綠色)。如果不想看到這些數字,可以在偏好設定中停用。
在 v1 排程器中,數字表示的是完成佇列中所有卡片所需的複習次數,而不是卡片數量。如果你為遺忘的卡片設定了多個學習階段,則在回答失敗時,增加的數字會大於 1,因為該卡片需要顯示多次。
v2 排程器以後,數字表示的是卡片數量,因此無論卡片剩餘多少個學習階段,在計數時只會算一次。
顯示答案時,Anki 會在每個按鈕上方顯示下一次顯示卡片的預估時間。如果不想看到預估時間,可以在偏好設定中停用。
模糊乘數 Fuzz Factor
按下難易度按鈕的同時,Anki 會為複習卡隨機套用一個模糊乘數,從而使每張卡片稍微錯開,這樣你在相同時間按下相同按鈕的卡片未來就不會一直都在同一天出現。只有 v3 排程器後,回答按鈕上才會顯示套用模糊乘數後的時間,所以如果你使用的是較舊的版本,按鈕上的時間可能會跟卡片的實際間隔不一致。
學習中的卡片也會被賦予最多 5 分鐘的額外延遲,以避免每次出現的順序都相同,但這一延遲不會體現在回答按鈕上。這個功能無法被停用。
「編輯」和「其他」 Editing and More
你可以按一下左下方的「編輯」按鈕來編輯當前筆記。編輯結束後則會繼續學習。編輯畫面與新增筆記畫面非常相似。
右下方的「其他」按鈕提供了更多可為當前卡片或筆記執行的動作。
-
為卡片加上旗標:為卡片加上或移除一個以顏色區分的標記。旗標會在學習時顯示,在瀏覽器中也可以搜尋加上了旗標的卡片。現在在忙想晚點再詳細查詢一個單字?你可以先給它加上旗標。在 Anki 2.1.45 及以上版本,你還可以在瀏覽器中重新命名旗標。
-
推遲卡片/筆記:停止複習一張卡片或一則筆記中的所有卡片,第二天再複習。(若要提前取消推遲,可以在學習概覽畫面按一下「取消推遲」按鈕)。若你當下無法回答某些卡片,或想改時間再學習,則可以使用這個動作。推遲也可以自動套用到同一則筆記的卡片。
使用舊版排程器時,若卡片在學習時就被推遲,卡片會回到推遲前原來的新卡片或複習佇列。
使用 2.1 排程器時,推遲卡片不會重置其學習階段。
-
忘記卡片:移動當前卡片到新卡片佇列末尾。
在 Anki 2.1.50 及以上版本中,當使用 v3 排程器首次學習新卡片時,Anki 會記住卡片的原始順序。在遺忘卡片時可使用「回復原始順序」(Restore original position) 選項來回復卡片到原始順序。
如果啟用「重設重複和遺忘次數」(Reset repetition and lapse count) 選項,卡片的複習和失敗次數將被重設為零。卡片資訊底部的複習歷史記錄不會被移除。
-
設定到期日:將卡片加入複習佇列,並使其在指定日期到期。
-
擱置卡片/筆記:停止複習一張卡片或一則筆記中的所有卡片,直到手動取消擱置(透過瀏覽器中的擱置按鈕)。若你在短期內都不想要複習一則筆記,但又不想刪除,則可以使用此動作。使用舊版排程器時,若卡片在學習時就被擱置,卡片會回到擱置前原來的新卡片或複習佇列。
使用 2.1 排程器時,擱置卡片不會重置其學習階段。
-
選項:編輯當前牌組的選項。
-
卡片資訊:顯示卡片的統計資料資訊。
-
上一張卡片資訊:顯示上一張卡片的統計資料資訊。
-
標記筆記:為當前筆記加入「marked」標籤,以便在瀏覽器中尋找。類似為卡片加上旗標,但加上的是標籤,這樣若筆記有多張卡片,則所有卡片都會在搜尋「marked」標籤時出現。通常使用旗標即可。
-
建立複本:開啟編輯器,重複當前筆記的內容,你可以稍作修改來建立圍繞同一主題的不同卡片。根據預設,複本會與原筆記放入同一牌組。
-
刪除筆記:刪除筆記及其所有卡片。
-
重播音訊:若卡片正面或背面有音訊,重新播放。
-
暫停音訊:若音訊正在播放,暫停播放。
-
音訊倒轉 5 秒/快轉 5 秒:倒轉/快轉正在播放的音訊 5 秒。
-
錄音:使用你的麥克風錄音來檢查你的發音。一旦前進到下一張卡片,錄音就會被刪除。若要將音訊永久加入卡片,請編輯筆記。
-
重播錄音:重新播放你的上一個錄音(如顯示答案後)。
顯示順序 Display Order
學習時,顯示的卡片會從你選取的牌組及其子牌組中抽取。因此,若選取學習「日文」牌組,則其子牌組「日文::課本::第一課」和「日文::單字」也會一併顯示。
Anki 從牌組中收集(抽取)卡片的方式取決於使用的演算法:
根據預設,Anki 在收集新卡片時將依牌組名稱的字母/筆劃數順序收集。在上述例子中,你會先看到父牌組「日文」的卡片,然後子牌組則以筆劃數順序先顯示「單字」再顯示「課本」。若你的牌組是「French」、「French::Vocab」和「French::My Textbook::Lesson 1」,顯示順序則為「French」→「My Textbook」→「Vocab」。你可以利用這個特性來控制卡片出現的順序,把優先級高的卡片放入在清單中靠上的牌組。 依字母順序排序時,「-」會出現在字母前,「~」會出現在字母後。因此,若要讓牌組排在最前面,你可以把它命名為「-Vocab」;要讓另一個牌組排在最後則可以把它命名為「~My Textbook」。
Anki 會分開收集新卡片和複習卡,所以若你學完了 A 牌組的新卡片但未學完複習卡,你可能會同時學習 A 牌組的複習卡和 B 牌組的新卡片,反之亦同。如果不想發生這樣的情況,你可以直接選取要單獨學習的牌組,而不是它的父牌組。
由於學習中的卡片需要儘早完成,Anki 會同時從所有牌組中收集這些卡片,並依到期順序顯示。
要控制特定牌組的複習卡顯示順序,或將新卡片改為隨機順序出現,請參閱《牌組選項》。要對新卡片的順序微調,請在瀏覽器中進行調整。
關聯卡片和推遲 Siblings and Burying
還記得 Anki 可以為你輸入的單項內容建立多張卡片嗎?譬如同時建立一張「正面→背面」和一張「背面→正面」卡片,或是同一段文字中建立兩個克漏字空格。像這樣幾張相關的卡片叫做「關聯卡片」(siblings)。
當你回答的卡片存在關聯的卡片時,Anki 可以自動「推遲」(bury) 這些卡片來防止關聯卡片在同一次學習中一起出現。被推遲的卡片在當天不會再出現,直到第二天才會被取消隱藏,除非你使用了牌組概覽畫面下方的「取消推遲」(Unbury) 按鈕來手動取消推遲。即使關聯卡片與你學習的卡片不在同一個牌組內(例如當你使用了「覆蓋牌組」功能時)也仍會被推遲。
你可以在牌組選項畫面中開啟推遲,可對新卡片和複習卡分別進行設定。
Anki 僅推遲關聯的新卡片或複習卡。學習中的卡片應儘早完成學習,因此不會被推遲;但反過來,學完學習中的卡片時,與它關聯的新卡片/複習卡會照常被推遲。
注意:在 v2 排程器及以上版本中,Anki 會區分手動和自動推遲的卡片,因此你可以取消推遲一張卡片的同時不影響另外一張。
卡片無法同時被推遲和擱置。擱置卡片時,已被推遲的卡片將被取消推遲。Anki 2.1.49 及以上版本中無法推遲已擱置的卡片,在較早版本中則會將卡片取消擱置。
快速鍵 Keyboard Shortcuts
Anki 中大多數的常用動作都可以使用快速鍵來操作。其中大多可在介面中找到:選單項目旁邊標有快速鍵,將滑鼠遊標懸停在按鈕上通常會顯示含有快速鍵的工具提示。
在學習時,按下空白鍵或Enter 鍵會顯示答案。顯示答案時,按下空白鍵或Enter 鍵會選取「良好」按鈕。使用數字鍵 1 至 4 可以選取不同難度的按鈕。比如你可以一隻手指放在空白鍵上來回答大多數卡片,另一隻手指放在 1 鍵上,遺忘卡片時就能按下「重來」。
藥使用鍵盤來快速切換牌組,你可以使用「工具」選單中的「學習牌組」項目。你可以使用「/」鍵來切換。打開「學習牌組」後,視窗中會顯示你的所有牌組,上方還有一個篩選器。輸入文字,Anki 就會隨之篩選你的牌組。你可以加入空白來輸入多個搜尋詞彙,Anki 會顯示符合所有詞彙的牌組。搜尋「日 單」或「字 日」都會符合名為「日文::單字」的牌組。
進度落後 Falling Behind
當你的複習進度落後時,Anki 會優先顯示等待時間最長的卡片。等待時間最長的卡片會以隨機順序顯示,直至達到複習上限。這樣的順序可以確保沒有卡片會被長時間遺漏,但會使你在趕上進度之前都不會複習到新學習的卡片。
要更改逾期複習的順序,你可以建立一個篩選牌組。
當你回答逾期的卡片時,逾期的時長會影響 Anki 決定卡片下次何時出現。請參閱 Anki 的間隔重複演算法 來進一步了解。
新增/編輯 Adding/Editing (英文)
- 新增卡片和筆記 Adding Cards and Notes
- 新增筆記類型 Adding a Note Type
- 自訂欄位 Customizing Fields
- 更改牌組/筆記類型 Changing Deck / Note Type
- 整理 Organizing Content
- 編輯功能 Editing Features
- 克漏字空格 Cloze Deletion
- 影像遮擋 Image Occlusion
- 編輯遮擋筆記 Editing IO notes
- 輸入外文字元和變音符號 Inputting Foreign Characters and Accents
- Unicode 正規化 Unicode Normalization
新增卡片和筆記 Adding Cards and Notes
回憶基礎,我們在 Anki 中加入的是「筆記」,建立卡片的任務被交給了 Anki。在主視窗中按一下「新增」,就會出現新增筆記的視窗。
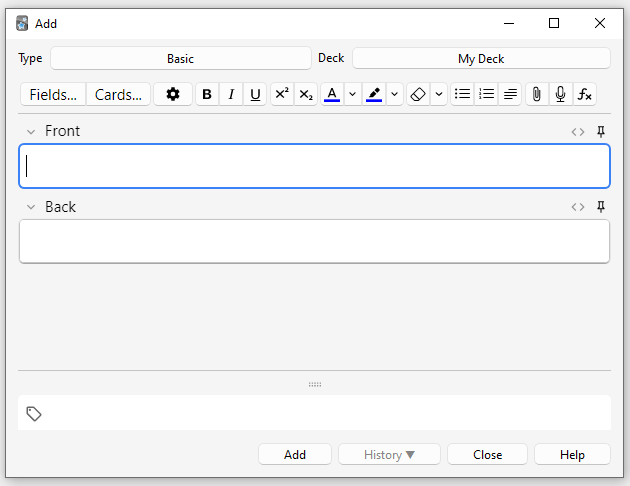
視窗左上方顯示當前的「筆記類型」。如果寫的不是「基本型(Basic)」,那可能是你下載了共享牌組,因而加入了其他筆記類型。以下說明以「基本型」為準。
視窗右上方顯示卡片將被放入的牌組。要將卡片放入新牌組,請按一下牌組名稱按鈕,然後點選「新增」。
筆記類型下方有一些按鈕,還有一個寫著「正面」和「背面」的區域,這兩個區域是筆記的「欄位」,你可以使用上方的「欄位...」按鈕來新增、移除或重新命名各欄位。
欄位下方還有一個寫著「標籤」的區域。加入標籤可方便整理及尋找筆記,如果不需要標籤則可以留空。標籤以半形空格分隔。如果標籤列寫著
vocab check_with_tutor
則加入的筆記會有「vocab」和「check_with_tutor」兩個標籤。
在「正面」和「背面」中輸入文字後,按下「新增」按鈕或 Ctrl+Enter (Mac: Command+Enter) 來將筆記加入你的集合中。同時,卡片將被建立並放入你選取的牌組。若要編輯加入的卡片,請點選「歷程記錄」按鈕來使用瀏覽器檢視剛加入的卡片。
請參閱〈編輯器〉章節來進一步了解筆記類型下方/欄位區域上方的按鈕。
檢查重複 Duplicate Check
Anki 會檢查第一個欄位是否唯一,如果有兩則筆記的「正面」欄位都寫著「apple」,你會看到一條警告。重複項目的檢查範圍是當前的筆記類型,因此若你在學習的兩種語言中恰好有兩個字的拼寫相同,你可以為兩種語言分別建立一個筆記類型,這樣「正面」欄位相同也不會提示重複。
為效能所限,Anki 不會自動檢查其他欄位中的重複項目,你可以手動定期執行瀏覽器中的「尋找重複項目」功能。
高效學習 Effective Learning
每個人的複習方法都不一樣,但最好還是要知道一些基本的概念。建議參閱 SuperMemo 上的這篇文章。特別注意:
-
保持簡單:卡片越短就越容易複習。內容過於充實可能在最後複習時弊大於利。
-
懂了再記:如果你在學習語言,請儘量不要背「必考3000字」之類的單字表。學習外文應在「文」中理解,而不是背誦脫離了上下文語境的單字。
新增筆記類型 Adding a Note Type
雖然基本型足以應付一面一字這種較為簡單的卡片,但若要在正面或背面顯示多個要點,你應該把這些資訊分為多個欄位。
你可能會想,「如果我只需要一張卡片,為甚麼不能直接把音訊、圖片、提示和翻譯全部放到正面欄位中?」如果你想這麼做也沒關係。不過這樣,所有的內容將被混在一起。你將無法依提示或翻譯來排序,也沒有辦法直接把所有音訊移到另外一面上,只能一則一則筆記複製貼上來編輯。現在多分幾個欄位,未來修改卡片佈局時就不用大費手腳。
要建立新的筆記類型,請在 Anki 主視窗選取「工具」→「管理筆記類型」。然後按一下「新增」來新增筆記類型。在新的畫面中,你可以選取新筆記類型的基底。點選「新增」將使用 Anki 內建的筆記類型。「複製」則可讓你選取集合中已有的筆記類型。比如你可以在新增「日文」筆記類型時直接複製已有的「英文」類型。
選擇「好」之後,你可以為你的新類型命名。命名後,關閉筆記類型視窗,回到新增視窗。
自訂欄位 Customizing Fields
若要自訂欄位,請在新增/編輯筆記畫面或「管理筆記類型」視窗中點選「欄位...」按鈕。
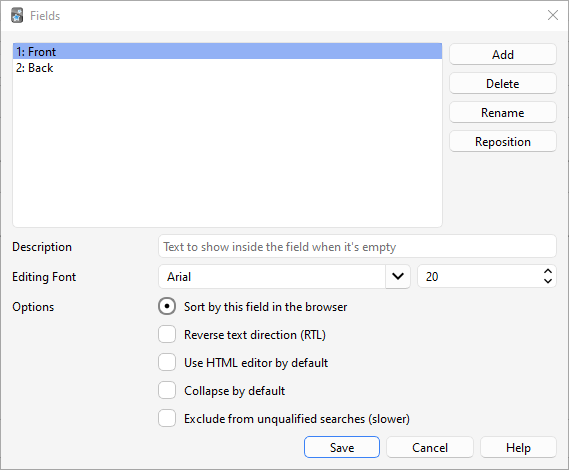
你可以在欄位畫面中新增、移除或重新命名欄位。如需更改欄位在這裡和新增筆記畫面中的順序,請按「調整順序 (Reposition)」按鈕,並輸入數字序號。例如,要將欄位改為第一個欄位,則應輸入 「1」。
Anki 預留了一些特殊欄位,如「Tags」、「Type」、「Deck」、「Card」和「FrontSide」。因此請勿將欄位命名為這些名稱,否則欄位將無法正常運作。
畫面底部的選項用於調整新增和編輯卡片時的欄位屬性。這些選項不是用來自訂學習時顯示的卡片樣式;請參閱〈模板〉來進一步了解卡片樣式自訂。
-
編輯器字型:調整筆記編輯畫面的字型和大小,可以用來縮小沒那麼重要的欄位,或是放大較難看清的字母。這裡的更動不會影響卡片複習時的樣式,如需自訂卡片樣式,請參閱〈模板〉。不過,如果你啟用了「輸入答案」,輸入框中的文字將使用這項設定。(有關如何在輸入答案時變更實際字型的資訊,請參閱〈檢查答案〉章節來進一步了解如何更改答案實際輸入字型)。
-
依此欄位在瀏覽器中排序:設定瀏覽器中顯示的排序欄位。一個筆記類型只能設定一個排序欄位。
-
反轉文字方向為由右至左 (RTL):用於阿拉伯語、希伯來語等從右向左顯示文字的語言。這項設定目前僅在編輯時生效;若要確保在複習時也能正確顯示卡片,你將需要調整模板。
-
預設使用 HTML 編輯器:供比較喜歡編輯欄位的 HTML 原始碼的使用者使用。
-
預設摺疊此欄位:設定欄位預設狀態為摺疊或展開。另外,摺疊/展開的動畫可以在偏好設定中停用。
-
若搜尋條件未指定欄位,則不搜尋此欄位的內容(較慢):可以在搜尋時排除某一欄位的內容,只有在限制欄位(搜尋條件中指定了欄位)時才會出現在搜尋結果中。
新增欄位後,你可能會想要把欄位的內容放到卡片正面或背面上。請參閱〈模板〉章節來進一步了解。
更改牌組/筆記類型 Changing Deck / Note Type
新增筆記時,你可以按一下左上方的按鈕來更改筆記類型,或按一下右上方的按鈕來更改牌組。你可以在開啟的視窗中選取已有的牌組和筆記類型,或是新增牌組和管理筆記類型。
整理 Organizing Content
恰當運用牌組 Using Decks Appropriately
使用牌組可以讓你把內容分類,以便分別學習「英文」、「地理」等不同學科。但不建議分類過細,分成「有機化學第二章」、「食物字彙」這樣的牌組,原因是:
-
過多細分牌組會使卡片以你知道的順序出現。使用較舊的排程器版本時,新卡片只會依牌組順序出現。此外,若你打算分別學習每一個牌組(而且一個一個牌組來按會很慢),則「第二章」中的所有卡片都會排到一起複習。這樣會有損你的記憶,因為同類的卡片可能會幫你想起答案,從而導致你沒有完全憑自身記憶來作答。因而,當你在考試時,因為沒有其他卡片來幫你,你可能會完全回想不出一張卡片的內容。
-
雖然較新的 Anki 版本中可能較少出現,但一大堆牌組可能會導致運作緩慢。在 2.1.50 及較舊的版本中,上千個牌組和層級還會導致牌組清單無法正常顯示。
使用標籤 Using Tags
雖然不建議細分牌組,但我們可以使用標籤或欄位來達成類似的目的。標籤可以幫你更精準地搜尋,並保持集合井然有序。你可以自由使用標籤和旗標,建議提前規劃好使用方法,這樣將更容易找出最適合你的方案。
有些人可能喜歡用牌組和子牌組來整理卡片,但你可以給一則筆記加上多個標籤,而一張卡片只能放在一個牌組中。在大多數情況下,標籤可以更好地進行分類整理。你也可以跟牌組一樣,分上下層級來建立父標籤/子標籤。
譬如,比起建立「食物動詞」牌組,更好的辦法是把卡片放入學習語言的主牌組,然後為卡片加上「食物」和「動詞」標籤。得益於多標籤,你可以搜尋所有動詞,所有食物字彙,或所有與食物有關的動詞。
你可以在編輯視窗和瀏覽器中加入標籤,在瀏覽器中還可以新增、刪除、重新命名或整理標籤。請注意,標籤是套用於筆記上,因此當你為一張卡片加上標籤時,關聯的卡片也會被加上標籤。若僅需為一張卡片加上標籤,而不影響同一則筆記的其他卡片,請選擇使用旗標。
使用旗標 Using Flags
旗標跟標籤類似,但旗標會在學習時出現在畫面右上方。你也可以搜尋帶旗標的卡片、在瀏覽器中重新命名旗標,或是建立僅限某一旗標的篩選牌組。但與標籤不同,一張卡片只能有一個旗標。另外,旗標套用於卡片自身,因此不會影響關聯卡片。
你可以在複習畫面中為卡片加上/移除旗標(Windows: CTRL + 1-7,Mac: CMD + 1-7),或在瀏覽器中編輯。
標記「Marked」標籤 The "Marked" Tag
「marked」是一個特殊標籤。你可以透過複習畫面和瀏覽器中的標記選項來加入/移除「marked」標籤。標記了筆記後,其卡片會在複習畫面中顯示一顆星,並會在瀏覽器中顯示為不同顏色。
注意:Anki 主要是為了與較舊版本相容才保留了「標記」功能;現建議使用旗標。
使用欄位 Using Fields
如欲整理得更為精細,你還可以新增一些用來分類的欄位,比如「書冊」、「頁碼」等。Anki 支援搜尋特定欄位中的內容,所以當你需要英文第一冊第63頁的卡片時,搜尋 "書冊:英文 第一冊" 頁碼:63 就能找到這些卡片。
自訂學習和篩選牌組 Custom Study and Filtered Decks
透過自訂學習和篩選牌組,你可以套用搜尋條件來建立一個臨時牌組。這樣你可以維持集中所有內容到一個牌組來複習的原則(記憶效果最佳),但在考前也能透過建立臨時牌組來挑重點複習。如果有些內容每次都需要單獨學習,建議把這些內容分開放入一個普通牌組;若僅偶爾需要單獨學習(如考前複習、清理積壓複習等),則建議僅在有需求時透過標籤、旗標、標記或欄位等搜尋條件來建立篩選牌組。
編輯功能 Editing Features
![]()
右邊是格式控制按鈕。粗體、斜體和底線用法與一般文書處理軟體一樣。緊接在後的是上標和下標,可用於化學符號 H2O 或簡單的數學方程式 x2。後面兩個按鈕可讓你更改文字顏色。
點選橡皮擦按鈕將清除所選文字的所有格式——包括顏色、粗斜體等。後面三個按鈕用於建立清單、調整文字對齊和增加/減少縮排。
點選迴紋針按鈕後,你可以從電腦硬碟中選取音訊、圖片和影片來加入筆記。你也可以直接複製媒體檔(如在瀏覽器中右鍵選擇「複製圖片」),然後在需要的欄位貼上。請參閱〈媒體檔〉章節來進一步了解媒體檔。
點選麥克風圖示將使用電腦麥克風錄製音訊,錄製結束後音檔將被加入筆記。
點選 Fx 按鈕可以快速新增 MathJax 或 LaTeX 方程式到筆記中。
使用克漏字筆記類型時,還會顯示 […] 按鈕。
![]()
使用 </> 按鈕可以編輯欄位的 HTML 原始碼。
![]()
Anki 2.1.45+ 支援在編輯畫面調整欄位凍結。點選欄位右上方的釘選圖示後,每次新增筆記後 Anki 都不會清除這個欄位中的內容。如果你準備新增的筆記中有多則筆記含有相同的欄位,則可將這個欄位凍結。在較舊的 Anki 版本中,切換欄位凍結的設定在欄位畫面中。
![]()
大多數按鈕都有快速鍵。將滑鼠游標懸停在按鈕上即可檢視其快速鍵。
根據預設,在 Anki 中貼上文字時大部分格式都將被保留。若在貼上的同時按住 Shift 鍵,則 Anki 會清除大部分格式。如需預設清除格式,請在偏好設定中切換「自動清除文字格式(貼上時無需按住 shift 鍵)」選項。
克漏字空格 Cloze Deletion
「克漏字空格」可以用來隱藏句子中的字詞。比如:
臺北縣2010年升格為新北市。
你可以把這句話中的「2010」設為空格:
臺北縣[...]年升格為新北市。
要進一步了解使用克漏字的優點,請參閱 Rule 5(英文)。
要在 Anki 中建立克漏字,選取克漏字筆記類型,並在「文字」欄位中輸入文字。選取要隱藏的文字,然後點選 […] 按鈕。Anki 會取代所選文字:
臺北縣{{c1::2010}}年升格為新北市。
「c1」表示建立的第一個空格。你可以繼續建立空格,選取「新北市」,然後點選 […]:
臺北縣{{c1::2010}}年升格為{{c2::新北市}}。
此時,新增筆記後,Anki 將會為你建立兩張卡片。第一張卡片的問題面如下:
臺北縣[...]年升格為新北市。
而答案面將會顯示完整的句子。第二張卡片的問題面如下:
臺北縣2010年升格為[...]。
你還可以將多個空格合併為一張卡片。在上面的例子中,如果你把「c2」改為「c1」,則 Anki 只會建立一張卡片,問題面上「2010」和「新北市」都會被隱藏。在建立空格時,按住 Alt 鍵(Mac: Option 鍵)則 Anki 會自動使用相同的空格序號。
你可以在任意位置建立空格,例如你可以在「Canberra」一字中只選取「anberra」建立空格,這樣在卡片問題面上會顯示為「C[…]」,留下首字母作為提示。
你也可以加入不在原文中的提示。你可以這樣寫:
Canberra::市名 was founded in 1913
選取「Canberra::市名」,然後按[…]以建立空格,兩個半形逗號「::」後面的文字將成為提示:
{{c1::Canberra::市名}} was founded in 1913
在複習時,卡片顯示效果如下:
[市名] was founded in 1913
如需了解如何在克漏字卡片中輸入答案,請參閱〈檢查答案〉章節。
在 2.1.56 及以上版本中,你可以在克漏字空格中內嵌空格。比如:
{{c1::臺北縣{{c2::2010年}}}}升格為新北市。
內嵌空格必須完全包含於外部的空格。也就是說不能像這樣只重疊一部分:
[...]升格為新北市 -> 臺北縣2010年
臺北縣[...]新北市 -> 2010年升格為
「2010年」無法同時存在於兩個空格中。
在 2.1.56 之前的版本中,要建立有文字重疊的克漏字,你需要額外新增一個文字欄位,把欄位加入模板,然後在兩個文字欄位中都貼上原文:
文字欄位 1:{{c1::臺北縣2010年}}升格為新北市。

文字欄位 2:{{c1::臺北縣}}2010年升格為新北市。
預設的克漏字筆記類型還有一個「背面額外內容」欄位,這個欄位只會在卡片答案面出現,可以用來補充額外的資訊。
克漏字是一種特殊的筆記類型,無法以普通的筆記類型為基底來建立。如需自訂克漏字類型,請確保複製的是克漏字類型。你可以自訂克漏字筆記類型的卡片樣式,但不能新增卡片模板。
影像遮擋 Image Occlusion
Anki 23.10 及以上版本支援影像遮擋(Image Occlusion),無須安裝附加元件。影像遮擋類似克漏字,但隱藏的不是文字,而是圖片中的一部分。

加入圖片 Adding an image
要新增影像遮擋卡片,請在新增畫面上點選筆記類型,並選擇內建的「影像遮擋」筆記類型。然後按一下「選取影像」來選取硬碟上的圖檔,或者按一下「貼上剪切版影像」來貼上你複製的圖片。
新增遮擋卡 Adding IO cards
載入影像後,影像遮擋編輯器將出現。你可以使用左邊的按鈕來選定區域,可選三種形狀:
- 矩形
- 橢圓形
- 多邊形
筆記可選兩種影像遮擋模式:
- 全部遮住,猜測一個 Hide All, Guess One:隱藏所有區域,答案面只會揭露當前學習的區域。
- 遮住一個,猜測一個 Hide One, Guess One:只會隱藏/揭露當前學習的區域,其他區域不會被隱藏。

編輯完成後,點選下方的「新增」按鈕。Anki 將為你加入的每個/組形狀都建立一張卡片。
編輯遮擋筆記 Editing IO notes
你可以在複習時按一下「編輯」或直接在瀏覽器中來編輯遮擋筆記。可用的編輯工具:
- 選取:選取一或多個形狀來移動、調整大小、刪除或群組/解散群組。
- 縮放:你可以使用滑鼠滾輪來移動、縮放影像。
- 形狀(矩形/橢圓形/多邊形):新增形狀/卡片。
- 文字:加入文字框。文字框可被移動、調整大小或刪除。新增文字框時不會建立卡片。
- 復原/重做
- 縮小/放大/重置縮放
- 切換半透明:可在編輯時檢視被隱藏的區域。
- 刪除:刪除選取的形狀和文字框。跟刪除克漏字空格一樣,刪除形狀後相應的卡片不會被自動刪除,請手動執行「空白卡片」工具。
- 複製
- 群組:將所選形狀組成群組,可以同時移動、調整大小或刪除多個形狀。注意,多個形狀組成群組後只會建立一張卡片。
- 取消群組:將所選群組解散為獨立的形狀。
- 對齊:用來對齊形狀或文字框。
複習遮擋卡時,圖片下方會顯示一個「切換遮罩」按鈕。學習使用「全部遮住,猜測一個」模式的卡片時可按下這個按鈕來暫時揭露所有區域。
輸入外文字元和變音符號 Inputting Foreign Characters and Accents
現在的電腦都支援使用多種方式來輸入外文字元和變音符號。我們建議使用目標語言的鍵盤佈局。
中文、日文、泰文等使用非拉丁文字的語言都各自使用不同的鍵盤佈局。
有些歐洲語言使用變音符號,所以也有不同的佈局,但一般都可使用一個通用的「國際 (International)」鍵盤佈局來輸入。使用這個佈局時,只需先按下變音符號,再按下字母就能打出帶變音符號的字元——例如,先按「'」,再按「a」就能打出「á」。
要在 Windows 上加入國際鍵盤佈局,請參閱: https://support.microsoft.com/zh-tw/topic/如何在-windows-7-windows-vista-和-windows-xp-中使用-united-states-international-鍵盤配置-e05ce3ed-11f0-8fc2-498e-a214fa6b898f
要在 Mac 上新增輸入方式,請參閱: https://support.apple.com/zh-tw/guide/mac-help/mchlp1406/mac
若對其他語言的輸入法有疑惑,建議 Google 搜尋相關問題。
如果你在學習從右至左書寫的語言,還需要考慮其他問題。請參閱這個頁面來進一步了解。
建置 Anki 使用的工具與一些輸入方式可能衝突,比如在 macOS 上按住按鍵來選取變音符號、在 Windows 上按住 Alt 鍵並輸入數字等方式。
Unicode 正規化 Unicode Normalization
á 這樣的文字在電腦中有多種表示方法,比如使用一段程式碼來代表一個字母,或是在一個普通的 a 後面再附上一段程式碼來代表字母上的變音符號。當你從多個來源蒐集內容,或是使用不同電腦時,這會造成一些問題,比如搜尋時可能看起來是同一個字元,但卻找不到結果。
因此,Anki 會將文字統一。大部分使用者應對這一過程無感,不過在少數情況下部分字元可能會在正規化時被轉換成其他字元。
若要保留多種儲存字元的方式,請在除錯控制台執行以下指令來停用正規化:
mw.col.conf["normalize_note_text"] = False
指令執行成功後,新增的內容都不會被正規化。但未來若更換作業系統,或將不同來源蒐集到 Anki 貼上,則可能無法直接搜尋到結果。
卡片模板 Card Templates
模板就像卡片的藍圖,讓 Anki 知道卡片的正背面應該顯示哪些欄位,並可使卡片僅在相應欄位中有內容時才會被產生。你可以透過調整卡片模板來輕鬆修改大量卡片的樣式。
以下是有關卡片模板的影片:
模板畫面 The Templates Screen
在編輯畫面中按下「卡片...」按鈕即可開始修改卡片模板。
在較舊的 Anki 版本中,左上方是正面模板,左下方是背面模板,中間是樣式表。在 2.1.28+ 版本中,正面、背面和樣式表不會同時顯示,你可以使用快速鍵 Ctrl+1, Ctrl+2, and Ctrl+3 來切換各選項。
模板跟一般的網頁一樣,使用 HTML 語言編寫。樣式表也同樣使用編寫網頁樣式的 CSS 語言。
右邊顯示的是當前所選卡片的正背面預覽。若在新增筆記時打開了卡片模板視窗,則預覽中會顯示你剛輸入的內容。若在「工具」→「管理筆記類型」中打開,則會顯示「(欄位名稱)」。
你可以在視窗右上方的「選項」中選擇重新命名卡片或調整卡片順序,以及以下兩個選項:
-
覆蓋牌組:將使用當前卡片類型產生的卡片放入所選牌組。根據預設,卡片會被放入新增筆記時選取的牌組。若在這裡設定要放入的牌組,即可將指定的卡片類型放入不同的牌組(如可為「單字→意思」和「發音→意思」卡片類型分別建立牌組)。
-
瀏覽器預覽樣式:另外設定一個用於瀏覽器「問題」和「答案」欄中的(簡化)模板。請參閱〈瀏覽器預覽樣式〉來進一步了解。
欄位取代 Field Replacements
- 基本取代 Basic Replacements
- 換行 Newlines
- 欄位文字轉語音 Text to Speech for individual fields
- 靜態文字和多個欄位文字轉語音 Text to Speech for multiple fields and static text
- 特殊欄位 Special Fields
- 提示欄位 Hint Fields
- 辭典連結 Dictionary Links
- 清除 HTML 標籤 HTML Stripping
- 從右至左書寫 Right To Left Text
- 注音 Ruby Characters
- 媒體檔與 LaTeX 方程式 Media & LaTeX
- 檢查答案 Checking Your Answer
基本取代 Basic Replacements
最基本的模板長這樣:
{{正面}}
當你用花括號包住文字時,Anki 會尋找名為括號中文字的欄位,並取代上欄位中的實際內容。
欄位名稱分大小寫。如果你的欄位名稱是 Front,模板中則不能寫作 {{front}},否則將無法正常運作。
除了欄位,你還可以在模板中加入普通文字。若你在背各國首都,並在筆記類型中建立了「國家」欄位,你可以把正面模板改成這樣:
{{國家}}的首都是?
這是預設的背面模板:
{{FrontSide}}

<hr id=answer>

{{背面}}
這樣表示,顯示正面的內容,然後顯示一條分隔線,最後顯示「背面」欄位。
「id=answer」表示問題和答案的界線。當你在一張較長的卡片上點選「顯示答案」時,Anki 會自動滾動至答案部分(在螢幕較小的行動裝置上相當實用)。如無需答案前的橫線,可改用段落或 div 等其他 HTML 元素。
換行 Newlines
因為卡片模板跟網頁一樣,所以換行時需要使用特殊的指令。如果你的模板如下:
一
二
在預覽時,你將看到: 一 二
要換行,請在行末加入代碼 <br>:
一<br>
二
代碼「br」來自「換行」的英文「(line) br(eak)」。
欄位間要換行也一樣,例如
{{欄位 1}}<br>
{{欄位 2}}
欄位文字轉語音 Text to Speech for individual fields
僅 Anki 2.1.20+、AnkiMobile 2.0.56+ 及 AnkiDroid 2.17+ 版本支援這個功能。
要使用美國英語唸出「正面」欄位中的內容,你可以在卡片模板中寫出:
{{tts en_US:正面}}
在 Windows、macOS 和 iOS 上,Anki 會使用系統內建的語音。Linux 上沒有內建語音,但你可使用附加元件來加入語音,像是這個附加元件。
要檢視所有可用的語言/語音,請在卡片模板中寫下:
{{tts-voices:}}
若所需語言有多種聲音可用,你可以將這些聲音列成清單,Anki 會使用清單中第一個可用的聲音。比如:
{{tts ja_JP voices=Apple_Otoya,Microsoft_Haruka:欄位}}
這樣設定,則在 Apple 裝置上會使用 Otoya,在 Windows 裝置上會使用 Haruka。
部分 TTS 聲音還能調整速度(speed=):
{{tts fr_FR speed=0.8:另一個欄位}}
速度和聲音都可省略,但必須包含語言。
在 Mac 上,你可以自訂可用的聲音:
-
開啟「系統設定」。
-
按一下「輔助使用」。
-
按一下「語音內容」
-
按一下「系統聲音」,然後在下拉式選單中選擇「管理聲音」...
聲音的品質不一,建議多嘗試幾個聲音再做出選擇。只有 Apple 內建軟體才能使用 Siri 聲音,因此安裝後也不能在 Anki 中使用。安裝完成後,你需要重新啟動 Anki 才能選用新的聲音。
在 Windows 上,有些聲音也不能被其他應用程式使用,比如 Cortana。
在克漏字筆記類型中,你可以加入 cloze-only 篩選器,這樣 TTS 就只會朗讀空格中的內容:
{{tts en_US:cloze-only:文字}}
僅 Anki 2.1.29+、AnkiMobile 2.0.65+ 及 AnkiDroid 2.17+ 版本支援「cloze-only」篩選器。
靜態文字和多個欄位文字轉語音 Text to Speech for multiple fields and static text
僅 Anki 2.1.50+、AnkiMobile 2.0.84+ 及 AnkiDroid 2.17+ 版本支援這個功能。
要郎讀模板中的靜態文字或多個欄位,請輸入:
[anki:tts lang=zh_TW]朗讀這些文字。還有{{欄位 1}}和{{欄位2}}[/anki:tts]

模板上的其他文字。這行不在標籤內,所以不會被讀出來。
特殊欄位 Special Fields
你可以在模板中加入以下特殊欄位:
筆記標籤:{{Tags}}

筆記類型:{{Type}}

卡片所屬牌組:{{Deck}}

卡片所屬子牌組:{{Subdeck}}

卡片旗標:{{CardFlag}}

卡片類型(如「反向」):{{Card}}

正面模板內容(僅限背面模板使用):{{FrontSide}}
「FrontSide」中的音訊不會被自動播放。要在卡片正背面都自動播放音訊,你需要把音訊欄位單獨加入背面模板。
跟普通欄位一樣,特殊欄位的名稱也區分大小寫——比如筆記標籤應為 {{Tags}},不能輸入為 {{tags}}。
提示欄位 Hint Fields
你可以隱藏卡片正面或背面上的欄位,且可在需要的時候選擇顯示。被隱藏的欄位叫做「提示欄位」。新增提示前,請注意,越容易回答的問題會越難記住。請前往 https://super-memory.com/articles/20rules.htm 了解「最少資訊原則 (minimum information principle)」。
首先,請先建立一個提示欄位。如果不知道怎麼新增欄位,請參閱〈自訂欄位〉章節。
假設你建立了一個「我的欄位」,要把欄位加入模板時,依以下格式:
{{hint:我的欄位}}
在卡片上,這會被取代成一個標著「hint」的連結;按一下連結,欄位中的內容就會出現。
在問題面顯示提示後,若按下顯示答案,則提示會再次隱藏。如果不想在答案面隱藏提示,請在背面模板移除 {{FrontSide}} 並手動加入欄位。
目前無法使用音訊作為提示——沒有按下「hint」連結也會照樣播放音訊。
要自訂提示的樣式或行為,你將需要自己建置一種提示欄位。我們無法幫你學習 HTML 和 CSS 語言,但你可以參考以下程式碼:
{{#背面}}
<a class=hint href="#"
onclick="this.style.display='none';document.getElementById('hint4753594160').style.display='inline-block';return false;">
顯示背面</a><div id="hint4753594160" class=hint style="display: none">{{背面}}</div>
{{/背面}}
辭典連結 Dictionary Links
你可以利用欄位取代來建立辭典連結。假設你在學習語言,你常用的線上辭典可使用 URL 進行搜尋:
http://example.com/search?q=單字
你可以新增一個這樣的連結:
{{單字}}

<a href="http://example.com/search?q={{單字}}">檢索辭典</a>
複習使用這個模板的卡片時,只需按一下「檢索辭典」連結即可搜尋該卡片對應的單字。請繼續閱讀下一部分來了解潛在的問題。
清除 HTML 標籤 HTML Stripping
跟模板一樣,欄位也是使用 HTML 碼來儲存內容的。在上面的辭典連結中,若「單字」欄位內容為「word」且不包含格式,則 HTML 原始碼仍為「word」。但如果你加入了格式,則會同時加入 HTML 原始碼,若「word」加上了粗體,HTML 原始碼將會是「<b>myword</b>」。
因此,在辭典連結或類似的情形中可能會出現問題。依上述例子,辭典連結可能會變成:
<a href="http://example.com/search?q=<b>word</b>">檢索辭典</a>
因為多出了「<b>」等無關字元,在辭典中很可能搜尋不到任何結果。
為了解決這一問題,Anki 提供了在取代時清除欄位格式的功能。只要在欄位名稱前輸入「text:」,Anki 就會清除所有格式。依以下格式設定連結,即便欄位文字存在格式也能正常搜尋:
<a href="http://example.com/search?q={{text:單字}}">檢索辭典</a>
從右至左書寫 Right To Left Text
如果你在學習的語言是從右至左書寫,你需要像這樣調整模板:
<div dir=rtl>{{有 RTL 文字的欄位}}</div>
注音 Ruby Characters
日本語[にほんご]
假設你在「單字」欄位中寫入了以上文字,如果模板上的欄位沒有加上篩選器,則 {{單字}} 會顯示為 日本語[にほんご]。你需要在模板名稱前加上 furigana 篩選器才能自動將注音放到字上方:
{{furigana:單字}}
以下是一些範例:
| 原文 | 顯示效果 |
|---|---|
日本語[にほんご] | |
水 獺[ㄊㄚˋ] | 水 |
水獺[ㄊㄚˋ] | |
世[よ]の 中[なか] | |
世[よ]の中[なか] |
注意第 2 個例子中的「獺」和第 4 個例子中的「中」前面都有一個半形空格。這是為了表示注音應顯示在空格後的文字上方。如未加入空格,則會像第 3 和第 5 個例子中那樣,「ㄊ」可能會跑到「水」上面,而「な」可能會顯示在「の」上面。
其他注音篩選器 Additional Ruby Character Filters
除了振假名篩選器 furigana,你還可以選擇只顯示注音或原文。使用假名篩選器 kana 時將只顯示注音,使用漢字篩選器 kanji 則會移除注音。
| 原文 | 欄位篩選器 | 顯示效果 |
|---|---|---|
日本語[にほんご] | {{furigana:欄位名稱}} | |
日本語[にほんご] | {{kana:欄位名稱}} | にほんご |
日本語[にほんご] | {{kanji:欄位名稱}} | 日本語 |
媒體檔與 LaTeX 方程式 Media & LaTeX
因執行速度所限,Anki 不會掃描模板有無引用媒體檔。因此在模板上直接加入媒體會導致一些後果。
靜態音檔/影像 Static Sounds/Images
要在每張卡片上都加入同樣的音檔或影像:
-
重新命名檔案,在開頭加上一個底線,如「_logo.jpg」。底線表示檔案被模板引用,且應在共用牌組時被匯出。
-
在正面或背面模板中引用這個媒體檔:
<img src="_logo.jpg">
引用欄位 Field References
媒體引用中不能包含欄位取代。問題有:複習時可能無法正常顯示、檢查未被使用的媒體檔無法被偵測到、無法正常匯出/匯入等。無法正常運作的例子:
<img src="{{單字}}.jpg">

[sound:{{例句}}]

[latex]{{欄位一}}[/latex]
請將媒體引用放入欄位內容。請參閱〈匯入媒體檔〉章節來進一步了解。
檢查答案 Checking Your Answer
要檢查你的答案,最簡單的方式是使用「基本型(輸入答案)」筆記類型。
若要修改已有筆記類型,假設你的模板如下:
{{中文}}

{{FrontSide}}

<hr id=answer>

{{英文}}
要輸入英文並檢查答案,請修改卡片正面模板:
{{中文}}
{{type:英文}}
在要檢查的欄位前加入 type:。因為背面模板有「FrontSide」欄位,所以無需再次加入 {{type:英文}}。
複習畫面中將會顯示一個文字框,輸入答案後按下 Enter 鍵或顯示答案按鈕後,Anki 會對比你給出的答案和正確答案。文字框的字型大小是你在「欄位」編輯畫面中設定的大小。
答案檢查結果僅供參考,你可以依實際情況自由選擇評價按紐。
一張卡片只能加入一個文字對比。加入多個 {{type:欄位}} 將無法正常運作。文字框只能顯示為一行,因此不適合用於包含多行文字的欄位。
答案檢查結果使用等寬字型,這樣你輸入的答案和正確答案中的字母可以一一對齊。若要覆蓋使用的字型,請在樣式表底部加入:
code#typeans { font-family: "字型名稱"; }
加入的程式碼會影響答案檢查結果的 HTML 原始碼:
<code id=typeans>...</code>
進階使用者還可以使用 CSS class「typeGood」、「typeBad」和「typeMissed」來覆蓋預設的檢查結果文字顏色。AnkiMobile 支援「typeGood」和「typeBad」兩個 class,但不支援「typeMissed」。
要覆蓋文字框的字型大小但不更改「欄位」對話框中的設定,你可以使用 !important 來覆蓋預設的行內 (inline) 樣式:
#typeans { font-size: 50px !important; }
克漏字卡片也可以輸入答案。請在卡片正背面模板中都加入 {{type:cloze:文字}},像這樣:
{{cloze:文字}}
{{type:cloze:文字}}
{{背面額外內容}}
因為克漏字類型不使用「FrontSide」欄位,所以需要在正背兩面都加入。
若一張卡片中包含了多個克漏字空格,顯示正確答案時各空格內容將以半形逗號和空格「, 」隔開。
輸入答案文字框不會在瀏覽器預覽中顯示,只會在複習畫面或卡片類型視窗中顯示。
在 ankiweb.net 上複習時也不會顯示輸入答案文字框。
產生卡片 Card Generation
- 反向卡片 Reverse Cards
- 產生與刪除卡片 Card Generation & Deletion
- 選擇性產生卡片 Selective Card Generation
- 條件式取代 Conditional Replacement
- 背面空白 Blank Back Sides
- Anki 較舊版本的限制 Limitations in Older Anki Versions
- 新增空白筆記 Adding Empty Notes
- 克漏字模板 Cloze Templates
反向卡片 Reverse Cards
使用內建的「基本型(含反向卡片)」筆記類型,Anki 會建立兩張正背面相反的卡片(即「正面→背面」和「背面→正面」)。
若僅部分筆記需要反向卡片,你可以使用「基本型(選擇性反向卡片)」筆記類型。若你僅在正面和背面欄位中輸入了文字,則 Anki 只會為你建立一張「正面→背面」卡片。需要反向卡片時,只要在「加入反向卡片」欄位中輸入任意文字(如「1」),Anki 就會再建立一張反向卡片。「加入反向卡片」欄位中的文字不會出現在卡片中。
產生與刪除卡片 Card Generation & Deletion
當卡片正面沒有內容時,Anki 不會建立這些卡片。若有一則筆記的「我的欄位」欄位為空,且有一個卡片類型的正面模板僅為 {{我的欄位}},則這則筆記不會產生這個類型的卡片。
編輯已有筆記時,若你新增的內容使部分卡片的正面不再是空白,則 Anki 會自動為你建立這些卡片。但反過來,如果你移除了一些內容後,有些卡片正面變成空白的,則 Anki 不會自動刪除這些卡片,以防因不小心刪除欄位內容而造成資料遺失。要移除空白卡片,請在主視窗中前往「工具」→「空白卡片」。若有空白卡片,則彈出的視窗中會列出所有空白卡片清單,並可選擇刪除。
囿於卡片產生機制,你無法手動刪除單張卡片,否則每次編輯筆記時,刪掉的卡片都會被重新建立。要刪除不需要的卡片,你應該把卡片正面模板中的相關「條件式取代」欄位留空,然後執行「空白卡片」工具。
Anki 判斷是否產生卡片時不會考慮特殊欄位和非欄位文字。因此雖然以下卡片「國家」欄位外有文字:
{{國家}}在哪個洲?
但只要「國家」為空就不會產生卡片。
選擇性產生卡片 Selective Card Generation
你可以使用「基本型(選擇性反向卡片)」筆記類型來為重點卡片多加一張卡片。要自己建立這樣的筆記類型,請先新增一個欄位。然後在卡片模板中,你可以設定依欄位有無內容來確定是否要建立卡片。請繼續閱讀〈條件式取代〉章節來進一步了解如何設定。
條件式取代 Conditional Replacement
你可以依欄位有無內容為條件,決定要不要為卡片加入文字、欄位或 HTML 碼。例如:
這句話永遠會被顯示

{{#欄位名稱}}
    這句話只有當「欄位名稱」中有文字時才會被顯示
{{/欄位名稱}}

{{^欄位名稱}}
    這句話只有當「欄位名稱」為空時才會被顯示
{{/欄位名稱}}
以下實際案例只有當欄位不為空時才會顯示欄位前的文字(「標籤:」):
{{#Tags}}
    標籤:{{Tags}}
{{/Tags}}
再舉例,假如你的筆記類型可以在較難的卡片背面附上備註,你可能想在複習時知道哪些筆記有備註,以便多花一點時間來耐心回答較難的卡片。要讓「目標欄位」僅當有備註時才顯示為藍色字型,請參照以下設定:
{{#備註}}
    <span style="color:blue;">
{{/備註}}

{{目標欄位}}

{{#備註}}
    </span>
{{/備註}}
利用 Anki 不會建立正面空白的卡片的特點,你還可以使用條件式取代來控制要不要產生卡片。假設你的卡片模板如下:
{{原文}}
{{備註}}
正常情況下,只要「原文」和「備註」中有一個欄位不為空,就會產生卡片。要讓卡片僅在「原文」有內容時才產生,你可以將模板改成這樣:
{{#原文}}
    {{原文}}
    {{備註}}
{{/原文}}
要讓卡片僅在兩個欄位都有內容時才產生,你可以使用兩個條件式取代:
{{#原文}}
    {{#備註}}
        {{原文}}
        {{備註}}
    {{/備註}}
{{/原文}}
注意,僅在卡片正面使用這樣的條件式取代才能控制卡片產生;放在背面則會產生背面空白的卡片。另外,因為這是利用了 Anki 不會建立正面空白的卡片的特點,如果你不把整個正面都放進條件式取代中,可能會達不到預期效果:
{{#原文}}
    {{原文}}
{{/原文}}
{{備註}}
背面空白 Blank Back Sides
產生卡片時只會檢查卡面正面。假設你的卡片正面為:
{{欄位一}}
背面模板為:
{{欄位二}}
只要「欄位一」不為空,卡片就會被產生。若「欄位二」為空,卡片仍會被產生,且卡片背面將為空白。
要避免產生背面空白的卡片,你需要在卡片正面模板加上條件式取代,像這樣:
{{#欄位二}}
    {{欄位一}}
{{/欄位二}}
這樣,只有當「欄位一」和「欄位二」都不為空時,才會產生卡片。
Anki 較舊版本的限制 Limitations in Older Anki Versions
以下限制不套用於 Anki 2.1.28+ 和 AnkiMobile 2.0.64+ 版本。
在較舊的版本中,Anki 無法在產生卡片時使用否定條件式取代。例如,在 Anki 2.1.28 版本中,以下模板產生卡片的條件為,「空白時新增」欄位為空,且「正面」欄位不為空:
{{^空白時新增}}
    {{正面}}
{{/空白時新增}}
但版本較舊的 Anki 會無視這條否定條件式,因此是否產生卡片僅取決於「正面」欄位是否為空。
在條件中混合使用邏輯且 (AND) 和或 (OR) 也會在較舊版本中造成問題。這是一個能正常運作的例子(若 A或B或C 不為空,則新增卡片):
{{A}}
{{B}}
{{C}}
這是另一個能正常運作的例子(若 A且B且C 不為空,則新增卡片):
{{#A}}
    {{#B}}
        {{#C}}
            {{A}}
        {{/C}}
    {{/B}}
{{/A}}
但以下混用了邏輯且和或的例子(若 A或(B且C) 不為空,則新增卡片)則無法正常運作:
{{A}}
{{#B}}
    {{#C}}
        {{B}}
    {{/C}}
{{/B}}
新增空白筆記 Adding Empty Notes
在 Anki 2.1.28+ 和 AnkiMobile 2.0.64+ 版本中,若新增筆記時沒有產生任何卡片,則 Anki 會使用第一個模板來建立一張空白卡片。這樣是為了在內容不完整時也能先新增筆記,等到日後完善筆記內容或修改模板後,方可使卡片生效。若不想要保留空白筆記,請執行「空白卡片」功能以移除。
在版本較舊的 Anki 中,當筆記不會產生卡片時,筆記將無法被新增/匯入。
克漏字模板 Cloze Templates
請參閱〈克漏字空格〉章節來了解背景資訊。
普通的筆記類型可以自訂卡片類型的數量,但在克漏字筆記類型中,筆記中所有空格都共用同一個唯一的卡片類型。
在上面的章節中,我們談到普通卡片產生的條件是問題面中指定的欄位不為空。但克漏字筆記類型的規則不同:
-
Anki 將首先檢查正面模板中的克漏字取代,如「{{cloze:欄位名稱}}」。
-
然後,Anki 將檢查「欄位名稱」欄位中的所有克漏字引用,如「{{c1::文字}}」。
-
最後,依空格序號將產生卡片,序號相同的空格將被包含在同一張卡片中。
由於這一機制僅限於克漏字卡片,因此「{{cloze:…}}」標籤無法用於普通筆記類型。
條件式取代可以用來自訂各空格序號所產生的卡片。若要在第一張克漏字卡片中顯示「提示一」欄位,在第二張克漏字卡片中顯示「提示二」欄位,請參照以下模板:
{{cloze:文字}}

{{#c1}}
    {{提示一}}
{{/c1}}

{{#c2}}
    {{提示二}}
{{/c2}}
樣式與 HTML Styling & HTML
- 卡片樣式 Card Styling
- 調整影像大小 Image Resizing
- 欄位樣式 Field Styling
- 音訊播放按鈕 Audio Replay Buttons
- 文字方向 Text Direction
- 其他 HTML Other HTML
- 瀏覽器預覽樣式 Browser Appearance
- 平台特定 CSS Platform-Specific CSS
- 安裝字型 Installing Fonts
- 夜間模式 Night Mode
- 捲動 Scrolling
- JavaScript
卡片樣式 Card Styling
要存取樣式表,請按下「背面模板」按鈕旁的「樣式」按鈕。在樣式表中,你可以改變卡片的背景顏色、預設字型、文字對齊等等。
可用的標準選項有:
font-family
卡片顯示字型的名稱。如果字型名稱有空格,比如「Microsoft JhengHei」,則需要包含在英文半形雙引號中:"Microsoft JhengHei"。 你也可以同時加入多個字型,請參閱下文。
font-size
字型的大小。請確保在數字後加入單位,如加入 px 來以像素作為單位。
text-align
文字對齊。如 center 置中、left 左對齊或 right 右對齊。
color
文字的顏色。基本的顏色可以直接使用英文單字表示,如 blue 或 red。你也可以使用 HTML 色碼來使用更多顏色。要進一步了解,請前往 HTML 顏色代碼網站。
background-color
卡片的背景顏色。
樣式表中可以加入任意 CSS 程式碼。例如,進階使用者可以為卡片背景加入圖片或漸變色。如果你想修改卡片上某一區域的樣式但不知道從何下手,可以透過網路上的資源來自學 CSS 程式碼。
所有卡片共用同一樣式表。因此當你做出更動時,同一筆記類型的所有卡片都會被影響。不過,你可以在樣式表中加入限定卡片的程式碼。例如,要讓第一張卡片顯示為藍色背景,其他卡片全部為黃色,你可以這樣設定:
.card {
  background-color: yellow;
}
.card1 {
  background-color: blue;
}
調整影像大小 Image Resizing
Anki 預設會將影像縮放至符合螢幕大小。要停用這一功能,你可以在樣式表底部(預設的 .card { ... } 外面)加入以下程式碼:
img {
  max-width: none;
  max-height: none;
}
AnkiDroid 有時會無法符合螢幕大小。使用 CSS 設定影像最大長寬本應解決這一問題,但 AnkiDroid 2.9 及較舊版本中會無視這一設定。你可以在行末加入 !important 來解決:
img {
  max-width: 300px !important;
  max-height: 300px !important;
}
若在調整影像大小後,標記的卡片上的星星也受到影響(比如圖片放大後星星過大),你可以加入以下程式碼來指定星星的樣式:
img#star {
  ...;
}
你可以透過 Chrome 來以互動方式探索卡片樣式:
https://addon-docs.ankiweb.net/porting2.0.html#webview-changes
Anki 2.1.50 及以上版本支援在編輯器中調整影像大小。
欄位樣式 Field Styling
預設的樣式會套用於整張卡片。你也可以為欄位單獨設定不同字型、顏色或其他。這在學習外文時很重要,比如在學習日文時,如果使用的是中文字型,有些日文寫法不一樣的漢字可能無法正確顯示。
假設你的卡片中有欄位「短語」,並要在欄位中使用 Windows 的「MS Gothic」字體。假設這是你當前的模板:
{{短語}}是甚麼意思?

{{備註}}
你需要把要修改樣式的文字包含在 HTML 程式碼內。例如在文字前加入以下程式碼:
<div class=mystyle1>
然後在文字後加入:
</div>
以上程式碼表示,包含的文字要使用自訂樣式 mystyle1,我們稍後再來建立該樣式。
修改後的模板如下:
<div class=mystyle1>{{短語}}是甚麼意思?</div>

{{備註}}
但是這樣,中文的部分也會使用日文字體,所以你可以只包含「短語」欄位:
<div class=mystyle1>{{短語}}</div>是甚麼意思?

{{備註}}
編輯模板後,前往樣式表。未做更動的樣式表應如下:
.card {
  font-family: arial;
  font-size: 20px;
  text-align: center;
  color: black;
  background-color: white;
}
你可以把新的樣式放在最下方:
.card {
  font-family: arial;
  font-size: 20px;
  text-align: center;
  color: black;
  background-color: white;
}

.mystyle1 {
  font-family: "MS Gothic";
}
花括號中可以加入任意樣式。要讓字型變大,你可以把樣式修改為這樣:
.mystyle1 {
  font-family: "MS Gothic";
  font-size: 30px;
}
你也可以在牌組中加入自訂字型檔案,這樣你就不需要在電腦或手機上安裝只想要在 Anki 中使用的字型。請參閱〈安裝字型〉章節來進一步了解。
音訊播放按鈕 Audio Replay Buttons
當卡片中有音訊或 TTS 時,Anki 會顯示一個播放按鈕。
若不需要這個按鈕,你可以在偏好設定中停用。
你可以在卡片樣式表中自訂按鈕外觀。如果你要縮小按鈕並加上顏色,可以加入程式碼:
.replay-button svg {
  width: 20px;
  height: 20px;
}
.replay-button svg circle {
  fill: blue;
}
.replay-button svg path {
  stroke: white;
  fill: green;
}
文字方向 Text Direction
如果你使用阿拉伯文或希伯來文等由右至左書寫的文字,你可以在 .card 中加入 direction 屬性:
.card {
  direction: rtl;
}
這會更改整張卡片的書寫方向。你也可以使用 HTML 標籤來修改單個欄位:
<div dir="rtl">{{正面}}</div>
要修改編輯器中的欄位書寫方向,請參閱〈自訂欄位〉章節。
其他 HTML Other HTML
模板可以包含任意 HTML 程式碼,因此一般網頁中使用的各種佈局都能被加入卡片中。例如表格、清單、影像、外部連結等。例如你可以使用表格 table 來使卡片正背面分別顯示在左半邊和右半邊。
因 HTML 功能之多,此使用手冊無法一一涵蓋所有功能,請在網路上自行尋找 HTML 入門教學來進一步了解。
瀏覽器預覽樣式 Browser Appearance
如果你的卡片模板過於複雜,卡片清單中的問題欄(正面)和答案欄(背面)可能難以閱讀。透過「瀏覽器預覽樣式」,你可以自訂一個僅限瀏覽器中顯示的模板,比如只顯示重要的欄位或者改變顯示順序。「瀏覽器預覽樣式」使用與普通卡片模板相同的語法。
使用這個選項時,當問題面文字包含在答案面開頭時,答案欄中不會顯示問題。假如問題是「日本在」、答案是「日本在東亞」,則答案欄僅會顯示「東亞」。
平台特定 CSS Platform-Specific CSS
Anki 定義了一些特殊的 CSS class,可為不同平台設定不同的樣式。例如,你可以像這樣在不同平台上顯示不同的字型:
/* Windows */
.win .example {
  font-family: "字型 1";
}
/* macOS */
.mac .example {
  font-family: "字型 2";
}
/* Linux 電腦 */
.linux:not(.android) .example {
  font-family: "字型 3";
}
/* Linux 電腦和 Android 裝置 */
.linux .example {
  font-family: "字型 4";
}
/* Android 和 iOS */
.mobile .example {
  font-family: "字型 5";
}
/* iOS */
.iphone .example,
.ipad .example {
  font-family: "字型 6";
}
/* Android */
.android .example {
  font-family: "字型 7";
}
然後這樣設定模板:
<div class="example">{{欄位}}</div>
如果你使用 AnkiWeb 複習卡片,你還可以使用 .chrome、.gecko 和 .opera 等 class 來在不同的瀏覽器中使用不同樣式。要檢視所有可用的 class,請參閱 http://rafael.adm.br/css_browser_selector/。
安裝字型 Installing Fonts
如果你在公司/學校電腦上使用 Anki,沒有權限安裝字型,或是使用行動裝置,不便安裝字型,你可以在 Anki 中加入字型檔。
Anki 僅支援加入 TrueType 格式的字型。TrueType 字型的副檔名為 .ttf,如 Arial.ttf。找到想要的字型檔後,請新增至 Anki 媒體檔資料夾:
-
重新命名檔案,在開頭加上一條底線,如
_arial.ttf。檔名開頭的底線表示檔案用於模板中,這樣在 Anki 中執行「檢查媒體檔」時就不會被刪除。 -
打開電腦上的檔案瀏覽器,並前往 Anki 資料夾,打開你的設定檔資料夾(預設名稱為「使用者 1」)。
-
將已重新命名的字型檔放入「collection.media」資料夾中。
加入後,模板需要被更新:
-
在主畫面上方,按一下「新增」按鈕,然後使用左上方的按鈕來選取要修改的筆記類型。
-
按一下「卡片」按鈕.
-
在樣式表底部(原有的最後一個花括號
}外),加入以下程式碼,並將_arial.ttf取代為你剛才加入的字型檔案名稱:
@font-face {
  font-family: myfont;
  src: url("_arial.ttf");
}
_arial.ttf 是字型檔案的名稱,而 myfont 是要在當前樣式表中使用的字體名稱。
使用上面的程式碼匯入字型後,要讓整張卡片使用新的字型,你可以在 .card 部分中的 font-family: 裡把字型改為 myfont 或你自己設定的名稱。要為欄位單獨自訂字型,請參閱上文中的〈欄位樣式〉章節。
注意,字型檔名必須完全一致,如果檔名為 arial.TTF,而你在卡片模板中輸入了 arial.ttf,則將無法正常運作。
夜間模式 Night Mode
你可以為夜間模式下的卡片自訂不同樣式。
要讓夜間模式下的卡片背景為淺灰色,你可以這麼設定:
.card.nightMode {
  background-color: #555;
}
如果你有文字使用了 .myclass 樣式,加入以下程式碼可以讓這些文字僅在夜間模式下顯示為黃色:
.nightMode .myclass {
  color: yellow;
}
捲動 Scrolling
根據預設,Anki 會透過 id=answer 來找到包含答案的 HTML 元素,並在卡片背面自動捲動到這個元素。你可以把 id=answer 移動至其他 HTML 元素上來改變自動捲動的終點,或移除 id=answer 以停用自動捲動。
JavaScript
因為 Anki 卡片本質上就是網頁,所以你也可以透過模板來在卡片上嵌入 JavaScript。請參閱此論壇貼文來進一步了解。
JavaScript 是一項進階功能,容易出現錯誤,因此 Anki 不為 JavaScript 功能提供支援。我們無法協助你編寫 JavaScript 程式碼,也無法保證當前可用的程式碼在未來不會失效。若無法自行解決相關問題,建議不要使用 JavaScript。
不同 Anki 用戶端上的卡片顯示效果可能不一,因此你需要在不同平台上進行測試。多數用戶端的卡片是顯示在一個持續動態更新內容的網頁上,所以你的 JavaScript 程式碼需要使用 document.getElementById() 等方法來更新文件內容,而不是類似 document.write() 的方法。
window.alert 這樣的函式可能不可用。Anki 會在終端機寫入 JavaScript 錯誤,你需要在控制台中檢視錯誤訊息。你可以使用 Chrome 的「檢查元素」功能來為 JavaScript 程式碼偵錯。
Checks and Errors
When you save changes to a notetype or export a deck, Anki 2.1.45+ checks for some common errors. These errors will cause issues later on when anyone studies the affected cards, so Anki won't let you proceed before you have fixed them.
Basics
Please see Key Concepts before reading further.
Most of the errors below will require you to modify your notetype/card template. To do so:
- Open the Browse screen, and look at the items on the left.
- Locate the notetype mentioned in error message. You can use the search bar at the top left if necessary.
- Click on the notetype, to show its cards/notes on the right.
- Click the Cards... button at the top of the editing area to open the templates screen.
Specific Issues
Template Syntax Error
This kind of error indicates an incorrect usage of the field replacement syntax. Visit the templates screen for the reported note and card type, and look at the preview area for more information. Some more information about template problems is available.
Identical Front Sides
You have Anki configured to create two identical questions for each input. This can happen if you add a new card type without making any adjustments to it. Identical cards double your workload, and make Anki's scheduling less effective.
To fix this, open the templates screen, and select one of the duplicates at the top. Then use the button on the top right to remove the selected card type. This will delete all the duplicate cards/notes that were using the card type as well.
No Field Replacement on Front Side
If you don't use a field replacement in the front template of a card type, every card created from it will look the same on the question side, regardless of its note. It would then be impossible to answer the card, as you wouldn't know what answer is expected.
To resolve the issue, open the templates screen, and click the Add Field button to add one or more fields to the front.
Cloze Filter Outside Cloze Notetype
The cloze filter (as in {{cloze:Some Field}})
may only be used on the cloze notetype, and on those created by cloning it.
If you get this error, you can remove the cloze filter from the template.
If you have notes with cloze deletions that are using that notetype, you can select them in the Browse screen, and use the Change Notetype action to assign them to a standard Cloze notetype instead.
Older Anki versions did not complain when you attempted to use cloze deletions on a normal notetype, but this was never a use case that was intended to be supported. If you want to combine cloze deletions with regular cards, you may find an add-on like the Closet add-on provides some alternatives.
No Cloze Filter on Cloze Notetype
A Cloze notetype's front and back templates should have a cloze filter. If one is missing, you will need to add it back so that Anki can create cloze cards correctly.
偏好設定 Preferences (英文)
你可以在 Windows/Linux 版本中的「工具」選單或 Mac 上的「Anki」選單中找到偏好設定。
外觀 Appearance
一般 General
語言
更改顯示語言。要幫 Anki 改進翻譯,請前往 https://translating.ankiweb.net/
使用者介面User Interface
佈景主題
Anki 介面使用深色(夜間)模式時,卡片會變為黑底白字。你可能需要修改部分卡片模板才能使這個功能正確運作,請參閱〈夜間模式〉章節來進一步了解。
2.1.50 及以上版本還可以選擇跟隨系統設定來自動切換深色/淺色模式。
使用者介面大小
若介面顯示元素過大或過小,可以嘗試調整這項設定。
重設視窗大小
將視窗大小和位置重設為預設。
視訊驅動程式
Anki 的函式庫需要透過視訊驅動程式以繪製螢幕上的圖形。由於各種軟硬體的設定不盡相同,各個驅動程式在你的機器的運作效果可能不一。ANGLE 和 OpenGL 效能比軟體較佳,但在某些系統上可能無法正常運作。在 Mac 上,通常應使用 OpenGL 選項。
注意:如果你正在使用 2.1.50+ (Qt6) 版本,請前往這個頁面。
減少干擾 Distractions
這些選項可以移除複習時畫面中不必要的干擾:
- 複習時隱藏頂部列和底部列。
- 極簡模式:使介面更加緊湊/簡約。
- 減少動態效果:停用部分過場效果和動畫。
- 切換本機樣式/Anki 佈景主題。(僅限 Mac/Linux)
複習 Review
排程器 Scheduler
次日始於
控制 Anki 從何時開始顯示下一天的卡片。使用預設的「4 時」時,在半夜 12 點左右學習時就不會跟第二天的卡片混到一起。如果你熬夜到很晚或者很早起床,你可以將這個選項設定在你平常的睡眠時間範圍內。Controls when Anki should start showing the next day’s cards. The default
setting of 4AM ensures that if you’re studying around midnight, you won’t have
two days' worth of cards shown to you in one session. If you stay up very late
or wake up very early, you may want to adjust this to a time you’re usually
sleeping. Note that the start of the next day is relative to your current timezone.
Also note that any cards that cross a day boundary will appear at the start of
the day they are scheduled for, just like review cards do.
Learn ahead limit
Tells Anki how to behave when there is nothing left to study in the current deck
but cards in learning. The default setting of 20 minutes tells Anki that cards
should be shown early if they have a delay of less than 20 minutes and there’s
nothing else to do. If you set this to 0, Anki will always wait the full delay,
showing the congratulations screen until the remaining cards are ready to be
reviewed.
Timebox time limit
Timeboxing is a technique to help you focus by dividing a longer activity (such
as a 30 minute study session) into smaller blocks. If you set the timebox time
limit to a non-zero number of minutes, Anki will periodically show you how many
cards you’ve managed to study during the prescribed time limit.
Review
Show play buttons on cards with audio
Whether a clickable (re)play button will be shown in the review screen
for cards with audio.
Interrupt current audio when answering
Whether a currently playing audio file should be stopped when answering
a card.
Show remaining card count
Disable this option to hide the card count at the bottom of the screen.
Show next review time above answer buttons
Useful to know how far in the future your cards are being pushed.
Spacebar (or enter) also answers card
Defines whether a press on the space bar (or the enter key) also answers cards.
Editing
Editing
Paste clipboard images as PNG
By default Anki pastes images on the clipboard as JPG files, to save disk space.
You can use the option to paste as PNG images instead. PNG images support
transparent backgrounds and are lossless, but they usually result in much larger
file sizes.
Paste without Shift strips formatting
By default, formatting like bold and colors are kept when pasting,
unless the Shift key is held down. This option reverses the behaviour.
Default deck
Controls how note types and decks interact. The default of "When adding, default
to current deck" means that Anki saves the last-used note type for each deck and
selects it again then next time you choose the deck (and, in addition, will
start with the current deck selected when choosing Add from anywhere). The other
option, "Change deck depending on note type," saves the last-used deck for each
note type (and opens the add window to the last-used note type when you choose
Add). This may be more convenient if you always use a single note type for each
deck.
The last used deck/notetype is updated when you add a card. If you change the deck and close the add window without adding a card, it won't be saved.
Browsing
Default search text
Allows you to customize the starting search text in the browser (eg, to start
with "deck:current").
Ignore accents in search (slower)
When enabled, simple text searches automatically ignore accents.
Import/Export
Legacy import/export handling
If enabled, legacy (pre 2.1.55) import / export code will be used. It is recommended to deactivate this option.
Syncing
This tab contains options related to syncing with AnkiWeb.
Synchronisation
Synchronize audio and images too
When enabled, media will also be synced with AnkiWeb.
Automatically sync on profile open/close
Disable this if you don't want an automatic sync with AnkiWeb when opening / closing a profile.
Periodically sync media
On next sync, force changes on one direction
When this option is enabled, the next sync will
ask you whether you wish to upload or download. This is useful if
you have made some changes accidentally, and wish to overwrite them
with an older version that is on AnkiWeb.
AnkiWeb Account
When logged in, clicking on Log Out will log you out.
Self-hosted Sync Server
For info on the custom sync server option, see this section.
Backups
Please see this section of the manual.
牌組選項 Deck Options
- Presets
- Subdecks
- Daily Limits
- 新卡片 New Cards
- 遺忘 Lapses
- Display Order
- Timer
- Auto Advance
- Burying
- Audio
- Advanced
- Custom Scheduling
Deck options primarily control the way Anki schedules cards. It is recommended that you spend a few weeks with the defaults to get a feel for how Anki works before you start adjusting options. Please make sure you understand the options before changing them, as mistakes could reduce Anki's effectiveness.
Deck options are accessed by:
- Clicking the gear icon on the
Decksscreen. - Selecting a deck on the
Decksscreen, and then clickingOptionsat the bottom of the screen. - Clicking on
More>Optionswhile in review mode. - Pressing
owhile in review mode.
This page describes the options shown in Anki 2.1.45+, when you have the v2 or v3 scheduler enabled. On older versions, some options will not be available, or will appear in a different section. Please keep in mind that the v1 scheduler is no longer supported in Anki 2.1.50+. If you have not yet updated to v2 or v3, you will be prompted to update when you attempt to review cards in 2.1.50+.
For more info on deck options, please check:
Presets
Anki allows you to share options between different decks, to make it easy to update options in many decks at once. To do this, options are grouped into presets. By default, all newly created decks use the same preset.
If you’d like to alter the settings on one deck but not other decks, click the arrow icon in the top right of the Deck Options window. The options are:
- Save: Saves all modifications you've made since opening the deck options screen.
- Add: Add a new preset, with the default options.
- Clone: Clone your current present, which is useful if you just want to modify certain options, keeping the rest as they are.
- Rename Changes the name of the current preset.
- Delete Deletes the current preset. This will require that the next sync is a one-way sync.
- Save to all subdecks. Like Save, but also assigns the selected preset to all subdecks of the currently selected deck.
- Optimize all presets. When FSRS is enabled, this allows you to optimize the parameters of all presets at once.
Deck Options are not retroactive. For example, if you change an option that controls the delay after failing a card, cards that you failed before changing the option will have the old delay, not the new one.
Subdecks
If your deck has subdecks, each deck can optionally be assigned a different preset. When Anki shows a card, it will check which subdeck the card is in, and use the options for that deck. There are some exceptions:
- The display order options in the v3 scheduler are taken from the deck you select to study, not the deck of the current card.
For example, let's say you have this collection:
- Deck A (Preset 1)
  - Deck A::Subdeck B (Preset 2)
    - Card B1
    - Card B2
Presets 1 and 2 are identical, with two exceptions:
- Preset 1:
- New Cards - Learning steps: 1m 10m
- Display Order - New/review priority: Mix with reviews
- Preset 2:
- New Cards - Learning steps: 20m 2h
- Display Order - New/review priority: Show after reviews
If you choose to study Deck A:
- All new cards will be mixed with reviews (preset 1 applies)
If you choose to study Subdeck B:
- All new cards will be shown after reviews (preset 2 applies)
Daily Limits
New Cards/Day
Controls how many new cards are introduced each day you open the program. If you study fewer than the limit, or miss a day, the next day the counts will be back to your limit - they do not accumulate.
When decks are nested (e.g Parent, Parent::Child, Parent::Child::Grandchild), the way the limits are applied depends on the scheduler version.
- v1 applies parent limits to children, regardless of which deck you click on
- v2 behaves similarly to v1 for new cards. For reviews, only the limits of the deck you click on are honored.
- v3 honors the limits of the deck you click on, and any decks inside it. Limits from parents above the deck you clicked on are ignored.
For more information, please see the v3 scheduler page.
Studying new cards will temporarily increase the number of reviews you need to do a day, as freshly learnt material needs to be repeated a number of times before the delay between repetitions can increase appreciably. If you are consistently learning 20 new cards a day, you can expect your daily reviews to be roughly about 200 cards/day. You can decrease the reviews required by introducing fewer new cards each day, or by turning off new card display until your review burden decreases. More than one Anki user has excitedly studied hundreds of new cards over their first few days of using the program, and then become overwhelmed by the reviews required.
Maximum Reviews/Day
Allows you to set an upper limit on the number of reviews to show each day. When this limit is reached, Anki will not show any more review cards for the day, even if there are some waiting. If you study consistently, this setting can help to smooth out occasional peaks in due card counts, and can save you from a heart attack when returning to Anki after a week off. When reviews have been hidden due to this option, a message will appear in the congratulations screen, suggesting you consider increasing the limit if you have time.
In the v3 scheduler and v1 schedulers, the counts are affected by parents/selected decks in the same way as new cards.
In the v2 scheduler, the limit is taken solely from the deck you select - any limits on its parents or child decks are ignored.
The v3 scheduler includes learning cards with a 1+ day delay in the review count, so those learning cards will be subject to the daily limit.
New Cards Ignore Review Limit
If using the v3 scheduler, please keep in mind that the new count is capped by the review count by default. If your review limit is set to 200, and you have 190 reviews waiting, a maximum of 10 new cards will be introduced. If your review limit has been reached, no new cards will be shown. If you have a backlog of reviews and still want to introduce new cards, you can do so by suspending the reviews, or increasing your review limit. That said, it is recommended you hold off on new cards until you catch up instead, as introducing more new cards when you're behind will only make the backlog worse.
From Anki 2.1.61 this feature is optional, and can be deactivated globally from the deck options screen.
Per-Deck Daily Limits
From version 2.1.55 it is possible to use the same preset for different decks / subdecks, with customized limits for each one of them. This eliminates the need to create cloned presets just for that purpose, and makes it easier to set custom limits on sub-decks when you have many nested decks.
The options are:
- Preset: The limit is shared with all decks using this preset.
- This deck: The limit is specific to this deck.
- Today only: Make a temporary change to this deck's limit.
新卡片 New Cards
The settings in this section only affect new cards and cards in initial learning mode. Once a card has graduated (i.e. there are no more learning steps for this card), it becomes a review card, and the settings in this section are no longer applicable.
學習階段 Learning Steps
Controls the number of learning repetitions, and the delay
between them. One or more delays, separated by spaces must be entered.
Each time you press Good during review, the card moves to the next step.
For example, let's say that your learning steps are 1m 10m 1d.
- When you press
Again, the card goes back to the first step, and will be shown again approximately 1 minute later. - When you press
Goodon a new card, or a card answeredAgain, it will move to the next step, and be shown again in approximately 10 minutes. - When you press
Goodon a card after the 10 minute step, it will be delayed until the next day. - When you press
Goodon the card the next day, it will leave learning (i.e. it will graduate), and become a review card. It will be shown again after the delay configured by the graduating interval.
If there’s nothing else to study, Anki will show cards up to 20 minutes early by default. The amount of time to look ahead is configurable in the preferences.
Please see the learning section for more info on how steps work.
Day Boundaries
Anki treats small steps and steps that cross a day boundary differently. With small steps, the cards are shown as soon as the delay has passed, in preference to other waiting cards like reviews. This is done so that you can answer the card as closely to your requested delay as possible. In contrast, if the interval crosses a day boundary, it is automatically converted to days.
Graduating Interval
The delay in days between answering "Good" on a learning card with no steps left, and seeing the card again as a review card. This means that it is the first interval after the learning card becomes a review card. Please see the example in the previous section.
「簡單」間隔 Easy Interval
The delay between answering Easy on a learning
card, and seeing it in review mode for the first time.
The Easy button immediately turns a learning card into a review card,
and assigns it the delay you have configured. It should always be at least
as long as the graduating interval, and typically a few days longer.
Insertion Order
控制要讓 Anki 隨機將新卡片放入牌組,還是按順序放入。 Controls whether Anki should add new cards into the deck randomly, or in order. When you change this option, Anki will re-sort the decks using the current Option Group. Cards with a lower due number will be shown first when studying, by default. Changing this option will automatically update the existing position of new cards.
One caveat with random order mode: if you review many of your new cards, and then add more new cards, the newly added material is statistically more likely to appear than the new cards that were already in the deck. For example, if you have 100 cards in random order, then review the first 50, newly added cards are still given position 1-100, but as you have already reviewed the first 50, the newly added cards are more likely to appear earlier. To correct this, you can change the order to Ordered mode and back again to force a re-sort.
When you select random order, Anki will randomize your notes, keeping the cards of a given note close together. The cards of a given note are shown in the order in which their card types appear, so that siblings are introduced consistently — otherwise you could end up in a state where some notes had all their cards introduced and other notes had only one or two. Please see the "bury related" and "display order" sections below for more info.
遺忘 Lapses
When you forget a review card, it is said to have 'lapsed', and the card must be relearnt. The default behaviour for lapsed reviews is to reset the interval to 1 (i.e. make it due tomorrow), and put it in the learning queue for a refresher in 10 minutes. This behaviour can be customized with the options listed below.
Relearning Steps
The same as 'learning steps', but for forgotten reviews. When you fail a card
(press Again), the card enters the relearning phase, and before it becomes a
review card again, you will have to pass all the relearning steps — or, press
Easy on the card.
If you leave the steps blank, the card will skip relearning, and will be assigned a new review delay.
Minimum Interval
Specifies a minimum number of days a card should wait after it finishes relearning. The default is one day, meaning once relearning is finished, it will be shown again the next day.
Leeches
Control the way Anki handles leeches. Please see the leeches section for more information.
Display Order
The options in this section are taken from the deck you select to study, not the deck of the currently displayed card.
This section is only available when you have the v3 scheduler enabled.
Some further information about display order is available in the studying section.
New Card Gather Order
Controls how Anki gathers cards from each subdeck. The options are:
-
Deck: gathers cards from each deck in order, starting from the top. Cards from each deck are gathered in ascending position. If the daily limit of the selected deck is reached, gathering may stop before all decks have been checked. This order is fastest in large collections, and allows you to prioritize subdecks that are closer to the top.
Decks / subdecks are always ordered alphabetically, so you can give them a numeric prefix like 001 to control the order they are shown. You can also use
_and~as a prefix to place items at the top or bottom.Although position order depends initially on the 'Insertion Order' setting above, you can manually reposition cards in different ways.
-
Deck, then random notes: gather cards from each deck in order, starting from the top. Cards from each deck are gathered randomly.
-
Ascending position: gather cards by ascending position (due #), which is typically the oldest-added first.
-
Descending position: gather cards by descending position (due #), which is typically the latest-added first.
-
Random notes: gather cards of randomly selected notes. When sibling burying is disabled, this allows all cards of a note to be seen in a session (eg. both a front->back and back->front card)
-
Random cards: gather cards completely randomly.
New Card Sort Order
Controls how new cards are sorted after they have been gathered. The options are:
-
Card type: Displays cards in order of card type number. If you have sibling burying disabled, this will ensure all front→back cards are seen before any back→front cards. This is useful to have all cards of the same note shown in the same session, but not too close to one another.
-
Order gathered: Shows cards exactly as they were gathered. If sibling burying is disabled, this will typically result in all cards of a note being seen one after the other.
-
Card type, then random: Like Card type, but shuffles the cards of each card type number. If you use Ascending position to gather the oldest cards, you could use this setting to see those cards in a random order, but still ensure cards of the same note do not end up too close to one another.
-
Random note, then card type: Picks notes at random, then shows all of their siblings in order.
-
Random: Fully shuffles the gathered cards.
New/Review Priority
Whether new cards should be mixed in with reviews, or shown before or after them.
Interday Learning/Review Priority
Whether learning cards with a 1+ day delay should be mixed in with reviews, or shown before or after them. Because learning cards tend to be harder than reviews, some users prefer to see them at the end (getting the easy stuff done first), or at the start (allowing more time to review forgotten ones).
牌組選項 Review Sort Order
Controls how review cards are sorted while reviewing. The options are:
-
Due date, then random: The default option prioritizes cards that have been waiting longer, and it's the recommended option when you are up to date, or when you only have a small backlog. If you have taken an extended break or have fallen behind in your reviews, you may want to consider changing the sort order temporarily.
-
Due date, then deck. This also prioritizes cards that have been waiting longer, and then will show reviews for each subdeck in turn.
-
Deck, then due date: This option will ensure reviews are shown for each subdeck in turn. This is generally not recommended, as having material appear consistently in the same order makes it easier to guess the answer based on context, and may lead to weaker memories.
-
Ascending intervals: This will ensure cards with shorter intervals are shown first.
-
Descending intervals: This will ensure cards with larger intervals are shown first.
-
Ascending ease: This will show most difficult cards first.
-
Descending ease: This will allow you to work through the easier material first.
-
Relative overdueness: Display cards that you're most likely to have forgotten first. This is useful if you have a large backlog that may take some time to get through, and you want to reduce the chances of forgetting more cards.
When using the SM-2 scheduler, overdueness is determined by comparing how overdue cards are, and how long their interval is. For example, a card with a current interval of 5 days that is overdue by 2 days, will display before a card with a current interval of 10 days that is overdue by 3 days.
When using FSRS, overdueness is calculated based on on each card's retrievability, and the desired retention in the deck preset.
Timer
Anki monitors how long it takes you to answer each card, so that it can show you how long was spent studying each day. The time taken does not influence scheduling.
The options are:
- Maximum answer seconds: The default limit is 60 seconds. If you take longer than that, Anki assumes you have walked away from your computer or have been distracted, and limits the recorded time to 60 seconds, so that you don’t end up with inaccurate statistics. If you consistently take longer than 60 seconds to answer a card (from when question is shown until you press an answer button), you may want to either consider raising this limit, or, ideally, making your cards simpler.
- Show answer timer: In the review screen, show a timer that counts the number of seconds you're taking to review each card.
- Stop timer on answer: whether the timer should keep running when you show the answer.
Auto Advance
Requires Anki 23.12 or later. Auto Advance allows you to automatically reveal
the answer and/or move to the next card. To use it, you must first set a non-zero
time in "seconds to show question" and/or "seconds to show answer". Then, in the
review screen, use the Auto Advance action from the More button to start advancing.
Burying
When Anki gathers cards, it first gathers intraday learning cards, then interday learning cards, then reviews, and finally new cards. This affects how burying works:
- If you have all burying options enabled, the sibling that comes earliest in that list will be shown. For example, a review card will be shown in preference to a new card.
- Siblings later in the list can not bury earlier card types. For example, if you disable burying of new cards, and study a new card, it will not bury any interday learning or review cards, and you may see both a review sibling and new sibling in the same session.
The options are:
- Bury new siblings: whether other new cards of the same note (e.g., reverse cards, adjacent cloze deletions) will be delayed until the next day.
- Bury review siblings: whether other review cards of the same note will be delayed until the next day.
- Bury interday learning siblings: whether other learning cards of the same note with intervals >= 1 day will be delayed until the next day.
For more info about burying cards, please see this section of the manual.
Audio
By default, Anki automatically plays audio on the front and back of
cards. If you check Don't play audio automatically, Anki will not play
audio until you press the replay audio key, r or F5.
Always include question side when replaying audio controls whether audio from the question side should be played when replaying the audio while an answer is shown. Please note that it does not control what happens when you show the answer; for that please see this section.
Advanced
FSRS
The Free Spaced Repetition Scheduler (FSRS) is an alternative to Anki's legacy SuperMemo 2 (SM2) scheduler. By more accurately determining when you are likely to forget, it can help you remember more material in the same amount of time. This setting is shared by all deck presets.
When you enable the setting, some new options will become available, and SM-2 specific settings, such as "Graduating interval", "Easy bonus", etc, will be hidden.
Before Enabling
- Please ensure all of your Anki clients support FSRS. Anki 23.10, AnkiMobile 23.10, and AnkiWeb all support it. AnkiDroid supports it in 2.17alpha3+. If one of your clients doesn't support it, things will not work correctly.
- If you previously used the 'custom scheduling' version of FSRS, please make sure you clear out the custom scheduling section before enabling FSRS.
FSRS Options
Desired Retention
Desired retention controls how likely you are to remember cards when they are reviewed. The default value of 0.9 will schedule cards so you have a 90% chance of remembering them when they come up for review again.
Here is a graph that shows how adjusting this value will affect your workload:
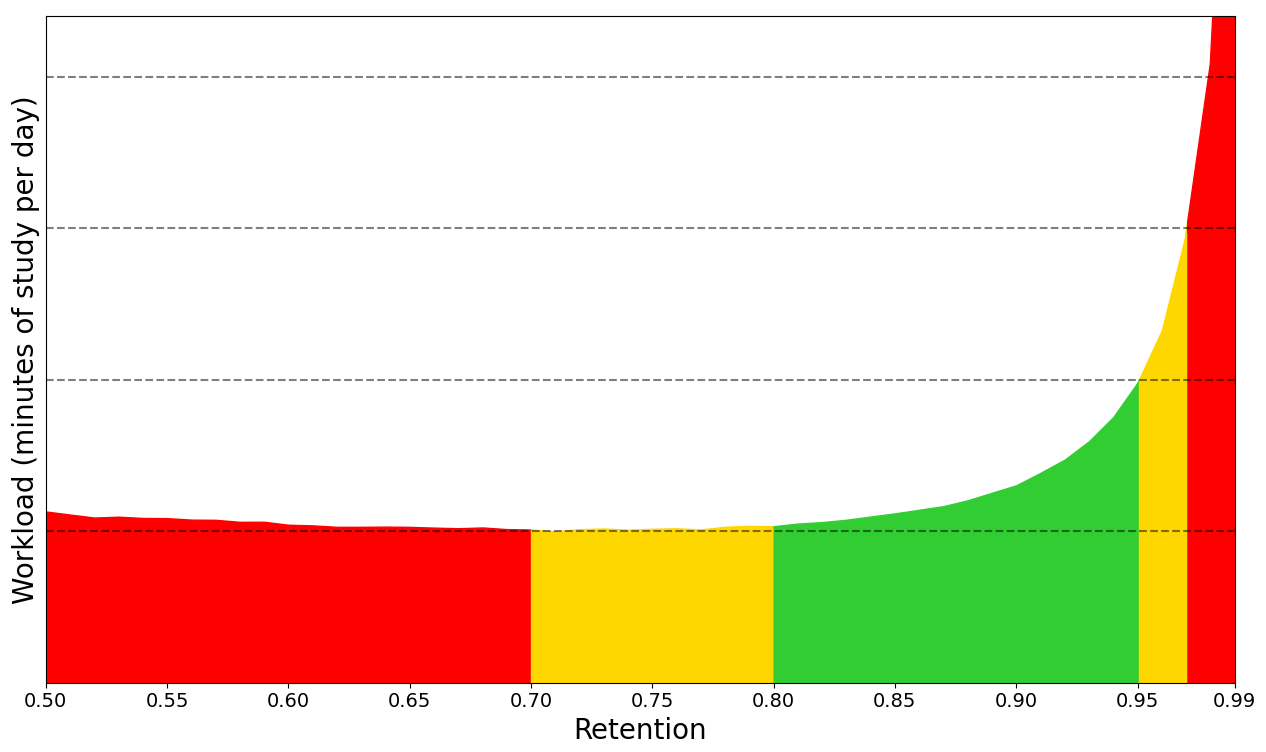
There are two things to notice:
-
As desired retention approaches 1.0, the frequency that you need to review cards increases drastically. For example, imagine you have a card that you have a 90% chance of remembering after 100 days. If your desired retention was 0.95, you'd need to review it after 47 days instead (approximately twice as frequently). At 0.97, the delay would be only 27 days (approximately 3.7x as frequently). At 0.99, you'd be reviewing every 9 days (more than 10x what you'd be doing with the defaults).
-
As desired retention decreases, you'll forget a greater percentage of your cards, and those cards will need to be reviewed again. Eventually, you'll get to a point where the forgotten cards contribute more to your workload than you gain from the longer delays, which is why you see the workload on the left of the graph increasing. Also, bear in mind that forgetting material frequently is demotivating.
For these reasons, we suggest you be conservative when adjusting this number, and recommend you keep it between 0.85 and 0.95.
SM-2 retention
If your actual retention before switching to FSRS was significantly different from 0.9, adjusting this value will allow Anki to better estimate your memory state when it encounters cards that are missing review logs. Since review logs typically won't be missing unless you explicitly deleted them to free up space, most users will not need to adjust this.
FSRS parameters
FSRS parameters affect how cards are scheduled. They are not intended to be manually modified. Once you've accumulated 1000+ reviews, you can have Anki optimize the parameters for you, based on your review history.
Reschedule cards on change
This option controls whether the due dates of cards will be changed when you enable FSRS, or change the parameters. The default is not to reschedule cards: future reviews will use the new scheduling, but there will be no immediate change to your workload. If rescheduling is enabled, the due dates of cards will be changed, often resulting in a large number of cards becoming due, so activating this option is not recommended when first switching from SM2.
If you wish to visualize how FSRS would change your schedule without altering your workload, there are two ways you can do so:
- Enable FSRS without rescheduling, and compare the interval and stability graphs. The interval graph will show the current intervals of cards; the stability graph will show the intervals FSRS would give cards if the desired retention is 0.9.
- Create a backup, enable FSRS with rescheduling, check the future due graph, and then undo or restore from the backup.
Optimize FSRS parameters
The FSRS optimizer uses machine learning to learn your memory patterns and find parameters that best fit your review history. To do this, the optimizer requires several reviews to fine-tune the parameters.
If you have less than 1,000 reviews, you can use the default parameters that are already entered into the "FSRS parameters" field. Even with the default parameters, FSRS should work well for most users.
Once you've done 1000+ reviews in Anki, you can use the Optimize button to
analyze your review history, and automatically generate parameters that are
optimal for your memory and the content you're studying. Parameters are
preset-specific, so if you have decks that vary wildly in difficulty, it
is recommended to assign them separate presets, as the parameters for easy
decks and hard decks will be different. There is no need to optimize your
parameters frequently - once every few months is sufficient.
By default, parameters will be calculated from the review history of all decks using the current preset. You can optionally adjust the search before calculating the parameters, if you'd like to alter which cards are used for optimizing the parameters.
You can optimize the parameters for all of your presets at once, by clicking on the down arrow in the top right, then choosing "Optimize all presets".
Evaluate FSRS parameters
You can use the Evaluate button in the "Optimize FSRS parameters"
section to see metrics that show how well the parameters in the
"Model parameters" field fit your review history. Smaller numbers
indicate a better fit to your review history.
Log-loss doesn't have an intuitive interpretation. RMSE (bins) can be interpreted as the average difference between the predicted probability of recalling a card (R) and the measured (from the review history) probability. For example, RMSE=5% means that, on average, FSRS is off by 5% when predicting R.
Note that log-loss and RMSE (bins) are not perfectly correlated, so two decks may have similar RMSE values but very different log-loss values, and vice-versa.
Compute optimal retention
This experimental tool assumes you're starting with 0 cards, and will attempt to calculate the amount of material you'll be able to retain in the given time frame. The estimated retention will greatly depend on your inputs, and if it significantly differs from 0.9, it's a sign that the time you've allocated each day is either too low or too high for the amount of cards you're trying to learn. This number can be useful as a reference, but it is not recommended to copy it into the desired retention field.
Learning and Re-learning Steps
(Re)learning steps of 1+ days are not recommended when using FSRS. The main
reason they were popular with the old SM-2 scheduler is because repeatedly
failing a card after it has graduated from the learning phase could reduce
its ease a lot, leading to what some people called "ease hell". This is not
a problem that FSRS suffers from. By keeping your learning steps under a
day, you will allow FSRS to schedule cards at times it has calculated are
optimum for your material and memory. Another reason not to use longer
learning steps is because FSRS may end up scheduling the first review for a
shorter time than your last learning step, leading to the Hard button
showing a longer time than Good.
We also recommend you keep the number of learning steps to a minimum. Evidence shows that repeating a card multiple times in a single day after you've remembered it does not significantly help with memory, so your time is better spent on other cards or a shorter study session
Add-On Compatibility
Some add-ons can cause conflicts with FSRS. As a general rule of thumb, if an add-on affects a card's intervals, it shouldn't be used with FSRS. A list of commonly used add-ons and their FSRS compatibility can be found in Add-on Compatibility.
More
For more info on FSRS, please check:
Maximum Interval
Allows you to place an upper limit on the time Anki will wait to reshow a card. The default is 100 years; you can decrease this to a smaller number if you’re willing to trade extra study time for higher retention.
起始輕鬆度 Starting Ease
Controls the easiness that cards start out with. It is
set when a card graduates from learning for the first time. It defaults
to 2.50, meaning that once you have finished learning a card, answering
Good on subsequent reviews will increase the delay by approximately
2.5x (e.g. if the last delay was 10 days, the next delay would be around 25
days). Based upon how you rate the card in subsequent reviews, the
easiness may increase or decrease from its starting value.
Easy Bonus
An extra multiplier applied to the interval when a review card is answered
Easy. With the default value of 1.30, Easy will give an interval that is
1.3 times the Good interval (e.g. if the Good interval was 10 days, the Easy
interval would be around 13 days).
Interval Modifier
An extra multiplier that is applied to all reviews. At its default of 1.00 it does nothing. If you set it to 0.80, though, for example, intervals will be generated at 80% of their normal size (so a 10 day interval would become 8 days). You can thus use the multiplier to make Anki present cards more or less frequently than it would otherwise, trading study time for retention or vice versa.
For moderately difficult material, the average user should find they remember approximately 90% of mature cards that come up for review. You can find out your own performance by opening the graphs/statistics for a deck and looking at the Answer Buttons graph - mature retention is the correct% on the right side of the graph. If you haven’t been studying long, you may not have any mature cards yet. As performance with new cards and younger cards can vary considerably, it’s a good idea to wait until you have a reasonable amount of mature reviews before you start drawing conclusions about your retention rate.
On the SuperMemo website, they suggest that you can find an appropriate multiplier for a desired retention rate. Their formula boils down to:
log(desired retention%) / log(current retention%)
Imagine we have a current retention rate of 85% and we want to increase it to 90%. We’d calculate the modifier as:
log(90%) / log(85%) = 0.65
You can use Google to calculate it for you.
If you plug the resulting 65% into the interval modifier, you should find over time that your retention moves closer to your desired retention.
One important thing to note however is that the trade-off between time spent studying and retention is not linear: we can see here that to increase our retention by 5 percentage points, we would have to study 35% more frequently. If the material you are learning is very important then it may be worth the extra effort – that is, of course, something you will need to decide for yourself. If you are simply worried that you are forgetting too much, then you may find investing more time at the initial learning stage and/or using mnemonics will give you more gain for less effort.
One final thing to note is that Anki forces a new interval to be at least 1 day longer than it was previously, so that you do not get stuck reviewing with the same interval forever. If your goal is to repeat a card once a day for multiple days, you can do that by setting more learning mode steps, instead of by adjusting this modifier.
「困難」間隔 Hard Interval
The multiplier used when you use the Hard button. The percentage is relative
to the previous interval: e.g. with a default of 1.20, a card with a 10-day interval
will be given 12 days.
New Interval
The multiplier used when you use the Again button on a review card. The
default 0.00 means that a review card's delay is reset to zero when you forget it
(which then becomes 1 day after the minimum interval is
applied).
If changed from the default, it is possible for forgotten cards to preserve part of their previous delay. For example, if a card had a 100 day interval, and you set the New Interval to 0.20, the new interval would be 20 days.
While preserving part of the interval may seem to make sense, SuperMemo has observed
that preserving part of the delay can actually be counter-productive. For this reason, we recommend you leave it on the default setting.
Custom Scheduling
Please see this page.
Syncing with AnkiWeb
- Intro Videos
- Setup
- Automatic Syncing
- Button Color
- Media
- Conflicts
- Merging Conflicts
- Firewalls
- Proxies
AnkiWeb is a service that allows you to keep your collection synchronized across multiple devices, and to study online. Please sign up for a free account before following the steps below.
Intro Videos
For a quick introduction to syncing, please check out the syncing intro videos.
Setup
To start syncing your collection across devices, click the sync button (the top right one on the main screen, or press 'y' on your keyboard. You’ll be prompted for your AnkiWeb ID and password, which you created in the signup process.
When you synchronize your collection for the first time, Anki will ask you if you want to upload or download. If you have cards on your computer and your AnkiWeb account is empty, choose "upload" to send your data to AnkiWeb. If you have cards on AnkiWeb from another device, and no cards on your computer, choose "download" to replace the empty local collection with the cards that are on AnkiWeb. If you have different cards on both devices, more work is required to avoid losing data.
Once the initial one way sync is completed, Anki will be able to merge changes from multiple locations with a few exceptions.
If you have multiple people using Anki on one machine and have created a profile for each user, each user will need to create their own AnkiWeb account to sync with. If you attempt to synchronize multiple profiles with a single AnkiWeb account, you will lose data.
Automatic Syncing
Once syncing is enabled, Anki will automatically sync each time your collection is closed or opened. If you would prefer to synchronize manually, you can disable automatic syncing in Anki’s preferences.
Button Color
The sync button will change to blue when a normal sync is required, and red when a full sync is required.
Media
Related video: https://www.youtube.com/watch?v=phP9GGG-PxY
Anki will synchronize any sounds and images used by your notes. It will notice when media has been added, removed or replaced in your media folder, but will not notice if you have made edits to existing files. To get your edits synced, you need to add, remove or replace a file as well.
One-way syncs (where you're prompted to upload or download) have no influence over how media syncs - media changes are always merged.
To prevent accidental data loss, deletions will only sync to other devices if they are made after media is fully in sync. If you delete files before your device is fully in sync, and the deleted files are already on AnkiWeb, they will be downloaded the next time you sync.
If you have accidentally deleted media files, and want to restore them, open the preferences and log out. The next time you sync, Anki will restore any deleted files, if they are available on AnkiWeb still.
If you’re running Anki off a USB flash drive, you should use an NTFS file system, as Anki may not be able to detect media changes on a FAT32 filesystem.
Conflicts
Related video: https://www.youtube.com/watch?v=UEAcpfMQnjo
Under normal circumstances, reviews and note edits can be merged, so if you review or edit on two different devices before syncing, Anki will preserve your changes from both locations. If the same card has been reviewed in two different locations, both reviews will be marked in the revision history, and the card will be kept in the state it was when it was most recently answered.
There are certain changes that Anki is unable to merge. These mainly relate to the format of notes: things like adding a new field, or removing a card template. When you perform an operation that can’t be merged, Anki will warn you, and give you the option of aborting the operation. If you choose to continue, you’ll be asked to choose whether to keep the local copy or the copy on AnkiWeb when your collection is next synchronized.
If certain problems are detected while syncing, it will also force a one way sync. If you find this consistently happens, please post on our support site.
When a one way sync is required, you need to choose whether you wish to keep the collection on your local device, or the collection on AnkiWeb. If changes have been made on both ends, only changes on one end can be preserved.
If you choose Upload, the content on your local device will be sent to AnkiWeb. You then need to sync your other devices, and choose "Download" to have them grab a copy of that content.
If you choose Download, it will replace any local changes you’ve made with the data that is on AnkiWeb.
Once all devices are in sync, future syncs will return to the normal behaviour of merging changes from both ends.
If you wish to force a full upload or download (for example, because you accidentally deleted a deck on one side and want to restore the deck rather than having its deletion synchronized), you can check the "On next sync, force changes in one direction" box in Tools>Preferences>Network, then sync as usual. (You’ll be given the option to choose which side you want to use.)
Forcing a one way sync only affects card syncing - media is synced as normal. If you have files that you want to remove from AnkiWeb, please ensure your client is fully in sync first. After syncing is up to date, any files you remove (e.g via the Check Media function) will be removed from AnkiWeb on the following sync.
Merging Conflicts
Because the first sync can only sync changes in one direction, if you have added different content to different devices or profiles before setting syncing up, content on one device will be lost if you overwrite it with the content from the other device. With some work, it is possible to manually merge data into a single collection.
Start by taking a backup on each device/profile, in case something goes wrong. With the computer version you can use File>Export to export "all decks" with scheduling information and media files included, and save the file somewhere safe. In AnkiMobile, the Add/Export button on the decks list screen will let you export all decks with media.
Next, if one of your devices is a mobile device, synchronize it first. If there’s a conflict, choose "upload" to overwrite any existing data on AnkiWeb with the data from your mobile device. If both devices/profiles are on your computer, synchronize the device/profile with the most number of decks first.
Now return to the other device/profile. If automatic syncing is enabled, a message may pop up asking if you want to upload or download. Click the cancel button - we don’t want to sync yet.
Once you’re looking at the deck list, click the cog icon next to the first deck, and choose "export". Export the content with scheduling information and media included, and save the .apkg file somewhere. Now you’ll need to repeat this for each top-level deck.
Once all top-level decks have been exported, click the sync button at the top right, and choose "download", which will overwrite the local content with the content you synced from your other device.
You can now use File>Import to import the .apkg files you exported earlier, which will merge the exported content with the existing content, so everything will be in one place.
Firewalls
Anki needs to be able to make outbound HTTPS connections to sync. It must be able to connect to ankiweb.net, sync.ankiweb.net, sync2.ankiweb.net, and so on. These domains may change over time, and the IP addresses they point to may also change, so we recommend you allow wildcard access to *.ankiweb.net to reduce the chance of the firewall rules needing to be updated in the future.
If you have a firewall on your machine, you should add an exception for Anki. If you are on a work or school network, please contact your network administrator for assistance - it is not something we can help you with.
Proxies
If you need a proxy to access the internet, Anki should automatically pick up your system proxy settings if you’re on Windows or macOS, and will honour the HTTP_PROXY environment variable if you’re on another platform.
Anki will only be able to pick up your system settings if a proxy is manually configured, and does not require a password. If your system uses automatic proxy setup, or uses a proxy that requires a username and password, you will need to manually tell Anki the proxy configuration.
To tell Anki your proxy settings, define a HTTPS_PROXY environmental variable that points to the proxy server. It will look like:
http://user:pass@proxy.company.com:8080
If your username or password contains an @ (e.g user@workdomain.com),
you need to change it to %40, like so:
http://user%40workdomain.com:pass@proxy.company.com:8080
Anki 2.0 expects to find HTTP_PROXY instead of HTTPS_PROXY.
To set environmental variables on Windows, please see https://www.google.com/search?q=windows+set+environmental+variable
If you’re on a Mac, please see http://stackoverflow.com/questions/135688/setting-environment-variables-in-os-x
Heavily locked down networks that intercept secure connections and present their own certificates may cause Anki to throw up SSL errors. In such environments, you may be able to work around the errors using this add-on.
An alternative solution is to install a local proxy server, and point that proxy server at your normal proxy server. You can then tell Anki to use the local proxy, which will redirect requests to the proxy you normally use.
設定檔 Profiles (英文)
如果有多人要在同一台電腦上使用 Anki,各個使用者可以自己建立一個設定檔。各設定檔的集合和程式設定互不影響,但會共用安裝的附加元件。你可以在「檔案」選單中選擇「切換設定檔」來管理設定檔。
一個 AnkiWeb 帳號只能同步一個設定檔 當電腦上有多個設定檔時,每位使用者需要自己建立一個 AnkiWeb 帳號。若試圖同步多個設定檔至同一 AnkiWeb 帳號,其中一個設定檔的資料將被另一個設定檔覆寫。
設定檔主要用於有多位使用者的情況,不建議自己一個人使用多個設定檔。如果你已經這麼做了,建議透過匯出/匯入選項來合併設定檔。
AnkiDroid 不支援使用設定檔。
設定檔視窗 Profiles window
在設定檔視窗裡 (主視窗中點選「檔案」>「切換設定檔」),你可以:
- 打開/新增/重新命名/刪除設定檔。
- 退出程式。
- 使用自動備份來回復內容。
- 為集合降級,降級後方可在較舊的 Anki 版本中打開。若未降級就安裝了舊版 Anki,在打開集合時可能會出現錯誤訊息,此時你將需要重新安裝原來的 Anki 版本,為集合降級,然後再試一次。
Browsing
- Table Modes
- Sidebar
- Search Box
- 卡片/筆記表格 Card/Note Table
- Editing Area
- Menus and Actions
- Find and Replace
- Finding Duplicates
The Browse window allows you to search through your cards and notes, and edit them. It is opened by clicking Browse in the main window, or by pressing B. It is comprised of three sections: the sidebar on the left, the card/note table on the top right, and the editing area on the bottom right. By positioning the mouse between two sections, it is possible to click and drag to expand one section and shrink the other.
Table Modes
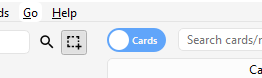
Anki 2.1.45+ offers two modes: either cards or notes are shown in the data table. You can change the current mode by clicking the switch at the top, to the left of the search area, or pressing Ctrl+Alt+T or Cmd+Opt+T. The switch also indicates if Cards or Notes are currently shown.
Note: For the sake of simplicity, this manual generally assumes the Cards mode to be the active one. Whenever selecting/finding/etc. "cards" is mentioned, the reader may substitute it for "cards or notes depending on the active mode".
Sidebar
The sidebar on the left allows quick access to common search terms. On Anki 2.1.45+, it also provides a searchbar, facilities to edit tags and decks, and a choice of two different tools, which are discussed in the following sections. You can switch tools using the toolbar at the top of the sidebar or the shortcuts Alt+1/2.
Search Tool

With this tool, the sidebar behaves as in previous versions: Clicking on an item will search for it.
You can hold down Ctrl (Command on Mac) while clicking in order to append the clicked item to the current search with an AND condition, instead of starting a new search. If you wanted to show learning cards that were also in the German deck for instance, you could click on "Learning", then Ctrl-click on "German".
You can hold down Shift to create an OR search instead of an AND. For example, you could click one deck, then Shift-click another to show cards from either of the decks in the same view.
You can hold down Alt (Option on Mac) in order to reverse the
search (prepend a -): for example, to show all cards in a current deck that
do not have a certain tag. Alt/Option can be combined with
either Ctrl or Shift (e.g. clicking with Ctrl+Alt
will result in adding a new search term that is negated).
On Anki 2.1.39+, you can also hold down both Ctrl and
Shift together when clicking a search term to replace all occurrences of the
same kind of search with the new one.
Let's say you had previously typed in a complicated search expression like
deck:Swahili (is:due or tag:important)
and now want to perform the same search for your Urdu deck. You can hold down
Ctrl+Shift while clicking the Urdu deck in the sidebar to obtain the
following search expression:
deck:Urdu (is:due or tag:important).
Selection Tool
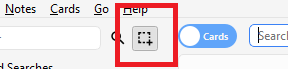
The Selection tool allows for selecting multiple items at the same time by holding down Ctrl or Shift while clicking. It also enables drag-and-drop to reorder decks and tags.
Here is an example: Say you have the tags Math, Calculus, and Algebra.
Click on the Calculus tag, then Ctrl-click on the Algebra tag. Now both
tags are selected, click and drag any of the two onto the Math tag to make them
both children of this tag. Behind the scene, Anki has renamed the two tags to
Math::Calculus and Math::Algebra respectively and updated your notes accordingly.
Another use case for selecting multiple items is searching: If you right-click on a selection of items, you can choose Search > All/Any Selected. This can be combined with keyboard modifiers as described in Search Tool to append the resulting search to the current search.
Saved Searches
If you regularly search for the same thing, you can save the current search by right-clicking the topmost item in the sidebar, choosing “Save Current Search” and typing in a name. You can also drag and drop any sidebar item onto this area to add an equivalent saved search, effectively pinning it at the top.
Editing Items
You can delete or rename tags, decks, and saved searches directly from the sidebar, from the right-click menu, or by using a shortcut key (Del and F2 on Windows). Deletion even works for multiple items at once (see Selection Tool).
Finding Items
To find a certain item in the sidebar tree, type part of its name into the searchbar at the top to temporarily hide all items not matching the search.
Search Box
Above the card list is a search box. You can type in various things there to search for cards. For information on the search syntax, see Searching.
卡片/筆記表格 Card/Note Table
The table's rows represent cards or notes that match the current search. When you click on a row, the corresponding note will be shown in the bottom section.
Rows
If you drag the mouse or hold Ctrl or Command to select multiple rows, the editor will be temporarily hidden. Various operations (such as changing the deck) can operate on multiple cards or notes at once, independent of the active mode. Therefore in Cards mode, a note is considered to be selected if any of its cards is selected, and in Notes mode, a card is considered to be selected if its note is selected.
Other operations (like showing card information) only operate on a single card or note. This is called the current card or note, which is usually the one that was last selected or clicked. In Cards Mode, again, the current note is the note of the current card and in Notes mode, the current card is the first card of the current note.
The background colour will change depending on the card and note. In Cards mode, the first match will be used:
- if the card is flagged, use the flag colour,
- if the card is suspended, yellow,
- if the card's note is marked, purple.
In Notes mode, colour is only applied to marked notes.
For more information about marked notes and suspended cards, see Editing and More.
Columns
The columns are configurable: right click on one (or Ctrl-click on a Mac) to choose which columns you'd like to see. You can drag columns to reorder them. Clicking on a column will sort by that column; click again to reverse the sort order. Note that you cannot sort by the Question and Answer columns.
All columns are available for both Cards and Notes mode but sometimes with slightly different names and data. The following table lists the behaviours for both modes.
| Column | Cards mode | Notes mode |
|---|---|---|
| Answer | The back side of the card in one line with the question stripped. You can also choose a custom format in the card type editor instead. | The same as in Cards mode, only for the first card of the note. |
| Card(s) | The name of the card's template. | The number of cards the note has. |
| Card Modified | The last time changes were made to the card (e.g. when you reviewed the card and the review history and interval were updated). | The last time changes were made to one of the note's cards. |
| Created | The same as in Notes mode for the card's note. | The date the note was created. |
| Deck | The name of the deck the card is in. | The number of different decks the note's cards are in, or the deck name if all cards are in the same deck. |
| Due | The due date for cards in review or (re)learning, and the position in the new card queue for new cards. The line is wrapped in brackets if the card is suspended or buried. Sorting is done by type and only then by date or position. | The due date for the note's next due review or (re)learning card that is not suspended, buried or in a filtered deck. |
| (Avg.) Ease | The card's ease if it is not new. | The average ease for the note's cards that are not new. |
| (Avg.) Interval | The card's interval if the card is in review or relearning. | The average interval for the note's cards that are in review or relearning. |
| Lapses | How often the card was rated “Again”. | The total lapses for all cards of the note. |
| Note | The same as in Notes mode for the card's note. | The name of the note's notetype. |
| Note Modified | The same as in Notes mode for the card's note. | The last time the note (e.g. the content of a field) was edited. |
| Question | The front side of the card in one line. You can also choose a custom format in the card type editor instead. | The same as in Cards mode, only for the first card of the note. |
| Reviews | How often the card has been reviewed. | The total review count for all cards of the note. |
| Sort Field | The same as in Notes mode for the card's note. | The content of the note's field that is defined as the notetype's sort field. Only this one field can be displayed and sorted by. You can change the sort field by clicking Fields... in the editing area. |
| Tags | The same as in Notes mode for the card's note. | The note's tags. |
Editing Area
The bottom right area displays the note of the currently selected row. For more information about cards and notes, see Getting Started. For more information on formatting buttons, see Editing.
You can see a preview of what the currently selected card would look like when reviewing by clicking the Preview button at the top of the editing area. Note that this will not display any type-the-answer fields on your cards, which makes it easier to preview the cards quickly. In Notes mode, the preview is shown for the first card of the selected note.
Menus and Actions
At the top of the browser window, you find a toolbar with various menus which in turn offer various actions that can be performed in the browser.
Edit
| Name | Action |
|---|---|
| Undo | Revert the most recently performed operation. |
| Select All | Select all rows displayed. |
| Select Notes | Show only the currently selected notes and select all rows. |
| Invert Selection | Select those rows not selected, and deselect the currently selected rows. |
| Create Filtered Deck | Show the filtered deck dialog and set the current browser search as a filter. Use Alt / Option to set the second filter instead (requires scheduler version 2+). |
Notes
Most of the following actions operate on the selected notes. They are also available through a context menu when a selected row is right-clicked in Notes mode. In Cards mode, they can be found in a submenu of the context menu.
| Name | Action |
|---|---|
| Add Notes | Open the Add dialog. |
| Create Copy | Open a duplicate of the current note in the editor, which can be slightly modified to easily obtain variations of your cards. By default, the duplicate card will be created in the same deck as the original. |
| Export Notes | Open the Export dialog. |
| Add Tags | Add provided tags to all selected notes. |
| Remove Tags | Enter tags and remove them from all selected notes. |
| Clear Unused Tags | Remove all tags from the sidebar that are not used by any notes. |
| Toggle Mark | If the current note is marked (i.e., has the Marked tag), unmark all selected notes. If the current is not marked, mark all selected notes. |
| Change Note Type | Convert the selected notes from one type to another. For example, imagine you have a Russian notetype and a Computer notetype, and you accidentally added some computer-related text into a Russian note. You can use this option to fix that mistake. The scheduling of cards is not affected. Changing the type of a note requires a one-way sync. |
| Find Duplicates | Open the Duplicates dialog. |
| Find and Replace | Open the Find and Replace dialog. |
| Manage Note Types | Open the Notetypes dialog. |
| Delete | Delete all selected notes and their cards. It is not possible to remove individual cards, as individual cards are controlled by the templates. |
Cards
The following actions operate on the currently selected cards. They are also available through a context menu when a selected row is rightclicked in Cards mode. In Notes mode, they can be found in a submenu of the context menu.
| Name | Action |
|---|---|
| Change Deck | Move currently selected cards to a different deck. |
| Set Due Date | Turns cards into review cards if they are new, and makes them due on a certain date. This can be useful for moving cards forward or back a few days when your study schedule is interrupted. Entering a range like 60-90 will make the selected cards due between 60 and 90 days from now. New cards will have their interval set to the same delay, but review cards will be rescheduled without changing their current interval, unless an exclamation mark (!) is included at the end of the range. Note that the answer time is not recorded when manually scheduling cards, since the action can be performed even outside of review, and Anki isn't aware of which card may or may not be shown at the time. |
| Reset | Move currently selected cards to the end of the new queue. The existing review history is preserved. In 2.1.50+, there are options to restore the original card position, and to reset the card's lapse and repetition counters. |
| Reposition | Change the order new cards will appear in. You can find out the existing positions by enabling the due column, as described in the table section above. If you run the reposition command when multiple cards are selected, it will apply increasing numbers to each card in turn. By default the number increases by one for each card, but this can be adjusted by changing the "step" setting. The Shift position of existing cards option allows you to insert cards between currently existing ones, pushing the currently existing ones apart. For instance, if you have five cards and you want to move 3, 4, and 5 between 1 and 2, selecting this setting would cause the cards to end up in the order 1, 3, 4, 5, 2. By contrast, if you turn this option off, 1 and 2 will get the same position number (and it will thus be unpredictable which of the cards with the same number comes up first). Please note that when enabled, any card with a higher position will be modified, and all of those changed cards will need to be sent the next time you sync. |
| Toggle Suspend | Suspend or unsuspend all selected cards, depending on whether the current card is suspended or not. |
| Flag | Toggle the flags of all selected cards. Whether a flag is added or removed depends on whether the current card has the chosen flag. |
| Info | Show various information about the current card, including its review history. For more information, see Card Info. |
Go
This menu exists to provide keyboard shortcuts to jump to various parts of the browser, and to go up and down the card list.
Find and Replace
This dialog allows for replacing text on notes. As described above, it is available from the toolbar and the table's context menu.
The first input field is for the text that is going to be replaced, the second one for the replacement. Next, there is a dropdown menu that allows you to specify where Anki should look for text to replace: in a note's tags (requires Anki 2.1.45+), in all fields, or just in a specific field (only fields belonging to a selected note will be listed).
By default, only selected notes will be affected. If you want to lift that restriction, you can untick the "selected notes only" checkbox (requires Anki 2.1.45+).
The regular expression option allows you to perform complex replacements. For example, assume there is the following text in a field:
<img src="pic.jpg" />
We use these settings:
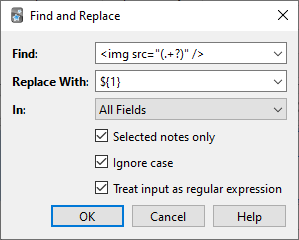
(Note that on Anki versions prior to 2.1.28, you would need to replace ${1}
with \1.)
Then the assumed field content will change to:
pic.jpg
A full discussion on regular expressions is outside the scope of this document. There are a number of syntax guides available on the web:
- For Anki 2.1.28+, see https://docs.rs/regex/latest/regex/index.html#syntax.
- For older Anki versions, see http://docs.python.org/library/re.html.
Finding Duplicates
You can use the Notes > Find Duplicates option to search for notes that have the same content. When you open the window, Anki will look at all of your note types and present a list of all possible fields. If you want to look for duplicates in the Back field, you’d select it from the list and then click Search.
By default, it will search in all note types that have the field you provided. This differs from the duplicate check when you add cards manually, which is limited to a single note type.
The Optional filter text box allows you to narrow down where Anki will look for duplicates. If you only want to search for duplicates in the "French Vocab" and "French Verbs" note types, you would enter:
"note:french vocab" or "note:french verbs"
Or you might want to look only for duplicates in a particular deck, so you could use:
"deck:myDeck"
The search syntax is the same as used when searching in the browser. For more information, see Searching.
You can click one of the links in the search results list to display the duplicate notes in that set. If the search brings up a large number of duplicates, you may wish to instead click the Tag Duplicates button, which will tag all matching notes with duplicate. You can then search for this tag in the browser and handle them all from the same screen.
Filtered Decks & Cramming
- Custom Study
- Home Decks
- Creating Manually
- Order
- Steps & Returning
- Due Reviews
- Reviewing Ahead
- Rescheduling
- Catching Up
When you study a regular deck in Anki, only a limited number of cards are shown: the cards Anki thinks you are about to forget, and a daily limit of new cards. This is generally useful, as it ensures you don't spend more time studying than necessary. But sometimes it can be useful to step outside of these normal limits, such as when you need to review for a test, focus on particular material, and so on. To make this possible, Anki provides a different type of deck called a 'filtered deck'.
Filtered decks offer a lot of possibilities. They can be used for previewing cards, cramming cards before a test, studying particular tags, catching up on a backlog with a particular sort order, reviewing ahead of schedule, going over the day's failed cards, and more.
Custom Study
The easiest way to create a filtered deck is with the Custom Study button, which appears at the bottom of the screen when you click on a deck. It offers some convenient preset filters for common tasks like reviewing the cards that you have failed that day. It will create a filtered deck called "Custom Study Session" and automatically open it for you.
If an existing "Custom Study Session" deck exists, it will be emptied before a new one is created. If you wish to keep a custom study deck, you can rename it from the deck list.
Here is a summary of each of the options:
Increase today's new card limit
Add more new cards to the deck you are currently studying. Note that
unlike other options, this does 'not' create a new filtered deck, it
modifies the existing deck.
Increase today's review card limit
If not all reviews due today were shown because of the daily review limit,
this option allows you to show more of them. As with the new cards
option, this modifies the existing deck.
Review forgotten cards
Show all the cards, for which you've answered Again (1) within the number of days
you specify.
Review ahead
Show cards that will be due in the near future (the number of days you
specify). This is useful for working through some of your older cards
before a vacation, but it will not help with cards you have learnt
recently. Please see the reviewing ahead section
below for more info.
Preview new cards
Show cards that you have recently added, without converting them to
review cards as they are answered.
Study by card state or tag
Select a certain number of cards from the current deck to study. You can
choose to select new cards only, due cards only, or all cards; after you
click "Choose Tags", you can also limit the selected cards by tags. If
you wish to see all the cards in the deck (for instance, to study before
a big test), you can set the number of cards to more than the number of
cards in the deck.
Home Decks
When a card is moved to a filtered deck, it retains a link to the deck, from which it came. That previous deck is said to be the card's 'home deck'.
Cards automatically return to their home deck after they are studied in the filtered deck. This can be after a single review, or after multiple reviews, depending on your settings.
It is also possible to move all cards back to their home decks at once:
-
The "Empty" button in the study overview moves all cards in the filtered deck back to their home deck, but does not delete the empty filtered deck. This can be useful if you want to fill it again later (using the Rebuild button).
-
Deleting a filtered deck does the same thing as "Empty" does, but also removes the emptied deck from the deck list. No cards are deleted when you delete a filtered deck.
In the old scheduler, if you create, rebuild, empty, or delete a filtered deck while cards are still in learning, they will be turned back into new cards. In the case of failed reviews in relearning, any remaining relearning steps will be skipped. This was fixed in the v2 scheduler so cards are no longer reset.
Creating Manually
Advanced users can create filtered decks with arbitrary search strings (or 'filters'), instead of relying on the preset filters. To create a filtered deck manually, choose Create Filtered Deck from the Tools menu.
When you click the Build button, Anki finds cards that match the settings you specified, and temporarily moves them from their existing decks into your new filtered deck for study.
If you wish to fetch cards again using the same filter options (for instance, if you want to study all cards with a particular tag every day), you can use the Rebuild button at the bottom of the deck's overview screen.
The search area controls what cards Anki will gather. All of the searches possible in the browser are also possible for filtered decks, such as limiting to tags, finding cards forgotten a certain number of times, and so on. Please see the searching section of the manual for more information on the different possibilities.
Filtered decks cannot pull in cards that are suspended, buried, or already in a different filtered deck. And if you are using the v1 scheduler, cards in (re)learning will not be included either. For this reason, a search in the browser may reveal cards that do not end up in the filtered deck.
The limit option controls how many cards will be gathered into the deck. The order you select controls both the order cards are gathered in, and the order they will be reviewed in. If you select "most lapses" and a limit of 20 for example, then Anki will show you only the 20 most lapsed cards.
The enable second filter option allows you to create a filtered deck comprised of two different searches, so that you can, for example, include due cards with one order, and a smaller amount of new cards with a different order.
Order
The "cards selected by" option controls the order that cards will appear in. If the maximum number of cards you select is lower than the number of cards that match the filter criteria, Anki will exclude the cards at the end of this sorted list first.
Oldest seen first
Display those cards first, that you haven't seen in reviews for the longest
time.
Random
Randomize the order of all cards that match the filter criteria (use no
set order).
Increasing intervals
Display cards that have the smallest interval first.
Decreasing intervals
Display cards that have the largest interval first.
Most lapses
Display those cards first, that you have failed the most times.
Order added
Display cards that you added first (i.e. those cards that have the earliest
creation date).
Order due
Display cards with the earliest due date first.
Latest added first
Display cards that you have most recently added to the deck first.
(This is the opposite of 'Order added'.)
Relative overdueness
Display cards that you're most likely to have forgotten first. This is useful if
you have a large backlog that may take some time to get through, and you want to
reduce the chances of forgetting more cards.
When using the SM-2 scheduler, overduessness is determined by comparing how overdue cards are, and how long their interval is. For example, a card with a current interval of 5 days that is overdue by 2 days, will display before a card with a current interval of 10 days that is overdue by 3 days.
When using FSRS, overdueness is calculated based on on each card's retrievability, and the desired retention in the deck preset.
Steps & Returning
Please see the section on learning as a reminder of how steps work.
By default, Anki will use the steps of a card’s home deck. If a new card would normally be reviewed twice when being learnt, the same thing will happen when you study it in a filtered deck.
Cards return to their home deck when (re)learning is complete. Thus if you have 3 learning steps, a new card will return to its home deck upon three presses of "Good" or a single press of "Easy".
v1 and v2 scheduler
In the v1 scheduler, the custom steps option allows you to override the home deck’s steps and provide your own steps instead. The provided steps apply to both cards being learnt, lapsed reviews, and reviews ahead of time. Please note, however, that from the v2 scheduler filtered decks no longer support custom steps.
v3 scheduler
Filtered decks with rescheduling disabled show 4 buttons in the v3 scheduler - the provided delay applies to the Again button, and Hard/Good will use 1.5x and 2x the provided delay. Easy will remove the card.
Due Reviews
If the filtered deck includes cards that were due for review, they will be shown like they would have been in their original deck: they appear in the review card count at the bottom of the screen, and there are four choices for how well you remembered. Upon a correct answer, the card will be moved back to its home deck, and its next delay adjusted using the home deck's settings. If you forget the card, it will be shown according to the relearning steps defined in the home deck.
Reviewing Ahead
If your search included cards that are not due, Anki will show the reviews ahead of time.
Anki uses a special algorithm for these reviews that takes into account how early you are reviewing. If the cards were almost due to be shown, they will be given a new delay similar to what they would have received if you had reviewed them on time. If the cards are reviewed soon after they were scheduled however, their new delay will be similar to their previous delay. This calculation works on a sliding scale.
Because reviewing a card shortly after it is scheduled has little impact on scheduling (e.g. a card due tomorrow with a one day interval will remain due tomorrow if reviewed early), the "review ahead" custom study setting is not appropriate for repeated use. If used to go through a week's worth of cards before a trip, the mature cards will be rescheduled into the future and the new cards will remain at small intervals, because you don't know them well enough for them to be rescheduled further. If you review ahead again the next day, all you'll end up doing is going through those same new cards again, to little benefit.
Early reviews are included in the new card count rather than the review count, and will be shown according to the number of relearning steps defined in the home deck (unless you have provided custom steps). This means that if you have customized the number of relearning steps in the home deck, the non-due card may be shown more than once.
If you have multiple steps, Anki will only consider the first answer when deciding the next delay, and like relearning in normal decks, "Good" and "Easy" differ only in the step change and not the resulting delay.
Rescheduling
By default, Anki will return cards to their home decks with altered scheduling, based on your performance in the filtered deck. There is a reschedule cards based on my answers option available which alters this behaviour.
From the v2 scheduler, when rescheduling is disabled, cards are shown in a simple "preview mode", and when they are returned to the original deck, they are returned exactly as they started.
In the v1 scheduler, cards were presented more similarly to how they normally are, but studying cards had side effects, and the original position of new cards was lost when you studied them.
Catching Up
Filtered decks can be useful for catching up when you've fallen behind in your reviews. One Anki user describes the way they use the filtered decks to catch up as follows:
I did this for a backlog of 800 cards with filtered subdecks. Worked
very well for me.

Just Due filter with: "is:due prop:due>-7"

Over Due filter with: "is:due prop:due<=-7"

The Just Due deck will then contain cards that became due in the past
week. That's the deck you should study every day as it gets the cards
that become due regularly. With this you can study as if there weren't
any backlog.

The Over Due deck will contain your backlog — cards which you didn't
study in time. You can study them the same way you would study new
cards. They go back into the regular cards, so the number of overdue
will never grow as long as you keep your Just Due deck in check.

How long it takes depends on how many overdue cards you study each day
in addition to the ones that become due regularly. You can still motor
through them when you feel like it - or you can do a specific number per
day like you would for new cards. Up to you.
搜尋 Searching
- 簡單搜尋 Simple searches
- 限制欄位 Limiting to a field
- 標籤、牌組、卡片和筆記 Tags, decks, cards and notes
- Ignoring accents/combining characters
- Regular expressions
- Card state
- Flags
- Card properties
- Recent Events
- Matching special characters
- Object IDs
在 Anki 中,瀏覽畫面和篩選牌組使用相同的方法進行搜尋。同樣的方法也可以用來調整 FSRS 最佳化範圍。
簡單搜尋 Simple searches
在搜尋方塊中輸入文字後,Anki 將尋找所有筆記欄位,並顯示符合的卡片。搜尋結果不包含標籤。(請見後文來了解如何搜尋標籤)以下是一些搜尋條件範例:
dog
搜尋「dog」——也會符合類似「doggy」和「underdog」的字。
dog cat
搜尋同時包含「dog」和「cat」的筆記,如「raining cats and dogs」。
dog or cat
搜尋至少包含「dog」和「cat」其一的筆記。
dog (cat or mouse)
搜尋包含「dog」,且至少包含「cat」和「mouse」其一的筆記。即同時包含「dog」和「cat」或者同時包含「dog」和「mouse」。
-cat
搜尋不包含「cat」的筆記。
-cat -mouse
搜尋既不包含「cat」,也不包含「mouse」的筆記。
-(cat or mouse)
同上。
"a dog"
搜尋包含「a dog」的筆記,如「atta dog」。而「dog a」或「adog」則不符合條件。
-"a dog"
搜尋不包含「a dog」的筆記。
d_g
尋找包含「d, <一個字元>, g」的筆記,如「dog」、「dig」、「dug」等。
d*g
尋找包含「d, <零或多個字元>, g」的筆記,如「dg」、「dog」、「dung」等。
w:dog
搜尋單字「dog」,而不是 d, o, g 三個字元——即「dog」會符合搜尋條件,但「doggy」、「underdog」不會。僅限 Anki 2.1.24+、AnkiMobile 2.1.61+ 或 AnkiDroid 2.17+ 版本。文字格式可能改變單字邊界,例如,搜尋 w:exam 時將會符合「example」,因為「exam」包含在粗體格式中。
w:dog*
符合「dog」和「doggy」,但不符合「underdog」。
w:*dog
符合「dog」和「underdog」,但不符合「doggy」。
以上需要注意:
-
搜尋條件應以空白分隔。
-
輸入多個搜尋條件時,Anki 將尋找符合所有條件的筆記——默認在每個條件之間加入
and。在 Anki 2.1.24+、AnkiMobile 2.1.60+ 及 AnkiDroid 2.17+ 版本中,你也可以輸入這條and(dog and cat等於dog cat),但在較早版本中,and會被視為一個正常的單字進行搜尋。 -
如果僅需筆記符合一個條件,你可以使用
or。 -
你可以在搜尋條件前加入一個半形連字號 (
-) 來搜尋不符合這個條件的筆記。 -
你可以用半形括號來對搜尋條件分組。這一做法在混用
and和or時尤為重要,例如,上文範例中的dog (cat or mouse)將符合「dog cat」或「dog mouse」,若去掉括號,搜尋條件將變成「dog and cat」或「mouse」。 -
Anki is only able to search within formatting in the sort field you’ve configured. For example, if you add "example" to one of your fields, with the "exa" part in bold, this will not be matched when searching for
exampleunless that field is the sort field. If a word is not formatted, or the formatting does not change in the middle of the word, then Anki will be able to find it in any field. -
Standard searches are case insensitive for Latin characters - a-z will match A-Z, and vice versa. Other characters such as Cyrillic are case sensitive in a standard search, but can be made case insensitive by searching on a word boundary or regular expression (
w:,re:).
限制欄位 Limiting to a field
You can also ask Anki to match only if a particular field contains some text. Unlike the previous search examples, searching in fields requires an exact match by default.
正面:dog
find notes with a Front field of exactly "dog". A field that says "a
dog" will not match.
"animal front:a dog"
finds notes where the "Animal Front" field is exactly "a dog". The double quotes are
mandatory: see later in this section.
正面:*dog*
find notes with Front field containing dog somewhere
front:
正面:
尋找「正面」欄位為空白的筆記
正面:_*
尋找「正面」欄位不為空白的筆記
正面:*
尋找擁有「正面」欄位的筆記,無論是否空白
正*:text
在名稱開頭為「正」的欄位中尋找筆記。僅支援在 Anki 2.1.24+ 或 AnkiMobile 2.1.60+ 版本上使用。
標籤、牌組、卡片和筆記 Tags, decks, cards and notes
tag:animal
finds notes with the tag "animal", or subtags like "animal::mammal".
tag:none
finds notes with no tags.
tag:ani*
finds notes with tags starting with "ani".
deck:french
find cards in a deck called "French", or its subdecks like "French::Vocab".
deck:french -deck:french::*
finds cards in "French", but not its subdecks.
deck:"french vocab"
searching when the deck name has a space.
"deck:french vocab"
same as earlier.
deck:filtered
filtered decks only.
-deck:filtered
normal decks only.
preset:"Default"
cards in all decks that use the "Default" deck options preset.
Requires Anki 23.10+, AnkiMobile 23.10+ or AnkiDroid 2.17+.
card:forward
finds cards created by a card type named "Forward".
card:1
searches for cards by card type number, e.g. to find the second cloze
deletion for a note, you’d use card:2
note:basic
searches for cards created with a note type named "Basic".
Ignoring accents/combining characters
Requires Anki 2.1.24+, AnkiMobile 2.0.60+ or AnkiDroid 2.17+.
You can use nc: (nc stands for "no combining") to make Anki ignore combining characters. For example:
nc:uber
matches notes with "uber", "über", "Über" and so on.
nc:は
matches "は", "ば", and "ぱ".
Searches that ignore combining characters are slower than regular searches.
Regular expressions
Anki 2.1.24+, AnkiMobile 2.0.60+ and AnkiDroid 2.17+ support searching in notes with "regular expressions", a standard and powerful way of searching in text.
Start a search with re: to search using regular expressions. To make things easier, Anki will
treat the following as raw input, so bear in mind the rules listed there.
Some examples:
"re:(some|another).*thing"
finds notes that have "some" or "another" on them, followed by 0 or more characters, and then "thing".
re:\d{3}
finds notes that have 3 digits in a row.
Regular expressions can also be limited to a specific field. Please note that unlike the normal searches in a specific field, regular expressions in fields don't require an exact match:
front:re:[a-c]1
matches uppercase or lowercase a1, B1 or c1 that occurs anywhere in the "Front" field.
front:re:^[a-c]1$
same as the previous example, but will not match if any other text falls before or after a1/b1/c1.
Anki 2.1.50+ supports regular expressions for tags:
tag:re:^parent$
finds notes with the exact tag "parent", disregarding any child tags like "parent::child".
"tag:re:lesson-(1[7-9]|2[0-5])"
finds notes with tags "lesson-17" through "lesson-25".
For more information on regular expressions, see this website.
Some things to be aware of:
- The search is case-insensitive by default; use
(?-i)at the start to turn on case sensitivity. - Some text like spaces and newlines may be represented differently in HTML - you can use the HTML editor in the editing screen to see the underlying HTML contents.
- For the specifics of Anki's regex support, see the regex crate documentation.
Card state
is:due
review cards and learning cards waiting to be studied.
is:new
new cards.
is:learn
cards in learning.
is:review
reviews (both due and not due) and lapsed cards.
is:suspended
cards that have been automatically or manually suspended.
is:buried
cards that have been buried, either automatically or
manually
Cards that have lapsed fall into several of the previous categories, so it may be useful to combine different search terms to get more precise results:
is:learn is:review
cards that have lapsed and are awaiting relearning.
-is:learn is:review
review cards, not including lapsed cards.
is:learn -is:review
cards that are in learning for the first time.
Flags
flag:1
cards with a red flag.
flag:2
cards with an orange flag.
flag:3
cards with a green flag.
flag:4
cards with a blue flag.
flag:5
cards with a pink flag.
flag:6
cards with a turquoise flag.
flag:7
cards with a purple flag.
Card properties
prop:ivl>=10
cards with interval of 10 days or more.
prop:due=1
cards due tomorrow.
prop:due=-1
cards due yesterday that haven’t been answered yet.
prop:due>=1
all cards due in the future, including tomorrow.
prop:due<=-1
all overdue cards.
prop:due>-1 prop:due<1
cards due yesterday, today and tomorrow.
prop:reps<10
cards that have been answered less than 10 times.
prop:lapses>3
cards that been lapsed more than 3 times.
prop:ease!=2.5
cards easier or harder than default ease.
prop:cdn:d>5
cards with the value of d in custom data (usually refers to difficulty in FSRS) greater than 5 (requires Anki 2.1.64+).
prop:cds:v=reschedule
cards with the string v in custom data equal to reschedule (requires Anki 23.10+).
The following searches require Anki 23.10+ and FSRS enabled:
prop:s>21
cards with stability greater than 21 days.
prop:d>0.3
cards with difficulty greater than 0.3.
prop:r<0.9
cards with retrievability less than 0.9.
Recent Events
Added
added:1
cards added today.
added:7
cards added in the last 7 days.
The check is made against card creation time rather than note creation time, so cards that were generated within the time frame will be included even if their notes were added a long time ago.
Edited
edited:n
cards where the note text was added/edited in the last n days.
This requires Anki 2.1.28+ or AnkiMobile 2.0.64+.
Answered
rated:1
cards answered today.
rated:1:2
cards answered Hard (2) today.
rated:7:1
cards answered Again (1) in the last 7 days.
rated:31:4
cards answered Easy (4) in the last 31 days.
Anki 2.1.39+ supports rating searches over 31 days.
First Answered
Requires Anki 2.1.45+.
introduced:1
cards answered for the first time today.
introduced:365
cards answered for the first time within the last 365 days.
Matching special characters
If you're using a version earlier than Anki 2.1.36 the following searches may not work.
As shown in the previous section, some characters like *, _ and " have a
special meaning in search. If you need to locate those characters in a search,
you need to tell Anki not to treat them specially. This is called "escaping a character" and is primarily done by using double quotes and backslashes.
-
Space
To match something that includes spaces, enclose the"entire term"in double quotes. If it is a colon search, you also have the option to only quote thepart:"after the colon". -
And/Or
To search for these words, wrap them with double quotes. For example,dog "and" catsearches for "dog", "cat" and the word "and". If you wrap the entire search term with quotes like in the previous example, you do not need to escapeandoror. -
",*and_
Add a backslash before these characters to treat them literally. For example,_will match any single character, but\_matches only an actual underscore. -
\
Because a backlash is used to remove the special meaning from other characters, it too is treated specially. If you need to search for an actual backslash, use\\instead of\. -
(and)
You can search for parentheses by enclosing the entire term in quotes, by using a backslash, or both at the same time. For example,"(text)",\(text\)and"\(text\)"are all equivalent searches, and search for(text). -
-
Starting a search term with-usually inverts it:-dogmatches everything except dog for example. If you instead wish to include an actual hyphen, you can either use a backslash, or include the text in quotes. For example,\-freeor"-free"will match "guilt-free" and "cruelty-free". -
:
Colons have to be escaped using backslashes unless they are preceded by another, unescaped colon. For example,w:3:30searches for "3:30" on word boundary and doesn't require you to use a backslash. However, if you don't use a colon search, the colons need to be escaped like this:3\:30. -
&,<, and>
&,<, and>are treated as HTML when searching in Anki, and as such, searches containing them don't work as expected. However, you can search for them by using their corresponding HTML entity names (&for&,<for<, and>for>). For example, searching&textsearches for a note with&textin a field.
Raw input
Text preceded by certain keywords (like re:) will be treated as raw input. That is,
the characters listed above largely lose their special meaning. In such a context, only
a minimum of escaping is required to prevent ambiguity:
-
Double quotes (
") must be escaped. -
Spaces and unescaped parentheses require the search term to be quoted.
-
The search term must not end in an odd number of backslashes.
Object IDs
nid:123
the note with note id 123.
cid:123,456,789
all cards with card ids 123, 456, or 789.
Note and card IDs can be found in the card info dialog in the browser. These searches may also be helpful when doing add-on development or otherwise working closely with the database.
Importing
Anki can import text files, packaged Anki decks created by the export feature, Mnemosyne 2.0 .db files, and SuperMemo .xml files. To import a file, click the File menu and then "Import".
Text Files
- Spreadsheets and UTF-8
- HTML
- 匯入媒體檔 Importing Media
- Bulk Media
- Adding Tags
- Duplicates and Updating
- File Headers
Any plain text file that contains fields separated by commas, semicolons or tabs can be imported into Anki, provided some conditions are met.
-
The files must be plain text (myfile.txt). Other formats like myfile.xls, myfile.rtf, myfile.doc must be saved as a plain text file first.
-
The files must be in UTF-8 format (see below).
-
The first line also defines the separating character – if Anki finds a ';' on the first line it will use that, if it finds a comma it’ll use that, etc.
-
Anki determines the number of fields in the file by looking at the first (non-commented) line. If some of the later records in the file contain fewer fields, Anki will treat the missing fields as if they were blank. If some of your records contain extra fields, the extra content will not be imported.
Fields in your text file can be mapped to any field in your notes, including the tags field. You can choose which field in the text file corresponds to which field in the note when you import.
When you import a text file, you can choose what deck to put the cards in. Keep in mind that if you have the deck override option set for one or more of your templates, the cards will go to that deck rather than the one you’ve selected.
This is an example of a valid file with three fields:
apple;banana;grape
some text;other text;yet more text
There are two ways to include newlines or the field separator in fields.
Escape the characters by placing the contents of the field in quotation marks:
hello;"this is
a two line answer"
two;this is a one line field
"this includes a ; (semicolon)";another field
Because quotes are used to mark where a field begins and ends, if you wish to include them inside your field, you need to replace a single doublequote with two doublequotes to "escape" them from the regular handling, like so:
field one;"field two with ""escaped quotes"" inside it"
When you use a spreadsheet program like Libreoffice to create the CSV file for you, it will automatically take care of escaping double quotes.
Use HTML new lines:
hello; this is<br>a two line answer
two; this is a one line one
You need to turn on the "allow HTML in fields" checkbox in the import dialog for HTML newlines to work.
Escaped multi-lines will not work correctly if you are using cloze deletions that span multiple lines. In this case, please use HTML newlines instead.
You can also include tags in another field and select it as a tags field in the import dialog:
first field;second field;tags
This is an example of a valid file where the first line is ignored (#):
# this is a comment and is ignored
foo bar;bar baz;baz quux
field1;field2;field3
Spreadsheets and UTF-8
If you have non-Latin characters in your file (such as accents, Japanese and so on), Anki expects files to be saved in a 'UTF-8 encoding'. The easiest way to do this is to use the free LibreOffice spreadsheet program instead of Excel to edit your file, as it supports UTF-8 easily, and also exports multi-line content properly, unlike Excel. If you wish to keep using Excel, please see this forum post for more information.
To save your spreadsheet to a file Anki can read with LibreOffice, go to File>Save As, and then select CSV for the type of file. After accepting the default options, LibreOffice will save the file and you can then import the saved file into Anki.
HTML
Anki can treat text imported from text files as HTML (the language used for web pages). This means that text with bold, italics and other formatting can be exported to a text file and imported again. If you want to include HTML formatting, you can check the "allow HTML in fields" checkbox when importing. You may wish to turn this off if you’re trying to import cards whose content contains angle brackets or other HTML syntax.
If you wish to use HTML for formatting your file but also wish to include angle brackets or ampersands, you may use the following replacements:
| Character | Replacement |
|---|---|
| < | < |
| > | > |
| & | & |
匯入媒體檔 Importing Media
If you want to include audio and pictures from a text file import, copy the files into the collection.media folder. Do not put subdirectories in the media folder, or some features will not work.
After you’ve copied the files, change one of the fields in your text file as follows.
<img src="myimage.jpg">
or
[sound:myaudio.mp3]
Alternatively, you can use the find and replace feature in the browse screen to update all the fields at once. If each field contains text like "myaudio", and you wish to make it play a sound, you’d search for (.*) and replace it with "[sound:\1.mp3]", with the 'regular expressions' option enabled.
When importing a text file with these references, you must make sure to enable the "Allow HTML" option.
You might be tempted to do this in a template, like:
<img src="{{field name}}">
Anki doesn’t support this for two reasons: searching for used media is expensive, as each card has to be rendered, and such functionality isn’t obvious to shared deck users. Please use the find & replace technique instead.
Bulk Media
Another option for importing large amounts of media at once is to use the media import add-on. This add-on will automatically create notes for all files in a folder you select, with the filenames on the front (minus the file extension, so if you have a file named apple.jpg, the front would say 'apple') and the images or audio on the back. If you would like a different arrangement of media and filenames, you can change the note type of the created cards afterwards.
Adding Tags
If you want to add 'tag1' and 'tag2' to every line you’re importing, add the following to the top of the text file:
tags:tag1 tag2
Duplicates and Updating
When importing text files, Anki uses the first field to determine if a note is unique. By default, if the file you are importing has a first field that matches one of the existing notes in your collection and that existing note is the same type as the type you’re importing, the existing note’s other fields will be updated based on content of the imported file. A drop-down box in the import screen allows you to change this behaviour, to either ignore duplicates completely, or import them as new notes instead of updating existing ones.
The 'match scope' setting controls how duplicates are identified. When 'notetype' is selected, Anki will identify a duplicate if another note with the same notetype has the same first field. When set to 'notetype and deck', a duplicate will only be flagged if the existing note also happens to be in the deck you are importing into.
If you have updating turned on and older versions of the notes you’re importing are already in your collection, they will be updated in place (in their current decks) rather than being moved to the deck you have set in the import dialog. If notes are updated in place, the existing scheduling information on all their cards will be preserved.
For info on how duplicates are handled in .apkg files, please see the Deck Packages section.
File Headers
Anki 2.1.54+ supports certain headers that can be included in the text file to
make importing more powerful or convenient. They consist of #key:value pairs
and must be listed in separate lines at the top of the file, though the tags line
may precede them. Since header lines start with the comment character #, earlier
Anki clients will just ignore them.
You must enable the new importing option in the preferences screen to use this on 2.1.54. On 2.1.55, the new importing path is the default.
| Key | Allowed Values | Behaviour |
|---|---|---|
separator | Comma, Semicolon, Tab, Space, Pipe, Colon, or the according literal characters | Determines the field separator. |
html | true, false | Determines whether the file is treated as HTML. |
tags | List of tags, separated by spaces | Same as the old syntax. |
columns | List of names, separated by the previously set separator | Determines the number of columns and shows their given names when importing. |
notetype | Notetype name or id | Presets the notetype, if it exists. |
deck | Deck name or id | Presets the deck, if it exists. |
notetype column | 1, 2, 3, ... | Determines which column contains the notetype name or id of each note, see Notetype Column. |
deck column | 1, 2, 3, ... | Determines which column contains the deck name or id of each note, see Deck Column. |
tags column | 1, 2, 3, ... | Determines which column contains the tags of each note. |
guid column | 1, 2, 3, ... | Determines which column contains the GUID of each note, see GUID Column. |
Some headers have further implications.
Notetype Column
Usually, all notes from a file will be mapped to a single notetype, and you may choose which column should be mapped to which field of that notetype.
That changes, if there is a column with notetype names or ids. This allows to import notes with different notetypes, and their fields will be mapped implicitly: The first regular column is used for the first field of any note regardless of its notetype, the second regular column for the second field, and so on. A 'regular column' here being a column that does not contain special information like decks, tags, notetypes or GUIDs.
Deck Column
Usually, any new cards created as a result of importing a text file will be placed in a single deck of your choice. If the file contains a deck column, however, new cards of a note will be placed in its specified deck instead. If the deck does not exist, a deck with the given name will be created.
GUID Column
GUID stands for Globally Unique Identifier. When you create notes in Anki, Anki assigns each note a unique ID, which can be used for duplicate checking. If you export your notes with the GUID included, you can make changes to the notes, and as long as you do not modify the GUID field, you'll be able to import the notes back in to update the existing notes.
Please note that the GUID is intended to be created by Anki. If you are creating your own IDs, such as MYNOTE0001, then it's recommended that you place the IDs in the first field, instead of assigning them to Anki's internal GUID. When importing, Anki is able to use either the first field or the GUID for duplicate checking, so you do not need to make IDs a GUID in order to be able to update your notes.
One other thing to note is that the 'duplicate' option will not work for rows that have a non-empty GUID. If a GUID is provided, and already exists in the collection, a duplicate will not be created.
Packaged Decks
Anki packages (.apkg files) enable you to import decks, notes, notetypes, and cards from other users. They are commonly shared on AnkiWeb.
Scheduling
Anki packages may also contain scheduling information, which is useful if you want to transfer decks between devices or profiles. However, when importing a deck shared by someone else, you typically do not want to adopt their card intervals or review history.
If you encounter imported cards with unexpectedly large intevals, the deck author may accidentally have included their scheduling information. You can use the Set Due Date feature to reset the imported cards. On Anki 23.10 and later, you can remove any scheduling information during the import process by leaving the "Import any learning progress" option unselected. This will also remove any "leech" or "marked" tags from the imported cards.
Updating
When you import an .apkg file, Anki will identify any notes in it that are already in your collection due to a previous import. If the notes in the file are newer than your local copy, the notes will be updated with the contents of the file by default.
This updating process is generally not possible if the notetype is changed (e.g if either you or the deck author do things like add an extra field to the notetype). You will still be able to import any missing notes from the file, but notes you have imported previously will not be updated if the deck author has made changes.
Anki 23.10 and Later
Anki 23.10 introduced more flexibility: You can choose to unconditionally update notes and notetypes, always overwriting your modifications, or, on the other hand, never update existing objects.
Also, if both you and the deck author modified the same notetype, you can now decide to merge the two versions. This will preserve all templates and fields contained in either one, but will require a full sync, and may mark other existing notes as modified.
Note to Deck Authors
Merging relies on template and field ids, which were introduced in Anki 2.1.67. If a template or field lacks an id, because it has been created with an earlier release, Anki attempts to find an equivalent by comparing names.
See this this add-on for why it is advantageous to share notetypes with field and template ids, and how to add them to existing ones.
Workaround for Anki 2.1.66 and Earlier
If you know the deck author has made changes and you wish to gain access to them, changing the notetype back is possible, but rather difficult. You'll need to do the following:
- Create a new profile, and import the .apkg file into it.
- Locate one of the notes that failed to update in the Browse screen and select it.
- Use the Fields & Cards buttons to check the field names and card template names, and note them down.
- Use the debug console to determine the notetype id. It will be the number on the last line.
nt = bcard().note().note_type()
print("notetype", nt["name"], "has id", nt["id"])
- Return to your normal profile, locate the same card, and select it. Run the following
in the debug console, replacing
xxxwith the ID you got above:
nt = bcard().note().note_type()
print("current:", nt["name"], "has id", nt["id"])
nt = mw.col.models.get(xxx)
print("desired:", nt["name"], "has id", nt["id"])
-
If it prints two different notetype names, you will need to use the Change Notetype action to change the notetype of your existing notes to the desired one.
-
You then need to use the Fields and Cards buttons to check the field and template names match the one in your test profile. They must match exactly - there should be no more or less, and the spelling should be identical.
Exporting
Exporting allows you to save part of your collection as a text file or packaged Anki deck. To export, click the File menu and choose 'Export'.
Text Files
If you choose "Notes in Plain Text", Anki will write the contents of the notes into a text file. Each field is separated by a tab. If you edit the resulting file and don't modify the first field, you can later import that file back into Anki and Anki will update your notes based on your edits, provided you import back into the same note type.
If you find yourself needing to edit the first field as well, you'll need to change the format of your note type so that the first field is an ID number rather than actual text. (You can install the Add note id add-on to make this easier.)
In order for formatting to be preserved when you import text back in, the text is exported with all the HTML formatting embedded in it.
Packaged Decks
A 'packaged deck' consists of cards, notes, note types, and any sounds or images bundled up into a file ending with .apkg or .colpkg. You can use packaged decks to transfer cards between people, or for backing up parts of your collection.
There are two different kinds of packaged decks.
Collection (.colpkg)
When you export all decks with scheduling included, this is called a 'collection package'. Anki will copy your entire collection into a file ending in .colpkg, and place it on your desktop. A collection package is used to back up your collection, or copy it to another device.
Collection packages created with previous versions of Anki were called collection.apkg.
When this file is later imported, Anki will delete all the current cards in the collection, and replace the collection with the items in the file. This is useful for copying your collection back and forth between devices.
Existing media in your collection is not deleted when you import a collection package. To delete unused media, use Tools>Check Media.
If you choose Anki 2.1.50+ Collection Package format, imports and exports will be faster, and media files will be compressed, but the resulting .colpkg file will not be readable by older Anki clients.
Deck (.apkg)
Deck packages contain a single deck (and any child decks it may have). They have a filename ending with .apkg, but a filename other than collection.apkg. When you import a deck package, Anki will add the contents into your collection, rather than overwriting your collection.
If some notes in the deck package have previously been imported, Anki will keep the version with the most recent modification time. So if you download an updated deck, the edits that have been made in the updated version will be made in your collection as well, but if you re-import an unchanged deck after making edits in your collection, the changes in your collection will be kept.
If you choose not to include scheduling information, Anki will assume that you are sharing the deck with other people, and will remove marked and leech tags so that they will have a clean copy of it.
Backups
Automatic backups
Anki will create automatic backups of your card data. These include the text on your cards and your scheduling information, but do not include sounds or image files.
Automatic backups can be useful to recover from mistakes, but you should not rely solely on them. Because they are stored on your local device, they will not protect you if your device breaks or is stolen. We recommend you combine them with manual backups.
Restoring
To restore from an automatic backup:
- Open Anki, and choose Switch Profile from the File menu.
- Click on the "Open Backup" button.
- Select the backup you wish to restore from.
When restoring from a backup, any changes made since the backup was created will be lost.
Anki disables automatic syncing and backups when you restore from a backup. Once you're happy that you've restored the correct backup, close and re-open Anki to return to normal.
Anki 2.1.50+
Backups are created periodically. You can configure the time between backups in the preferences screen. The default is 30 minutes.
Certain operations will trigger a backup, even if the configured time has not elapsed yet:
- A one-way sync download
- Importing a .colpkg file using File>Import
- Tools>Check Database
After backups are two days old, Anki will start removing some of the older ones. You can control how many daily, weekly and monthly backups you'd like to keep.
Backups created with 2.1.50 will not be importable into older Anki versions.
Older Anki versions
Each time your collection is closed (when closing Anki, switching profiles, or doing a full sync download), Anki creates a backup. By default it will store up to 30 backups; you can adjust this in the preferences.
Manual colpkg backups
Restoring
You can restore from a manual backup by using File>Import.
Creating
In Anki 2.1.50+, you can use File>Create Backup to trigger an immediate backup. This functions like regular automatic backups, and does not include media files.
To create a backup that includes your sounds and images:
- Select Export from the File menu.
- Ensure "Anki collection package (.colpkg)" is selected.
- Enable the "include media" option.
This will create a .colpkg file that contains all of your cards and any sounds/images they use. We recommend you store the file somewhere safe, like a different device, or a cloud-based file storage service like Dropbox or Google Drive.
AnkiWeb
Synchronising your collection with AnkiWeb provides some level of protection against your device being lost or stolen. If you need to restore your collection from AnkiWeb, you can force a one-way sync in the preferences screen, or sync from a new device, and then choose "Download".
Deletion log
Anki logs deleted notes to a text file called deleted.txt in your profile folder. These notes are in a text format that can be read by File>Import, though please note the import feature only supports a single note type at one time, so if you have deleted notes from different note types, you'll need to split the file into separate files for each note type first.
管理檔案與集合 Managing Files and Your Collection (英文)
- 檢查集合 Checking Your Collection
- 檔案位置 File Locations
- 啟動選項 Startup Options
- 檔案同步 File Syncing
- 網路檔案系統 Network Filesystems
- 使用隨身碟執行 Running from a Flash Drive
- 備份 Backups
- 無法存取硬碟 Inaccessible Harddisk
- 暫存資料夾權限 Permissions of Temp Folder
- 集合損毀 Corrupt Collections
檢查集合 Checking Your Collection
你可以定期使用工具選單中的「檢查資料庫」功能來檢查集合檔,防止檔案損毀、重建部分內部架構以及最佳化檔案。
在 Anki 中刪除牌組或卡片時,標籤不會自動刪除。使用「檢查資料庫」時,你的標籤清單也會被重建,清理不再被使用的標籤。
Anki 每兩週會自動最佳化你的集合來改善效能。但自動最佳化不會檢查錯誤或重建標籤清單。
檔案位置 File Locations
Windows:較新版本的 Anki 檔案儲存在 appdata 資料夾中。你可以在檔案總管的網址列中輸入 %APPDATA%\Anki2 來打開。較舊版本的 Anki 檔案儲存在 文件\Anki 資料夾中。
Mac:較新版本的 Anki 檔案儲存在 ~/Library/Application Support/Anki2 資料夾中。資源庫(Library) 資料夾預設是隱藏的。要打開 資源庫,請在 Finder 按住 Option 鍵,然後選擇「前往」>「資源庫」。較舊版本的 Anki 檔案儲存在 文件/Anki 資料夾中。
Linux:較新版本的 Anki 檔案儲存在 ~/.local/share/Anki2 資料夾中,若你設定了自訂資料路徑則會在 $XDG_DATA_HOME/Anki2 資料夾中。較舊版本的 Anki 檔案儲存在
~/Documents/Anki 或 ~/Anki資料夾中。
在 Anki 資料夾裡,程式檔案與設定檔層級的偏好設定儲存在 prefs.db 檔案中。
每個設定檔都儲存在單獨的資料夾內。設定檔資料夾包含:
-
筆記、牌組、卡片等,儲存在
collection.anki2檔案中 -
音訊和影像,儲存在
collection.media資料夾中 -
備份資料夾
-
系統檔案
Anki 執行時,請勿修改、複製或移動檔案,否則可能會造成集合等檔案損毀。
啟動選項 Startup Options
如果你一台電腦上的集合損毀了,但另一台電腦的集合完好,你可以在打開 Anki 時按住 Shift 鍵來略過自動同步,然後再使用單向同步(完整同步)選項。另外,按住 Shift 鍵還可以暫時停用附加元件,當附加元件出現錯誤時可以避免發生更多問題。
It is possible to specify a custom folder location during startup. This is an advanced feature that is primarily intended to be used with portable installations, and we recommend you use the default location in most circumstances.
The syntax to specify an alternate folder is as follows:
anki -b /path/to/anki/folder
-
If you have multiple profiles, you can pass -p <name> to load a specific profile.
-
If you pass -p some-fake-name, Anki will show the profile screen on startup. If no profile is provided, the last-used profile is loaded.
-
To change the interface language, use -l <iso 639-1 language code>, such as "-l ja" for Japanese.
If you always want to use a custom folder location, you can modify your shortcut to Anki. On Windows, right-click on the shortcut, choose Properties, select the Shortcut tab, and add "-b \path\to\data\folder" after the path to the program, which should leave you with something like
"C:\Program Files\Anki\anki.exe" -b "C:\AnkiDataFolder"
You can also use this technique with the -l option to easily use Anki in different languages.
On Windows, you should use a backslash (\) not a forward slash (/).
On a Mac there is no easy way to alter the behaviour when clicking on the Anki icon, but it is possible to start Anki with a custom base folder from a terminal:
open /Applications/Anki.app --args -b ~/myankifolder
Alternatively, you can define the environment variable "ANKI_BASE". On Windows, you can define the environment variable with:
set "ANKI_BASE=C:/path/to/AnkiDataFolder"
On Linux and macOS, you can use:
export ANKI_BASE="/path/to/AnkiDataFolder"
檔案同步 File Syncing
使用第三方同步服務來同步 Anki 資料夾可能會造成資料庫損毀。
如果僅需同步媒體檔,你可以將外部資料夾連結至媒體檔資料夾中。
若要使用第三方服務來同步集合檔,建議建立指令碼,在打開 Anki 時複製雲端檔案到本機資料夾,關閉時再複製回去。
網路檔案系統 Network Filesystems
使用網路檔案系統可能會造成資料庫損毀。如果必須使用網路檔案系統,請定期使用「檢查資料庫」工具來檢查有無損毀。
使用隨身碟執行 Running from a Flash Drive
在 Windows 上,你可以在隨身碟中安裝 Anki 為可攜式軟體。以下步驟假設你的隨身碟為 G 槽。
-
複製
\Program Files\Anki資料夾到隨身碟上,變成G:\Anki。 -
建立一個文字檔,命名為
G:\anki.bat,內容為:g:\anki\anki.exe -b g:\ankidata
如果不想要看見開啟時的命令列視窗,請將內容改為:
start /b g:\anki\anki.exe -b g:\ankidata
- 按兩下
anki.bat來啟動 Anki,使用者資料儲存於G:\ankidata。
不能去除磁碟機代號,輸入 \anki\anki.exe 時將無法同步。
FAT32 格式的隨身碟可能無法同步媒體檔。請將隨身碟格式化為 NTFS 以確保能正常同步。
備份 Backups
請參閱〈備份〉。
無法存取硬碟 Inaccessible Harddisk
啟動時,如果 Anki 資料夾無法寫入, Anki 將顯示一則訊息並自動關閉。如果不清楚如何修正存取權限,請求助電腦專家。
暫存資料夾權限 Permissions of Temp Folder
Anki 使用系統暫存資料夾來暫時儲存檔案。如果這個資料夾的權限被某些軟體(如防毒軟體)更動,Anki 將無法正常運作。
If you're on a Windows 7 machine, the general steps to fix the problem are listed below. As this is somewhat complicated, please ask someone knowledgeable about Windows if you are not sure.
-
Click on the start bar, and type in %temp% (including the percents), then hit Enter.
-
Go up one folder, and locate the temp folder. Right click on it, and choose Properties.
-
In the security tab, click on Advanced.
-
Click on the Owner tab. If you're not listed as the owner, click the button to take ownership.
-
On the permissions tab, ensure that you have full control. On a default W7 install the control will actually be inherited from c:\users\your-username.
集合損毀 Corrupt Collections
Anki 使用的檔案格式通常不會在程式或電腦崩潰時受到太大的影響,但在少數情況下,集合還是有可能會損毀,比如檔案在 Anki 執行時被修改、檔案儲存在雲端硬碟或程式錯誤。
When you run Tools>Check Database, you will receive a message if Anki detects the file has been corrupted. The best way to recover from this is to restore from the most recent automatic backup, but if your backup is too old, then you can attempt to repair the corruption instead.
On Linux, make sure sqlite3 is installed. On a Mac, it should be installed already. On Windows, download http://www.sqlite.org/sqlite-3_6_23.zip.
Next, create a backup of your collection.anki2 file, in case something goes wrong with the steps below.
Linux/macOS
Open a terminal, change to the folder your collection is located in, and type:
sqlite3 collection.anki2 .dump > dump.txt
Open the resulting dump.txt file in a text editor, and look at the final line. If it reads "rollback;", change it to "commit;"
Then run the following in a terminal:
cat dump.txt | sqlite3 temp.file
Make sure you use temp.file - do not put collection.anki2 on the right, or you will blank out the file. When you're done, proceed to the final step.
Windows
Copy the sqlite3.exe program and your deck to your desktop. Then go to
Start>Run and type in cmd.exe.
If you're on a recent Windows, the command prompt may not start on your desktop. If you don't see desktop displayed in the command prompt, type something like the following, replacing 'administrator' with your login name.
cd C:\Users\Administrator\Desktop
Then type:
sqlite3 collection.anki2 .dump > dump.txt
Open the resulting dump.txt file in a text editor, and look at the final line. If it reads "rollback;", change it to "commit;"
Then run the following in a terminal:
type dump.txt | sqlite3 temp.file
Make sure you use temp.file - do not put collection.anki2 on the right, or you will blank out the file. When you're done, proceed to the final step.
Final Step
Check that you didn't get an error message, and that temp.file is not empty. The procedure optimizes the collection in the process, so it's normal for the new file to be somewhat smaller than the old one.
When you've confirmed the file is not empty:
-
rename the original collection.anki2 file to something else
-
rename temp.file to collection.anki2
-
move collection.anki2 back into your collection folder, overwriting the old version
-
start Anki and go to Tools>Check Database to make sure the collection has been successfully restored.
卡片資訊、圖表和統計 Card Info, Graphs and Statistics
卡片資訊 Card Info
要檢視卡片資訊,你可以右鍵按一下卡片,在選單中選取「卡片資訊」,或在複習畫面按下 I 鍵。
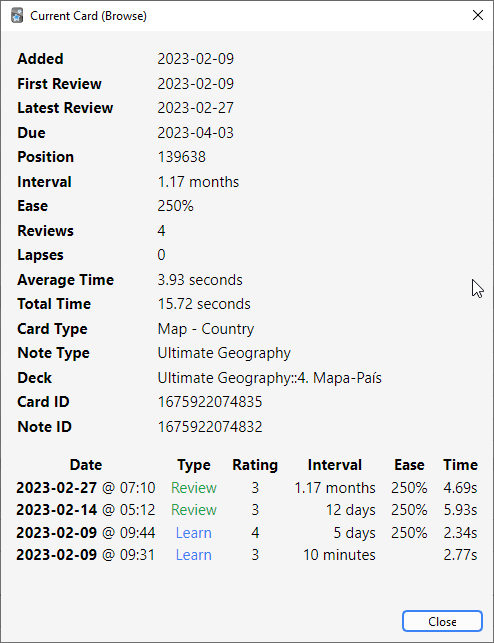
A few notes:
Position
It shows the order the card will appear
in relative to other new cards. The position can be changed in the
browser. Once a card has been studied, the position is not used, unless
the card is manually reset to new again.
Interval
The delay from one review to the next. Times are abbreviated; "0s, 1m,
3h, 4d, 5mo, 6y" refers to seconds, minutes, hours, days, months and
years respectively.
Ease
The approximate amount the interval will grow when you answer a review
card with the "Good" button.
The bottom section shows the review history for the card. Rating denotes the button (1 = Again, 4 = Easy). When cards are manually rescheduled using the "reset" or "set due date" actions, the type will be listed as Manual and the rating as 0.
Statistics
The statistics window is accessed by clicking on Stats button at the top of the main window, or by pressing T.
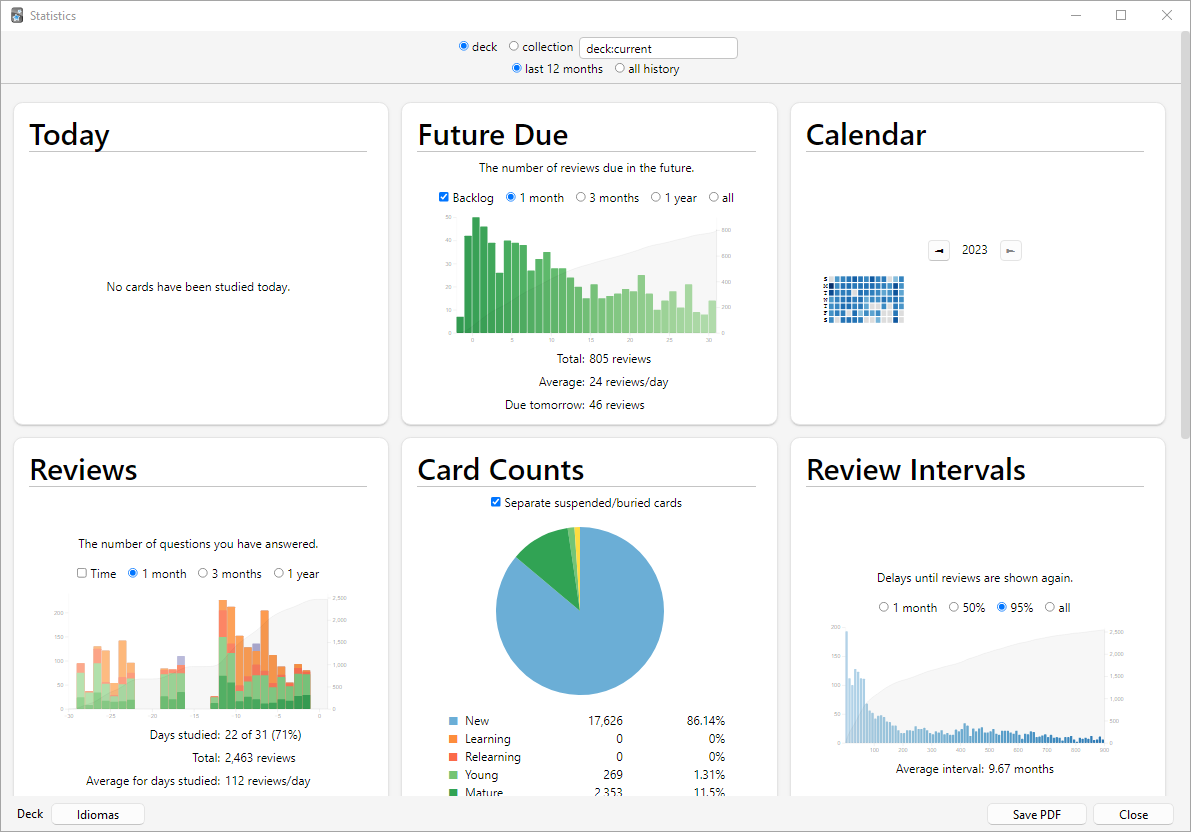
Selecting Decks / Collection
Deck.
By default, the statistics window will show statistics from the currently selected deck and any subdecks it may contain, but you can select any deck from your collection by typing its name in the text box at the top of the screen or (from Anki 2.1.61), by using the deck selector at the bottom.
Collection
If you select this checkbox, statistics will be shown for your entire collection. You can also display graphs for arbitrary searches by adding filters in the search box at the top (2.1.28+).
History
By default, Anki 2.1.28+ will show you statistics for the last 12 months. You can change this to all history scope or deck life scope at the top. (The "today" section at the top remains of course unaffected by this selection.)
Older versions of Anki will by default show you statistics for the previous month. You can change this to a year scope or deck life scope at the bottom. (Again, the “today” section at the top is unaffected by this selection.)
More
-
Clicking on "Save PDF" at the bottom will save a PDF document of the statistics to a file on your desktop to make it easy to share your statistics with others.
-
When you delete notes, their review history is maintained in Anki. It will not be included when looking at statistics for a specific deck (as Anki has no way of knowing which deck the deleted cards belonged to), but will be included when you look at statistics for the whole collection.
-
Anki 2.1.28+ introduced redesigned graphs. The old graphs are still accessible with a Shift-click on the Stats button.
Today
At the top of the statistics window is a brief list of textual statistics about the reviews that you have completed today. A “review” in this context is 'one answering of a card', so a card might count as multiple reviews if it needed to be seen multiple times, and a learning card answered also counts as a “review.” A couple of the stats whose meaning may not be immediately obvious:
Again Count
This is the number of reviews that you have failed (i.e., pressed Again
on). The correct percentage listed afterwards is the number of cards you
did 'not' fail divided by the total number of cards you studied.
Learn, Review, Relearn, Filtered
The number of reviews that were learning cards, review cards, relearning
cards, or studied in a filtered deck when not due.
The stats for the current day are not a good overall indicator of your learning progress; everyone has bad days and good days, and seeing that you got a lower percentage correct on a particular day should not be cause for concern. The remainder of the stats, which take longer periods of time into account, will give more useful information if you wish to try to change your study habits or scheduling settings based on your performance.
The “today” statistics are unaffected by the time period selected at the bottom of the window.
The Graphs
Future Due
This graph shows an estimated number of reviews that will be due on a
given day in the future if you learn no new cards and fail no cards. The
bars and the left axis show the number of cards due on each day if you
study all cards each day, while the line and the right axis show the
number of cards due on that day if you don’t study at all until then.
Note that the forecast graph does not count reviews that are currently
overdue, so if you have a large backlog, the overdue cards will not be
displayed.
Calendar This graph shows past card review activity. Hovering the mouse over a specific item allows you to view the number of revisions made that day. Click on a day of the week to make that the starting day.
Reviews
This graph counts the number of card reviews you have done. The bars may
correspond to days, weeks, or months, depending on the time period
you’ve selected at the bottom of the screen. The differently colored
blocks show how many of the cards you answered on each day were
mature, young, relearning, or learning cards.
There is also a separate group for cards answered in a filtered/cram
deck while they were not due. The line and the right axis shows the
cumulative total for each type of review as time progresses across the
graph (so at 0 days, it would display the number for the entire time
period displayed on the graph).
Card Counts
This pie chart shows what percentage of your deck or collection consists
of mature, unseen, young/learn, and suspended cards. If you wish to
calculate a more precise percentage, the key shows the exact number of
cards in each section, and the total number of cards is displayed to the
side.
Review Time
This graph works exactly like Review Count, except that it deals with
the amount of time you spent on each card rather than the number of
cards answered.
Review Intervals
This graph displays the number of cards that have a given interval (the
delay between two reviews). The line and the right axis tell you what
percentage of your cards have an interval of less than or equal to the
time below that point. The time scope has a different effect on this
graph than other graphs: rather than changing which cards or period of
studying is included, it limits how far out the intervals are displayed
to (so 14-month intervals are not displayed at all on a 1-year graph).
Card Ease This graph shows the number of cards that have a specific ease factor. Average ease of the selected deck / collection is also displayed here.
Hourly Breakdown
This graph shows what percentage of total reviews you have passed (i.e.,
not pressed Again on) during given hours. The larger, darker bars and
left axis show the success rate; the thinner, lighter bars and right
axis show the number of reviews you’ve made at that hour (so you know
how significant the results are).
Answer Buttons
This graph shows how many times you’ve chosen the Again, Hard, Good, or
Easy button while studying learning/new, young, and
mature cards. Anki also displays the percentage
of correct reviews for each type of card.
Manual Analysis
If you’re interested in getting information from your statistics other than what Anki provides, it is possible to access the data directly. Because of the complexity involved, this is not something we can provide any support for.
One option is to write an add-on that adds another graph or more details to the statistics window. There are several add-ons of this sort on AnkiWeb already, which you can look at to get an idea of how it works.
A more powerful and more complex option is to extract the review log information directly from Anki’s database and analyze it in an external program. Anki uses a database format called SQLite. There are many tools available for working with SQLite databases; one of the easiest to start with is called SQLite Browser, which will allow you to look around the database as well as export a CSV version of tables for import into another program.
The most important table for statistics is the 'revlog' table, which stores an entry for each review that you conduct. The columns are as follows:
id
The time at which the review was conducted, as the number of
milliseconds that had passed since midnight UTC on January 1, 1970.
(This is sometimes known as 'Unix epoch time', especially when in
straight seconds instead of milliseconds.)
cid
The ID of the card that was reviewed. You can look up this value in the
id field of the 'cards' table to get more information about the card,
although note that the card could have changed between when the revlog
entry was recorded and when you are looking it up. It is also the
millisecond timestamp of the card’s creation time.
usn
This column is used to keep track of the sync state of reviews and
provides no useful information for analysis.
ease
Which button you pressed at the end of the review (1 for Again, 4 for
Easy).
ivl
The new interval that the card was pushed to after the review. Positive
values are in days; negative values are in seconds (for learning cards).
lastIvl
The interval the card had before the review. Cards introduced for the
first time have a last interval equal to the Again delay.
factor
The new ease factor of the card in permille (parts per thousand). If the
ease factor is 2500, the card’s interval will be multiplied by 2.5 the
next time you press Good.
time
The amount of time (in milliseconds) you spent on the question and
answer sides of the card before selecting an ease button.
type
This is 0 for learning cards, 1 for review cards, 2 for relearning cards,
and 3 for early "cram" cards (cards being studied in a filtered deck when they
are not due).
媒體檔 Media
Anki stores the sounds and images used in your notes in a folder next to the collection. For more on the folder location, please see the file locations section. When you add media within Anki, either by using the paperclip icon in the editor or by pasting it into a field, Anki will copy it from its original location into the media folder. This makes it easy to back up your collection’s media or move it to another computer.
If your media filenames contain spaces or other special characters such
as percentage signs, the way the filenames appear in the HTML editor will
differ from the way the filenames appear on disk. For example, a file called
hello 100%.jpg will appear as hello%20100%25.jpg in the HTML editor.
Internally, Anki still uses the original filenames, so if you would like to
search for the file or modify the filename with Find&Replace, you will
need to use the name as it appears on disk, not as it appears in the
HTML editor. Exporting to a text file is another way to see the underlying
representation.
Checking Media
You can use the Tools>Check Media menu option to scan your notes and media folder. It will generate a report of files in the media folder that are not used by any notes, and media referenced in notes but missing from your media folder. It also allows you:
- To delete unused media files.
- To tag notes that refer to missing media files.
- To empty your trash folder.
- To restore the deleted files back to your media folder.
This tool does not scan question or answer
templates, which is why you can’t place media references to fields in
the template. If you need a static image or sound on every card, name it
with a leading _ (e.g., _dog.jpg) to tell Anki to ignore it when
checking for media. If you delete media using the unused media check,
Anki will move it into your operating system’s trash folder, so you can
recover if you accidentally delete media that shouldn’t have been
deleted.
Manually Adding Media
When you add media via Anki's interface, Anki takes care of ensuring the filenames are encoded in a way that should work across different devices, removing characters that won't work on certain operating systems, and truncating very long filenames.
If you manually add files to your media folder, you should use Tools>Check Media afterwards, to ensure the filenames are encoded correctly. If you skip this step, any filenames that are not compatible will be skipped when syncing.
Supported Formats
Anki uses a program called mpv (and mplayer as a fallback) in order to support sounds and videos. A wide variety of file formats are supported, but not all of these formats will work on AnkiWeb and the mobile clients. MP3 audio and MP4 video seems to be the most universally supported.
Math and Symbols
MathJax
MathJax is a modern, browser-based typesetting system, useful for mathematical and chemical equations. It does not require the installation of any extra software, so it is easy to use, and it is recommended for most users.
MathJax is supported out of the box on Anki 2.1+, AnkiMobile, and AnkiDroid 2.9+.
To try it out:
-
Type the following in a field:
\sqrt{x} -
Select the text you just typed.
-
Click the rightmost button in the editor, and choose "MathJax inline" from the menu. Anki will change the text so it reads:
\(\sqrt{x}\) -
If you click the Cards… button, you’ll see a preview of how the equation will appear when the card is reviewed.
Anki’s MathJax support expects content in TeX format. If you’re not
familiar with TeX formatting, please see this cheatsheet.
Please note that point 2 does not apply in Anki - Anki uses \( and
\) for inline equations, and \[ and \] for display equations.
If you want to use newlines in a MathJax expression, please use Shift+Enter instead of just Enter, as a normal newline will prevent MathJax from working correctly.
Anki includes built in support for mhchem for rendering chemical equations. Please see the 'chemical equations' section and the following sections for more information: https://mhchem.github.io/MathJax-mhchem/
It is possible to customize some settings.
LaTeX
LaTeX is a powerful typesetting system, useful for entering mathematical formulas, chemical formulas, musical notation and so on. Anki provides some support for LaTeX, allowing you to enter LaTeX code in your notes. When you review a card, Anki will call LaTeX and display the generated image instead.
LaTeX is more work to set up, and images can only be generated with the computer version of Anki - though once generated, the images can be displayed by mobile clients. Because of the extra complexity LaTeX brings, it is only recommended for users that need more features than MathJax provides.
Security Warning
LaTeX code can contain malicious commands that can read or write non-Anki data on your computer. For this reason, recent Anki versions will refuse to generate LaTeX images by default.
If you wish to use LaTeX on your own cards, you will need to enable the 'Generate LaTeX images' option in the preferences screen.
We strongly recommend you do not enable this option if you use shared decks, or think you will import shared decks in the future, as you are potentially giving any shared deck author access to your computer.
You do not need to enable this option for shared decks. If a shared deck author has correctly generated all the images prior to them sharing the deck, the images should already be available.
Assumed Knowledge
Anki’s LaTeX support is not turn-key: it is assumed that you know how to use LaTeX already, and that you have it installed. If you have no experience with LaTeX, please consult one of the many guides available on the internet. If you are having trouble with markup, please ask on a LaTeX forum.
To install LaTeX, on Windows use MiKTeX; on macOS use MacTeX, and on Linux use your distro’s package manager. Dvipng must also be installed.
On Windows, go to Settings in MikTeX’s maintenance window, and make sure "Install missing packages on the fly" is set to "Always", not to "Ask me first". If you continue to have difficulties, one user reported that running Anki as an administrator until all the packages were fetched helped.
On macOS, LaTeX has only been tested with MacTeX and BasicTeX. If you use BasicTeX, you need to install dvipng separately, with the following command:
sudo tlmgr update --self; sudo tlmgr install dvipng
The command may not be on the path, so you may need to provide the full path, e.g /usr/local/texlive/2014basic/bin/x86_64-darwin/tlmgr.
If you are not using the above LaTeX packages, you will need to use the edit LaTeX add-on to specify the full path to latex and dvipng.
Web/Mobile
When you review a card with LaTeX on it, Anki will generate an image for that LaTeX and place the image in your collection’s media folder for future use. The web & mobile clients will display these images if they already exist, but can not generate the images on their own.
To avoid having to review all your cards at least once before you can study on the other clients, Anki can generate the images in bulk for you. To generate all the images, please go to Tools>Check Media. After that, syncing should upload the generated media to AnkiWeb and the other clients.
Example
The most general way to input LaTeX content is to surround it with [latex][/latex] tags. There’s a shortcut button for this documented in the editor section.
[latex] tags must be used inside a field - placing them in the card template will cause problems.
For example, entering the following on the front of an Anki flashcard:
Does [latex]\begin{math}\sum_{k = 1}^{\infty}\frac{1}{k}\end{math}[/latex] converge?
will produce this when the flashcard is viewed:
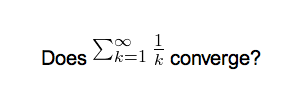
The formula in the example above is called a 'text formula', because it is displayed right within the non-mathematical text. In contrast, the following example shows a 'displayed formula':
Does the sum below converge?

[latex]\begin{displaymath}\sum_{k = 1}^{\infty}\frac{1}{k}\end{displaymath}[/latex]
'Text formulas' and 'display formulas' are the most common type of LaTeX expressions, so Anki provides abbreviated versions of them. Expressions of the form:
[latex]\begin{math}...\end{math}[/latex]
can be shortened to
[$]...[/$]
and expressions of the form
[latex]\begin{displaymath}...\end{displaymath}[/latex]
can be shortened to
[$$]...[/$$]
For example, the two LaTeX snippets shown before are equivalent to
Does [$]\sum_{k = 1}^{\infty}\frac{1}{k}[/$] converge?
and
Does the sum below converge?

[$$]\sum_{k = 1}^{\infty}\frac{1}{k}[/$$]
respectively.
Packages
Anki allows you to customize the LaTeX preamble so you can import custom packages for chemistry, music and so on. For example, imagine you find an example file for chemtex on the internet:
\documentclass[a4paper,12pt]{report}
\usepackage{chemtex}
\begin{document}

\initial
\begin{figure}[h]\centering
\parbox{.3\textwidth}{\ethene{H}{H$_3$C}{CH$_3$}{Br}}
\hfil
\parbox{.3\textwidth}{\cbranch{H}{S}{H}{S}{C}{S}{}{S}{H}
  \xi=-200 \cright{}{Q}{C}{D}{O}{S}{OH}}
\hfil
\parbox{.3\textwidth}{\hetisix{Q}{Q}{Q}{Q}{Q}{Q}{O}{Q}{O}
  \xi=-171 \fuseup{Q}{Q}{Q}{Q}{D}{Q}{D}{Q}{D}}
\caption{Chemie mit {\tt CHEMTEX}\label{a1}}
\end{figure}

\end{document}
Firstly, follow the documentation of the package and MiKTeX/MacTeX in order to install the package. To check the package is working, you’ll want to put code like the above into a .latex file and test if you can compile it from the command line. Once you’ve confirmed that the package is available and working, we can integrate it with Anki.
To use the package with Anki, click "Add" in the main window, then click the note type selection button. Click the "Manage" button, then select the note type you plan to use and click "Options". The LaTeX header and footer are shown. The header will look something like:
\documentclass[12pt]{article}
\special{papersize=3in,5in}
\usepackage{amssymb,amsmath}
\pagestyle{empty}
\setlength{\parindent}{0in}
\begin{document}
To use chemtex, you’d add the usepackage line in the earlier example, so it looks like:
\documentclass[12pt]{article}
\special{papersize=3in,5in}
\usepackage{amssymb,amsmath}
\usepackage{chemtex}
\pagestyle{empty}
\setlength{\parindent}{0in}
\begin{document}
After that, you should be able to include lines like the following in your Anki cards:
[latex]\ethene{H}{H$_3$C}{CH$_3$}{Br}[/latex]
Template Conflicts
As of Anki 2.1.20 / AnkiMobile 2.0.56 / AnkiDroid 2.13, this workaround is no
longer required, as {{field}} text inside fields no longer causes problems. If
you need to support older versions and want to keep using this syntax, please
make sure you place the {{=<% %>=}} string at the very top of your front and
back template, as recent Anki versions will not recognize it anywhere but the
start.
For older versions:
It’s not uncommon for {{ and }} to pop up in LaTeX code when writing mathematical equations. To ensure that your LaTeX equations don’t conflict with Anki’s field replacements, it’s possible to change the separator to something else.
For example, if you have a template:
{{latex field}}
Changing it to the following will make it unlikely that the LaTeX will conflict:
{{=<% %>=}}
<%latex field%>
Cloze Conflicts
Cloze deletions are terminated with }}, which can conflict with a }}
appearing in your LaTeX. To prevent LaTeX from being interpreted as a closing
cloze marker, you can put a space between any double closing braces that do not
indicate the end of the cloze, so
{{c1::[$]\frac{foo}{\frac{bar}{baz}}[/$] blah blah blah.}}
will not work, but
{{c1::[$]\frac{foo}{\frac{bar}{baz} }[/$] blah blah blah.}}
will (and LaTeX ignores spaces in math mode, so your equation will render the same). If you want to avoid adding the extra space into the rendered text (for example, when you are making Cloze cards for learning programming languages), another option is to use a HTML comment when editing the card in HTML mode:
{{c1::[$]\frac{foo}{\frac{bar}{baz}<!-- -->}[/$] blah blah blah.}}
You may use either workaround if you need to use the :: character
sequence within the Cloze-deleted text. The first card generated for the
following note text will read [type] in C++ is a type-safe union:
{{c1::std:<!-- -->:variant::~type~}} in C++ is a {{c2::type-safe union}}
Unsafe Commands
Anki prohibits certain commands like \input or \def from being used on cards or in templates, because allowing them could allow malicious shared decks to damage your system. (To be on the safe side, these commands are prohibited even in comments, so if you’re getting this error but don’t think you’ve used one, please double-check any comments you have in your headers, templates, and cards.) If you need to use these commands, please add them to a system package and import that package as described in the previous section.
Leeches
Leeches are cards that you keep forgetting. Because they require so many reviews, they take up a lot more of your time, compared to other cards.
Anki can help you identify leeches. Each time a review card 'lapses' (is failed while it is in review mode), a counter increases. When this counter reaches 8, Anki tags the note as a leech and suspends the card. The threshold, and whether to suspend or not, can be adjusted in the deck options.
If you keep failing that card, Anki will continue to alert you about the leech periodically. These warnings occur at half the initial leech threshold. For example, if you set the warning at 8 lapses, future warnings will happen every 4 lapses (at 12, 16, and so on).
Once a leech is found, there are several ways to handle it.
Editing
The most efficient method to deal with leeches is to change how the information is presented. Maybe your cards have too much information, or you’re trying to memorize something without fully understanding it. Often, it helps to follow the 20 rules of formulating knowledge, proposed by Dr Piotr Wozniak, the creator of SuperMemo. Some cards can benefit from a mnemonic. Even some well-written cards may need a boost in coherence, e.g. by adding cards for related concepts. However, it takes a lot of experience to know how to formulate the material properly, break it down into smallest possible components, and use mnemonic techniques.
Deleting
If the material you’re struggling with isn't important enough to justify the time spent, you can simply delete the card. By selectively deleting difficult and obscure items, you can spend more time learning other material, making studying more enjoyable. If you think the card might be useful for future reference, you can leave it suspended.
Waiting
Some leeches are caused by 'interference'. For example, an English learner may have recently learnt the words "disappoint" and "disappear". As they look similar, the learner may find themselves confusing the two when trying to answer. In such situations, it’s often helpful to concentrate on one idea at a time. Once that idea is firmly ingrained in your mind, you can then start learning the other idea. So, in these situations, you might want to leave one of the words suspended until you have learnt the other one well, and then unsuspend it.
For a more detailed discussion, you can refer to the article "Dealing with Leeches", written by Soren Bjornstad.
附加元件 Add-ons (英文)
你可以為 Anki 安裝附加元件來加入更多功能,如更多語言支援、進階排程控制等。
要檢視可用的附加元件清單,請前往「工具」>「附加元件」,然後按一下「取得附加元件」。或者你也可以直接在瀏覽器中打開 ankiweb.net/shared/addons。
如果下載的附加元件無法正常運作,或者附加元件設定有誤,你可以按一下選單中的「刪除」按鈕來移除附加元件。
附加元件使用且修改了任意 Anki 程式碼,因此 Anki 更新後有時會出現相容性問題。當有附加元件在 Anki 更新後無法正常運作時,請考慮向附加元件作者回報錯誤。若你依賴的附加元件發生錯誤,請先使用舊版 Anki,待附加元件更新後再升級。
要聯絡附加元件作者,你可以在 AnkiWeb 上的大多數附加元件頁面下找到一個「Contact Author」按鈕。
要自己開發附加元件,請參閱《附加元件編寫指南》。
Troubleshooting
If you encounter a problem with Anki, please try the following steps in order:
1. Restart Anki
Please close Anki, then start it again.
If you are unable to close Anki because of an error message, you can either terminate Anki using your task manager, or restart your computer. Anki saves periodically, so you should not lose more than a few minutes of work in most circumstances.
If the problem does not occur again, you can skip the following steps.
2. Check add-ons
Please close Anki, then start it again while holding down the shift key. If the problem goes away, that indicates an add-on is causing the problem. Remove any add-ons you don't need, and disable half of the others. If the problem continues, try the other half. Repeat the process until you've figured out which add-on is causing the problem. Then please report the issue to the add-on author, using the Copy Debug Info button, and pasting that into the report.
3. Check your Anki version
You can find the version you're using in the Help>About or Anki>About menu. If the version you're using is not the latest version published on https://apps.ankiweb.net, please close Anki, install the latest version, and then start Anki again to see if the problem has gone away.
If you're using Linux, please make sure you can reproduce the error using the packaged version on the Anki website, as distros often distribute broken versions.
4. Check your database
After restarting Anki, please try the Tools>Check Database menu item to make sure your collection doesn't have any problems.
5. Restart your computer
Sometimes restarting your computer may help.
6. Change the Video Driver
Crashes and display issues can be caused by the video driver. Changing to a different video driver in the preferences screen or via the gldriver file may help. Make sure you try all three options.
7. Reset window sizes
Sometimes pressing 'reset window sizes' button in the preferences screen immediately after starting Anki will help.
8. If the problem remains
If you're confirmed you are using the latest Anki version, and are still receiving errors when starting Anki while holding down the shift key, please report the problem, including the next error you receive in your post.
Self-Hosted Sync Server
Advanced users who cannot or do not wish to use AnkiWeb can use a self-hosted sync server instead.
Things to be aware of:
- This is an advanced feature, targeted at users who are comfortable with networking and the command line. If you use this, the expectation is you can resolve any setup/network/firewall issues you run into yourself, and use of this is entirely at your own risk.
- Newer clients may depend on changes to the sync protocol, so syncing may stop working if you update your Anki clients without also updating the server.
- Third-party sync servers also exist. No testing is done against them, and they tend to take time to catch up when the sync protocol changes, so they are not recommended.
- The messages inside Anki will use the term 'AnkiWeb' even if a custom server has been configured, (e.g "Cannot connect to AnkiWeb" when your server is down).
Installing/Running
There are various ways you can install and run the server. You can use either:
- the sync server bundled with the desktop version of Anki
- a separate minimal sync server that doesn't include Anki's GUI dependencies. Python and Rust implementations are available.
From a Packaged Build
This uses the sync server built into the desktop version of Anki as of version 2.1.57+.
On Windows in a cmd.exe session:
set SYNC_USER1=user:pass
"\Program Files\anki\anki.exe" --syncserver
Or MacOS, in Terminal.app:
SYNC_USER1=user:pass /Applications/Anki.app/Contents/MacOS/anki --syncserver
Or Linux:
SYNC_USER1=user:pass anki --syncserver
With Pip
To avoid downloading desktop Anki's GUI dependencies, you can run a standalone Anki sync server using a Python package downloaded from PyPI instead. Make sure you have Python 3.9+ installed.
python3 -m venv ~/syncserver
~/syncserver/bin/pip install anki
SYNC_USER1=user:pass ~/syncserver/bin/python -m anki.syncserver
With Cargo
From Anki 2.1.66+, you can alternatively build a Rust implementation of the standalone sync server using the below command. Make sure you have Rustup installed.
cargo install --git https://github.com/ankitects/anki.git --tag 2.1.66 anki-sync-server
Replace 2.1.66 with whatever the latest Anki version is.
Protobuf (protoc) will need to be installed.
After building, you can run it with:
SYNC_USER1=user:pass anki-sync-server
From a source checkout
If you've cloned the Anki repo from GitHub, you can install from there:
./ninja extract:protoc
cargo install --path rslib/sync
Multiple Users
SYNC_USER1 declares the first user and password, and must be set.
You can optionally declare SYNC_USER2, SYNC_USER3 and so on, if you
wish to set up multiple accounts.
Hashed Passwords
Advanced users may wish to use hashed passwords instead of plain text passwords. If you wish to do this, you'll need to use a separate tool (such as this one) to generate a password hash. You can then tell the server to expect hashed passwords by setting the env var PASSWORDS_HASHED to 1 (or any other value).
When hashed passwords are used, SYNC_USER variables are expected to be in username:password_hash format, where password_hash is a hash of the password in the PHC Format.
Storage Location
The server needs to store a copy of your collection and media in a folder.
By default it is ~/.syncserver; you can change this by defining
a SYNC_BASE environmental variable. This must not be the same
location as your normal Anki data folder, as the server and client
must store separate copies.
Public Access
The server listens on an unencrypted HTTP connection, so it's not a good idea to expose it directly to the internet. You'll want to either restrict usage to your local network, or place some form of encryption in front of the server, such as a VPN (Tailscale is apparently easy), or a HTTPS reverse proxy.
You can define SYNC_HOST and SYNC_PORT to change the host and port
that the server binds to.
Client Setup
You'll need to determine your computer's network IP address, and then
point each of your Anki clients to the address, e.g something like
http://192.168.1.200:8080/. The URL can be configured in the preferences.
If you're using AnkiMobile and are unable to connect to a server on your local network, please go into the iOS settings, locate Anki near the bottom, and toggle "Allow Anki to access local network" off and then on again.
Older desktop clients required you to define SYNC_ENDPOINT and
SYNC_ENDPOINT_MEDIA. If using an older client, you'd put it as e.g.
http://192.168.1.200:8080/sync/ and http://192.168.1.200:8080/msync/
respectively. AnkiDroid clients before 2.16 require separate configuration for
the two endpoints.
Reverse Proxies
If using a reverse proxy to provide HTTPS access (e.g. nginx), and binding to a subpath
(e.g. http://example.com/custom/ -> http://localhost:8080/), you must make sure to
including a trailing slash when configuring Anki. If you put http://example.com/custom
instead, it will not work.
On iOS, TLS 1.3 is not supported, so your reverse proxy will need to have TLS 1.2 enabled, or you'll get an "error code -9836".
Large Requests
The standard AnkiWeb limit on uploads is applied by default. You can optionally
set MAX_SYNC_PAYLOAD_MEGS to something greater than 100 if you wish to
increase the limit. Bear in mind that if you're using a reverse proxy, you may
need to adjust the limit there as well.
Contributing Changes
Because this server is bundled with Anki, simplicity is a design goal - it is targeted at individual/family use, and PRs that add things like a REST API or external databases are unlikely to be accepted at this time. If in doubt, please reach out before starting work on a PR.
If you're looking for an existing API solution, the AnkiConnect add-on may meet your needs.
Miscellanea
Menu Shortcuts
On Windows/Linux you can hold down the Alt key and press a highlighted letter to activate a particular menu.
Although macOS doesn’t support this feature, it does allow you instead to assign shortcuts to specific menu items. Please see https://support.apple.com/en-au/guide/mac-help/mchlp2271/mac for more information.
Debug Console
Sometimes you may be asked to use the debug console to change a setting or check something. Unless asked to enter text in the "debug console", you will probably not need this. Advanced users may like to read more about it in the add-on writing guide.
When asked to enter text into the "debug console", please start Anki, and in the main window, press
Ctrl+Shift+;
(the control key, shift key, and semi-colon key at the same time)
On a Mac, press
Command+Shift+;
(the command key, shift key, and semi-colon key at the same time)
On some non-English keyboards, you may need to press : or + instead of ;.
In the window that has popped up, please paste the text you were asked to paste in the top section. When you’ve done so, please press Ctrl+Return (Command+Return on a Mac), and some text should appear in the bottom section. If you’ve been asked to paste the resulting output, please copy it from the bottom area, and paste it back to the support person.
If you press Ctrl+Shift+Return instead of just Ctrl+Return, Anki will try to print the result rather than doing what you asked it to. If you are getting unexpected errors, please make sure you’re not holding down the Shift key.
- note 筆記
- card 卡片
- collection 集合
- again 重來
- hard 困難
- good 良好
- easy 簡單
- field 欄位
- note type 筆記類型:由欄位及卡片類型組成
- card type 卡片類型:由正面和背面兩個模板組成
- template 模板
- bury 推遲(舊譯暫停):暫停卡片一天
- suspend 擱置:無限期暫停卡片
- (learning) step (學習)階段
- leech 低效卡(舊譯榨時卡)
- gather 收集:從牌組中抽取新卡片至學習佇列
- retention/retrievability 留存機率
- stability 穩固期
Contributing
Sharing Decks Publicly
To share decks with the general public, synchronize them with AnkiWeb, then log into AnkiWeb and click on "Share" from the menu next to the deck you wish to share.
If you shared a deck previously (including with previous versions of Anki), you can update it by clicking "Share" as above. Updating a shared deck will not reset the download counts or ratings. You can delete a shared deck that you have uploaded using the Delete button on the shared deck's page.
When updating a deck, AnkiWeb expects the deck to be at the same location as before. If you shared a deck when it was called "Korean Verbs" for example, and then renamed it to "Korean::Korean Verbs", resharing will not be able to update the existing copy. If you have forgotten the original name, you can guess it by downloading the deck on AnkiWeb and importing it (File > Import) in a new profile (File > Switch profile > Add). Then you can copy the exact name of the deck when it was first shared. If this doesn't work, please contact support.
When you update a shared deck, users who downloaded the deck previously will not automatically receive updates. If they download the deck again and re-import it, newly added material will be imported without altering their existing study progress, provided neither you nor the user has altered the note type since the first import.
Sharing Decks Privately
If you’d like to share decks with a limited group of people (such as a study group or class) rather than the general public, you can do so by sharing them outside of AnkiWeb.
To share a deck privately, go to the File menu and choose Export. Select a single deck (not "All Decks"), and turn off "include scheduling information". This will produce an .apkg file which you can share with others.
You can share the .apkg file by emailing it to people, placing it on a website or shared folder, or using a free file sharing service like Dropbox or Google Drive and sending people a link.
Both the computer version and mobile clients make it easy to import from an apkg file simply by clicking or tapping on it. AnkiWeb does not have the ability to import apkg files however, so the recipients of your deck will need to have the computer version or Anki on their mobile device.
When a user imports an .apkg file, cards that already exist in their collection will be ignored and any new cards will be added. As long as they use the same note type, modified cards will also be updated. To prevent data loss, cards that have been deleted in the new apkg file will not be deleted in the user’s collection, so if you need to delete cards from users' decks for whatever reason, you will need to contact them about it.
Sharing Add-ons
Please see https://addon-docs.ankiweb.net/sharing.html
Translating Anki
Please see https://translating.ankiweb.net
Contributing Code
Anki's source code is available at https://github.com/ankitects/anki
Before contributing, please see contributing.md.
常見問題 Frequently Asked Questions
Resources
The SuperMemo site has a lot of good information about spaced repetition and memory: https://supermemo.guru/wiki/SuperMemo_Guru
Michael Nielsen has written a thorough piece about long term memory and how he uses Anki. He also provides a condensed version as a series of tweets.
Some medical students have banded together to make a paid-for guide focusing on the use of Anki in medical school: https://www.theanking.com/anki-mastery-course
Soren Bjornstad has written a series of extensive articles about memory, SRS and how to use Anki effectively.